Showing posts with label low carb. Show all posts

Saturday, August 30, 2014

Celebrating Local NC Food: Baby Back Ribs with the NC Pork Council


This month's signature cut with the NC Pork Council is RIBS! OTHER than my husband (who isn't a fan of any meat on the bone....I know... I have no idea...???)... WHO doesn't love ribs?

I love them! And honestly, I don't make them as often as I should. Especially in the summer, as ribs just seem like the ideal hot summer meal.

I've chosen my slow cooker as my cooking element of choice for these recipes with the pork council! I love using a slow cooker, it's so easy and since we don't grill out much, it's a great option. Also, proteins are not my cooking specialty and it seems like whenever I go the easy route and make them in the slow cooker, they're always perfect!

When I think of ribs, I generally think of savory, crispy pork slathered in a tangy barbecue sauce. I didn't have any barbecue sauce on-hand and I wanted to go in a different direction. I wanted to do something with an Asian flavor, so I started looking up recipes in my cookbooks at home.


I ran across a recipe in "The Food Lover's Make it Paleo" cookbook by Bill Staley and Haley Mason. The recipe sounded good to me because it had Asian flavors, but also didn't use soy sauce, which is really helpful since I'm allergic to soy.

I changed the recipe a bit, just adding several additional spices that we enjoy. You basically make an easy rub for the ribs and then several hours into slow cooking you drizzle a sesame ginger glaze over them.

The ribs caramelize will then caramelize a bit and with the fat that cooks through, they have a wonderful flavor and texture. When they have finished cooking they are fall-off-the-bone delicious. We served the ribs with slow cooked collard greens &amp (made in another slow cooker) and cinnamon sugar sweet potatoes, which I covered in foil and placed beneath the ribs. The sweet potatoes cooked right underneath the ribs, a technique I love using with root vegetables and even ears of corn. (You can find both of those recipes in my Everything Gluten-Free Slow Cooker Cookbook.)

That's another fun thing about using a slow cooker, you can cook several components of a meal in addition to one-dish meals! Super easy peasy and kinda fun as well!


Slow Cooked Chinese Spiced Ribs
adapted from a recipe in "The Food Lover's Make it Paleo" by Bill Staley and Haley Mason
free of gluten, dairy, soy, eggs, and nuts
printer-friendly recipe

Rub Ingredients: 
  • 3-5 pounds baby back ribs
  • 1 tablespoon Chinese five-spice powder
  • 1 teaspoon curry powder
  • 1 teaspoon ground ginger
  • 1/2 teaspoon ground cardamom
  • 1/4 teaspoon Saigon cinnamon
  • 3 tablespoons brown sugar or crystallized maple sugar or coconut palm sugar
Glaze Ingredients: 
  • 3-4 tablespoons sesame oil
  • 1/3 cup coconut aminos (a savory substitute for soy sauce, if you're cool with soy, use GF soy sauce!)
  • 1 teaspoon fish sauce
  • 2 cloves garlic minced
  • 1 tablespoon ginger root, minced
  • 2 tablespoons apple cider vinegar
  • 1 tablespoon molasses or brown sugar
Directions:
  1. In a large bowl of a bag mix together Chinese five-spice powder, curry powder, ground ginger, ground cardamom, Saigon cinnamon, and brown sugar. 
  2. Pat the rub generously over the baby back ribs, that have been cut into portions. Place the ribs into a greased 4-6 quart slow cooker and cook on LOW heat for 4-5 hours. (Alternately, you can cook on HIGH for 2 hours)
  3. Around the 4-5 hour mark mix the glaze ingredients together in a small bowl or glass measuring cup. Pour evenly over the ribs and continue to cook ribs another 2-3 hours on low heat. (Alternately, IF you are cooking on HIGH heat, around the 2-3 hour mark, mix the glaze together, pour over ribs and cook an additional 2 hours on HIGH heat.)
  4. When ready to serve, cut slow cooker off and allow ribs to cool for 30 minutes before serving. We served with slow cooked collard greens and cinnamon-sugar sweet potatoes. 


Previous Posts written in conjunction with the NC Pork Council: 


GLG Disclosure: 
This post is part of a new monthly series featuring local NC pork products sponsored by the North Carolina Pork Council. The NC Pork Council provided me with a gift certificate to purchase pork products and create a recipe to share. The opinions and photography in this post are completely my own.

Pin It!

Tuesday, May 20, 2014

Celebrating Local NC Food: Pork Tenderloin with the NC Pork Council


My grandmother, whom we affectionately called "Nan", LOVED pork tenderloin. She wasn't necessarily the world's greatest cook, although she made a killer dish called skillet dinner, the most rockin' pound cake you've ever eaten, and a sirloin tip roast that would melt in your mouth...

Her biscuits though? Hard as a rock... coffee? Don't even ask!

But pork tenderloin? She could knock it out of the park. I still haven't figured out EXACTLY how she made it, because it still never tastes quite the same when I make it... but it's still one of my favorite dishes!


When the NC Pork Council emailed me several months ago I was surprised and intrigued. I LOVE supporting local North Carolina products and I was more than happy to be on board with the NC Pork Council as one of their NC bloggers and recipe developers!

Pork is a North Carolina tradition. It's especially prominent here in Eastern NC. You'll find pork barbecue restaurants in nearly every town, each with it's own special sauce or way of cooking the pig just right. Another reason I like pork is that many cuts are great in the slow cooker. They can cook for long periods at a low & slow heat and turn out great. It's perfect for someone like me as a commuter who works 40 hours a week.

However, this month's product is pork tenderloin. A lean and very tender cut that you probably don't want to put in the slow cooker. As tenderloin cooks fairly quickly and you really don't want to overcook it. It will dry out very fast. Tenderloin is also great marinated and has a very mild flavor.

I will be highlighting one pork product per month and creating a gluten-free recipe to go along with it. The recipe this month is for simple pan-seared pork tenderloin with homemade brown gravy... almost the way my grandmother made it! I wish I knew EXACTLY how she made it! lol But this is pretty darn close and very tasty.


Pan-Seared Pork Tenderloin with Homemade Brown Gravy
free of gluten, dairy, and soy
created by Carrie of Gingerlemongirl.com

Tenderloin Ingredients:
  • 1-2 pounds fresh pork tenderloin, sliced into 1" medallions
  • 2 tablespoons olive oil or bacon grease
  • 1/2 teaspoon freshly ground black pepper
  • 1/2 teaspoon sea salt
Gravy Ingredients:
  • 2-3 tablespoons pork tenderloin pan drippings
  • 4 tablespoons brown rice flour
  • 1/2 teaspoon freshly ground pepper
  • 1/2 teaspoon sea salt
  • 1 1/2 cups warm water
  • 1 tablespoon Worcestershire sauce or soy sauce (if you can tolerate soy)
  • OPTIONAL: 1 tablespoon butter or olive oil to finish gravy
Directions: 
  1. Heat a large cast-iron or heavy-bottomed skillet to medium high heat. Add olive oil or bacon grease and cook until sizzling. Add 4-5 pork medallions to the pan at a time. Add salt & pepper to each medallion and cook for 2-3 minutes on each side, until the pork is richly brown and caramelized and the juices in a medallion run clear. Set cooked tenderloin on an oven-safe plate in a warm oven. Repeat until all medallions are cooked. 
  2. In the same pan whisk in brown rice flour and cook for several minutes on low heat to cook out the "flour" taste. Slowly whisk in warm water and turn heat up to medium-high. Continue to whisk until gravy thickens and will coat the back of a spoon. When the gravy is thickened as much as you'd like it, stir in Worcestershire sauce and taste to see if it needs additional salt or pepper. TO finish the gravy you can also stir in 1 tablespoon of butter or additional olive oil to give the gravy a velvety consistency. 
  3. Serve pork tenderloin medallions and gravy while hot with gluten-free toast scrambled eggs, and slices of fresh tomatoes. 


GLG Disclosure: 
This post is part of a new monthly series featuring local NC pork products sponsored by the North Carolina Pork Council. The NC Pork Council provided me with a gift certificate to purchase pork products and create a recipe to share. The opinions and photography in this post are completely my own.


Pin It!

Saturday, May 3, 2014

Recipe Review: Gluten-Free Goodness' Divine Chocolate Chip Cookies


Cheryl is a dear friend. a wise counsel, and a darn good cook! She shared these cookies last week on her blog and I had to try them! I love using lower glycemic, gluten-free (or even grain-free) flours for making baked goods for myself. My husband prefers "regular" gluten-free baked goods, but I need to keep an eye on my carbohydrate intake, so I enjoy making treats like this that I can enjoy and not feel guilty about eating! 

These cookies were SO easy to make and they are just so tasty. 

Cheryl's recipe is unique for several reasons:
  • Instead of using butter, palm shortening, or even coconut oil or butter... Cheryl gets creative and uses homemade macadamia nut butter for the fat. It works just beautifully and adds a rich and creamy and even BUTTERY (with no dairy!) texture to the cookies! Check out how to make the macadamia nut butter on Cheryl's blog post!
  • Instead of chocolate chips (which I did use, just because we had them), she suggests using a 70% or higher content chocolate bar chopped up for the chocolate bits in the cookies. I have to admit, I prefer cookies made with a chopped up high quality chocolate bar, than using chocolate chips, they just seem to have a more gourmet flair and seem to taste better! 
  • NO refined sugars! Cheryl uses maple syrup to sweeten the cookies and I have to say, I was skeptical at how well that would work. And I can tell you, it works perfectly! I loved the sweetless level and amazingly it doesn't really impart a "maple" flavor to the cookies. 
  • Cheryl also suggests using ground vanilla beans, or vanilla bean paste to create the cookies and I WISH I had some on hand, because both give SUCH an amazing flavor to cookies, much more deep and vanilla-y, than just extract! If you have ground vanilla beans or the paste on hand, definitely use them!


So please hop over to Cheryl's blog and check our her recipe! Tell her I sent ya and let me know what you think about these cookies! Cheryl additionally has a great collection of recipes, along with wonderful posts about self-care and learning how to become who you really are. I value her friendship and her guidance more than she'll ever know!

(And if you have time to make her red lentil dal, cinnamon apple millet, celery in chestnut sauce, OR her sweet potato pie... oh you MUST! They are wonderful and just a few of my favorite recipes from her lovely site!) 


Pin It!

Monday, October 7, 2013

Gluten-Free, Grain-Free Blueberry Coffee Cake


Over the weekend we attended one of our yearly family reunions. Even in this day and age of constantly new technology, our families still get together for several different reunions every year. And as with any family holiday or event... you really go for the food. Yes?

I've been "paleo-ish" for about 7-8 weeks now, so I really wanted to make a few dishes that I could definitely eat and that would hopefully appeal to others as well. While we really need some fresh groceries, I did have a fairly well stocked pantry so I made a "paleo" blueberry coffee cake - the FIRST baked good I've made in the past few months and I also was able to find enough ingredients in the fridge to create an "anti-pasta" platter!

I have to admit I really enjoyed creating both dishes. There's just something lovely about creating foods from scratch and I really enjoyed baking the coffee cake, something I haven't done in ages.


The anti-pasta platter was fun to put together as well. It was incredibly easy and turned out very pretty by the time I was finished. My friend Pamela over at "Aseafish Out of Water" often creates dishes like this, so I was thinking of her when I put together that platter of meats, cheese, and olives.

The coffee cake is adapted from one I found on "Paleo on Main." I changed a few ingredients and added blueberries, simply because I had a bunch in the freezer. I LOVED how this coffee cake turned out. I don't know if it's because I haven't had baked goods in so long, or because I've reduced my sugar intake so much, but it tasted incredibly sweet, even though it was only sweetened with a small amount of honey and the natural sugars from the blueberries. Definitely a win!

Gluten-Free, Grain-Free Blueberry Coffee Cake
adapted by Carrie Forbes from a recipe shared by: Paleo on Main
free of gluten, grains, dairy, white sugar, and soy
printer-friendly recipe

Cake Batter Ingredients:
2 cups blanched almond flour
1/2 cup arrowroot starch
1/2 teaspoon baking soda
1/2 teaspoon sea salt
1/2 teaspoon ground cinnamon
1/2 cup full-fat coconut milk
2 large eggs
1/4 cup honey or maple syrup
1 tablespoons pure vanilla extract
1 cup frozen or fresh blueberries

Streusel Topping Ingredients:
2-3 tablespoons coconut palm sugar
1/2 teaspoon cinnamon
1/2 cup crushed pecans or walnuts
3 tablespoons butter or coconut oil, optional for dotting on top

Directions:
Preheat oven to 325 degrees. Grease an 8x8 baking dish with coconut oil or butter and set aside. In a large bowl whisk together almond flour, arrowroot starch, baking soda, sea salt, and ground cinnamon. Make a well in the center of the dry ingredients and add in the coconut milk, eggs, honey, and vanilla extract. Stir to combine into a thick batter. Fold in the blueberries. Pour into the greased baking dishes. Spread evenly throughout the pan. In a small bowl whisk together the coconut palm sugar, cinnamon, and pecans. Sprinkle over the casserole and dot the top of the casserole with butter or coconut oil if desired. Bake for 35-45 minutes until a toothpick or knife inserted in the middle of the cake comes out clean the crust is golden brown. Allow to cook  REST/COOL for 15-20 minutes before slicing and serving.


Pin It!

Saturday, October 5, 2013

I finally GET it!


I've flirted with the idea of going fully "paleo" for several years. I actually tried it for a while back in 2011 and continued off and on for the past 2 years... until about 6-8 months ago when I was ANYTHING but paleo. Bring on the gluten-free oreos!

Now I've mentioned before how much I don't really like labels. I'm not saying I want to be "paleo" to have a certain online reputation or to pretend I am the be-all, end-all of all things food knowledge. I'm not. Far from it.

See the thing is, I was feeling terrible. Tired ALL the time. Sugar swings EVERY. SINGLE. afternoon. Cheetos and diet Dr. Pepper were a daily part of my food intake... and I was even nearly falling asleep on the way home from work in the evenings.  And that was not cool. Not cool at all. It was embarrassing and I just felt terrible. Again, ALL the time. And I finally had had enough. I was honestly scared that I might get into an accident on the way home just from the constant sugar swings.

It took me years to get to that point. Do you still want to go to McDonald's? No judgement here! I went for years and years, even just for the gluten-free eggs & sausage. But apparently after years & years of abusing my body through food... it had had enough.

My Dad needed heart transplant surgery. My grandmother was a long-time diabetic. I really didn't want to make either of those health issues part of my future and I was just exhausted from feeling bad ALL the time.

So with the help of my husband's cousin Sabrina, I decided to try paleo again. Sabrina talked about the great success she had had over the past few months and her soaring energy levels and I wanted that. I want to feel good. On a daily basis, without tons of caffeine or sugar swings in the afternoon.

I was finally ready to say goodbye to my beloved "Cheetos."  My body felt bad enough that I didn't want them anymore. You don't have to be there yet. It took me a LONG time. And that's kind of the beauty of this whole journey. I know how hard it is to let go of those foods. No judgement here.

Today marks being 1 month completely paleo. It's actually closer to 6 weeks, but a month since I've been tracking my weight and my stats just to see how paleo has helped me. And it has tremendously. My energy levels are incredible. I finally feel GOOD most of the time, most days. I've lost quite a few inches in my waist, arms, and thighs. My clothes fit much better. But I'm still learning things. I'm still learning what foods work best for my body and what foods don't.

Right now, as much as I love baking, I'm not baking much at all. I want to hold off on the "paleo" baked goods until I'm at a healthy weight and mindset. Baked goods are an 'overeating" trigger food for me. And right now, I feel better about my health than I have in years. I feel like I'm finally ready to make healthy eating a life choice, not just a "few months" choice, or a "transitional" choice... but lifelong.

I'm no longer angry that I can't eat whatever foods I want too. I came to the point where I'm more interested in my health than in what I cannot have. It took years, I MEAN YEARS, for me to get to that point in my life. But I'm here. And I'm ready. I'm ready for a healthy and happy future that works for my body.


Pin It!

Thursday, June 6, 2013

Easy Gluten-Free Almond Flour Cookies


I really need to keep my "good" camera around my neck at all times.. because when I don't you are forced to suffer through my terrible phone camera pictures...

But you know what's funny? I really like the imperfection of the phone camera pictures. I love the grainy quality. It's like adding some cool instagram filter, minus instagram.

At any rate, here are some cookies for you. And this imperfect, grainy picture... it's comfortably fitting for these tasty treats. They aren't amazing bakery cookies. They are easy, simple 4-ingredient cookies for a sweet tooth fix. They are low glycemic, so they won't spike your blood sugar and then send you sinking down, down, down on a Tuesday afternoon.

They are easy, kid-friendly, snack-size little gems of almond flour and coconut palm sugar... and will make you smile.

Who needs perfection? Have a cookie instead!

Easy Gluten-Free Almond Flour Cookies
free of gluten, dairy, soy, grains, and easily egg-free
printer-friendly recipe

Ingredients
2 cups blanched almond flour
1/2 cup - 3/4 cup coconut palm sugar (or: honey, sugar, maple syrup, date sugar...)
1 egg (or egg replacer, 1/4 cup applesauce would work just fine)
1 teaspoon pure vanilla extract

Directions
Preheat oven to 350 degrees. Line a baking sheet with parchment paper or a silpat mat. In a large bowl whisk together the almond flour and coconut palm sugar. Make a well in the center of the dry ingredients and add the egg (or egg replacer) and the pure vanilla extract. Stir the wet ingredients into the dry ingredients until you have a very stiff and sturdy dough. It should be stiff enough to stir into a ball. If it's too crumbly (and it could be, depending on the humidity levels where you live), add water a teaspoon at a time, until the dough will stir into a stiff ball. Scoop the dough out with a cookie scoop and place 1" apart onto the cookie sheet. I usually get about 12 medium-size cookies. Shape them with your fingers into circular cookies and flatten them slightly with your palm. Bake for 12-15 minutes until cookies are a bit puffy and are golden brown around the edges. Allow cookies to cool for 10-15 minutes before eating... if you can wait that long!


Pin It!

Tuesday, May 29, 2012

Make it Gluten-Free Tuesdays: Barbecued Spareribs

Photo from North Carolina Miscellany

Since we just celebrated Memorial Day, I thought it would be appropriate to share this recipe for Barbecued Spareribs from the 1964 Hyde County (NC) Cookbook.

This recipe isn't one from my great-grandmother's collection (as most will be in this series.) After thumbing through her recipe box and cookbooks, I couldn't find a grilling/barbecue recipe! I happened to find this pork barbecue on North Carolina Miscellany just in time for grilling season! North Carolina Miscellany is a really cool blog created & written by the NC history collection of UNC libraries. I'm rather addicted to all-things-north-carolina-history, so this one of my favorite blogs to visit.


This cookbook was originally published in 1964 by the Hyde County Home Demonstration Club. A home demonstration club was generally a women's group, formed primarily of farm wives or those who lived in a rural setting. It was a way to share education in the art of homemaking such as cooking, gardening practices, raising chickens, canning, food preservation methods, etc... These groups often shared and collected recipes and sometimes the resulting collections ended up a collaborative cookbook like this one.

This particular cookbook was so well received in the Coastal region of NC, that 3 more editions were printed in 1968, 1970, and 1973.

A great thing about this vintage recipe is that it is almost completely gluten-free, as is! You only have to change one ingredient to make this a safe option! The tomato soup. As you know, nearly all store-bought canned tomato soups are thickened with wheat flour.


For this recipe:  in place of the can of tomato soup (and we're assuming this is a small (10 3/4 oz.) can since the recipe serves around 4) you can use 1 cup + 2 tablespoons gluten-free ketchup or quite simply 1 cup plain, canned tomato sauce + 2 additional tablespoons brown sugar. Also if you wanted the vinegar & tomato sauce thickened a bit, you could add 1 tablespoon corn starch + 2 tablespoons water mixed together. Whisk together the cornstarch slurry with the tomato sauce and vinegar and cook in a small saucepan over medium heat until slightly thickened. Then pour sauce over the ribs and roast as directed.


One more tomato soup option: If you are a super motivated cook you could even simply create your own homemade gluten-free tomato soup!

In most older recipe books like this, if a recipe indicates "vinegar" it generally is referring to white, distilled vinegar which is gluten-free.


Barbecued Spareribs
Created by Mrs. Miles Finch
Published in the Hyde County Cookbook, c. 1964
Adapted to be gluten-free by Carrie Forbes
Printer-friendly recipe.

Dry Rub: 
1 tablespoon chili powder
1 tablespoon salt (I personally would only use about 1 teaspoon of salt, 1 tablespoon is a LOT of salt!)
1 tablespoons celery seed
1/4 cup brown sugar
1 teaspoon paprika

Tomato Sauce:
2 pounds pork spareribs, cut into serving pieces
1/2 cup white, distilled vinegar
1 cup + 2 tablespoons gluten-free ketchup (or tomato sauce option listed above)

Directions: 
  1. Mix together dry rub ingredients and rub over the spare ribs. 
  2. Place ribs in a large roasting pan and broil for 8 minutes on each side. 
  3. Arrange the ribs in the roasting pan to create a rack. 
  4. Mix vinegar & ketchup together and pour over ribs. 
  5. Roast at 350 degrees for 1 1/2 hours, basting with the tomato sauce every 30 minutes. Makes 4 very large servings. 
  6. Carrie's Slow Cooker Option: Make a foil rack to place in the bottom of your slow cooker by rolling up 3-4 pieces of foil and placing in a rack pattern in your slow cooker, as seen in the picture below. After initially broiling the ribs in the oven, place in a large 6-quart, greased slow cooker. Pour tomato sauce over ribs and cook on low for 6-8 hours or on high for 3-4 hours until ribs are extremely tender. If desired, baste ribs with tomato sauce mid-way through slow cooking. TO release excess moisture from the slow cooker during the cooking time, place a chop stick right under the lid to create a vent. 
Make an easy foil rack using tightly rolled foil "sticks" in a criss-cross pattern.
You can roast chickens, ribs, beef roasts, etc.. 

***********************


Now it's your turn!
Do you have a favorite family recipe that you re-created to be gluten free? It can be a new post, an old post, a post you've edited! Simply fill out the form below and a link to your recipe will be included! If you have time, please add a link back on your post to today's Make it Gluten-Free Tuesday at Gingerlemongirl.com.


Pin It!

Thursday, March 29, 2012

{Paleo 101 Books} Sarah Fragoso's Everyday Paleo


This book is where my paleo journey began. When I first pondered the idea of following a paleo diet, Sarah's book "Everyday Paleo" is where I started. I actually contacted the publisher myself because I was so interested in having a copy of the book. They graciously sent me one and I have been in love with this book ever since. I actually talked about the book a little back in October 2011 and the food you see at the top of that post is a skillet meal from Sarah's book. 

Sarah helped me to learn how carbohydrates didn't have to be the base or main part of a meal. Up until I started "re-learning" how to cook with Everyday Paleo, I was stuck on using pasta, mashed potatoes, bread, etc... as the base of my meals and I didn't know how to change that. Sarah's easy one pot recipes showed me you could use zucchini, acorn squash, or tomatoes as the base of your meal. Proteins are very important on a paleo-type of diet, but Sarah showed me how to make delicious and creative meals with vegetables and proteins. Paleo isn't about just eating meat.

Some of my favorite recipes from Sarah's book are:

  • Spice Rubbed Slow Cooked Chicken (I'm rather fond of anything slow cooker!) 
  • "Breaded" Baked Chicken
  • Better Butter Chicken
  • Everyday Meatloaf (this was hubs favorite - and he liked it even better on the 2nd day!)
  • Puerto Rican Beef
  • Sirloin Dijon (MY FAVORITE! use kale as pasta? Who knew you could do that! I love this dish!)
  • Garlic Beef Stew with Acorn Squash (serious comfort food! I loved this!) 
  • Kids Love Cabbage Slaw (really awesome sweet and sour slaw! Love mango!)
While I haven't cooked my way through the entire book, this is a cookbook that is often on my kitchen counter when I'm trying to find something quick for dinner. Many of the dishes are skillet meals and are easy to prepare. One of the things I like about this book in comparison to other paleo cookbooks is that you can make most of the meals with very simple kitchen equipment such as a good knife and a heavy cast iron skillet. No ice-cream makers. No high-end blenders needed. Keep it simple. Keep it fresh. 

Other reviews and thoughts on Sarah Fragoso's first book, "Everyday Paleo": 

Pin It!

Tuesday, December 13, 2011

Gluten Free Christmas Morning Bacon Quiche


I shared this recipe last year when I was participating in a gluten free blogging event... but it was sadly neglected and didn't get much attention.

And this quiche? It needs attention. It's a really delicious dairy-free quiche with a mouth-watering tangy sauce drizzled over the top!

So I suggest making it.. now. Before Christmas. Enjoy this and make sure you add a BIG drizzle of the wonderful not-one-bit-sinful, savory sauce!

To make a paleo version of this quiche leave off the shredded potato crust (or use shredded sweet potatoes instead). For the tangy white sauce you can use arrowroot starch or you could even try using 2-3 teaspoons of coconut flour instead of the sweet rice flour.

Christmas Morning Bacon Quiche
free of gluten, dairy/casein, and soy
created by Carrie Forbes @ Gingerlemongirl.com
printer-friendly recipe

Tangy white sauce for quiche:
1  1/2 cups hemp milk (or coconut milk or almond milk -- use what you like best! Coconut would be lovely here!)
2 tablespoons sweet rice flour
1 tablespoon olive oil
½ teaspoon salt
½ teaspoon pepper
1 teaspoon Herbs De Provence (a blend of herbs including rosemary, marjarom, thyme, and savory, often used in dishes from southern France.) 
1 tablespoon lemon juice

Quiche Ingredients:
5 eggs
1 lb. bacon, cooked and crumbled
5 green olives, finely chopped
½ cup chopped red peppers, or canned pimientos (drained)
½ cup green onions, sliced

Crust:
10 oz. frozen shredded gluten free hash browns, defrosted and drained of all water
1 egg
½ teaspoon salt
½ teaspoon pepper

Directions:
Preheat oven to 350 degrees.  In a large bowl mix together defrosted and drained shredded hash browns. Mix in egg, salt, and pepper. Press mixture into a crust in a greased 9” deep pie pan or an oven-safe casserole dish.  Place in heated oven for 10 minutes, remove and set aside.  In a small sauce pan whisk together hemp milk, sweet rice flour, olive oil, Herbs De Provence, salt, and pepper. Cook on medium heat whisking constantly until the sauce thickens. Once the sauce has thickened whisk in lemon juice and set aside to cool. Reserve ½ cup of white sauce for serving. Layer cooked crumbled bacon, chopped green olives, and red peppers  in the hashbrown crust. Beat eggs in a bowl. Slowly whisk in 1 cup of white sauce. Pour eggs/white sauce mixture over the vegetables and bacon in the hashbrown crust. Bake at 350 degrees for 1 hour or until quiche is set in the middle. A toothpick inserted in the middle should come out clean. Serve quiche in slices drizzled with warm white sauce.
Pin It!

Wednesday, October 19, 2011

so about this whole "paleo" thing...

I've known for a long time that my body just doesn't like sugar. Or simple starches. Or grains. Or soy. Or dairy....  Which to be honest...sometimes sucks. Especially when you like to bake. 

But a few months ago I realized how much I hated feeling like crap. And I spent a lot of days feeling like crap. Even with going to the gym, watching my "diet", losing a little bit of weight in the process, and even keeping a food journal... I still often felt like crap. 

So about 2 1/2 months ago I decided it was time to seriously change the way I eat... and bake. I've been working with nutritionist Cheryl Harris since February of this year. She is amazing and very intuitive. She already knew I needed to radically change the way I was eating. Me, though? I was resistant. Very. Very. Resistant. 

Who wants to change the way they eat? I knew I needed help. And I wanted advice... but this girl can be rather stubborn about actually accepting help and making real change. For many people it takes time and usually a rock-bottom experience to get to the place when you absolutely know it's time for change. That place when you are simply compelled to change. 

Cheryl understood that though. She didn't push. She suggested. She listened. She planted seeds of change. And eventually those seeds took root.

You may remember me talking about Overeater's Anonymous a month ago... the events that led up to that was my rock-bottom moment. That was when I KNEW I had to change. And so it began... I slowly started removing carbohydrates and grains from my diet. Gluten, of course, was already out. Dairy was already out (except for butter, which doesn't bother my tummy), soy was already out, I had been avoiding legumes (other than peanut butter) for months, so honestly this transition to meats, vegetables, fruits, nuts & seeds, healthy fats, and eggs almost seemed natural. 

Now... several months or so into this new "food" journey, I realized there was a name to the type of food plan my body likes best. "The Paleo Diet." I really hate labeling things, it seems like anything labeled becomes a fad. A trend. But it was kind of cool to hear a "name" for the way I need to eat. 

I've always had problems digesting grains, beans, and dairy. You know... the staples of the American diet. None of them liked me. Not one little bit. 

So with the help of my friend Heather, I jumped into Paleo. We both wanted to feel better. We both wanted our tummies to start behaving. So we just took the plunge and went shopping. Shopping for real food. For vegetables like kale, purple cabbage, celery, broccoli, carrots, onions, garlic, zucchini, and avocados (oh how I love avocados!). For proteins, meats like fresh ground beef, roasts, chicken, turkey, bacon... Mmmmm... bacon! And eggs, and lots of 'em! Fruits like mangoes, apples, raisins, cranberries, bananas, and pineapple. Healthy fats like almond butter, tahini, olives, olive oil, butter, coconut oil, and coconut milk. For the occasional treat -- baking with almond flour or coconut flour and sweetening with honey, dates, or fruit. We started learning simple ways to prepare food. I started using ingredients like balsamic vinegar, and different types of stone-ground mustard to flavor and season meats, chicken, and salads. 


I started using amazing books like newly published Sarah Fragoso's "Everyday Paleo" from Victory Belt Publishing -- chock full of healthy, easy, ONE dish meals that I could make in minutes to serve for dinner. I felt blessed to receive a review copy of this cookbook from Victory Belt at just the right time. I have truly NEEDED cookbooks like this for so long. Cookbooks that focus on using fresh vegetables, healthy lean meats, eggs, and fruit. SO many cookbooks, especially gluten free cookbooks focus on the starches. On the pasta. The bread. The muffins. The cake. The things that simply don't work for my body.  I'm so glad paleo-type cookbooks like this are finally becoming readily available! (Sarah's book in particular is so easy to use, focuses on EASY family meals, and even includes shopping lists, meal plans, and a workout strategy at the end. I highly recommend reading her blog, or purchasing her book for great recipes and ideas!) Sarah, your basic, real food recipes have helped me more than you could ever know!

I have loved the process of FINALLY finding meals that simply make me feel good. Fresh food, happy tummies, a better attitude, and great outlook on life... this paleo thing has been good to me. 

I know it's not for everybody. Some people really do perform and feel better with more carbohydrates in their system. Yet, I believe everyone can benefit from more fresh, real foods. For me though, it's been realizing that my body TRULY cannot tolerate processed carbohydrates. No more white sugar, no more baking with gluten free grains & starches, no more gluten free pasta. And finally, I can honestly say I rarely miss those things anymore. I've enjoyed the challenge of baking with almond flour and coconut flour. I've enjoyed wholesome, real meals without the starch. And the vegetables? I don't think I'd be able to function very well without them now. Fresh vegetables have become a true daily staple. 

So that's why I'm doing this... to feel better. To be better. To be on the right track for my body. And I finally feel like I'm heading down the right track... how about you? 

And if you're wondering about the husband.... well he's slowly adjusting. He's still in that lovely little resistance phase... so I understand... and I appreciate that he's being a good sport! :-) All good things take time. And I'm thankful he's at least willing to try!

Pin It!

Thursday, October 13, 2011

gluten free coconut flour vanilla cupcakes


See that?

Light, fluffy, airy, moist (but not TOO moist), gluten free cupcakes!! AND... wait for it... 

They are low glycemic, lower carb, and made with coconut flour, coconut oil, real vanilla extract, a pinch of salt, some baking soda, and agave nectar. (I know there's a big debate on whether or not agave's good stuff or bad stuff... you don't have to fight it out here) Soooo...since they are full of fiber, healthy fats, and yummy ol' protein-filled eggs, I'm declaring them kind of good for you! ;-)

But it's not my recipe. It's Elana's. She is a coconut flour and almond flour genius. Seriously. genius.

The cupcakes I made are the yellow cupcakes from Elana's newest cookbook: gluten free cupcakes cookbook! Elana also shares basically the same recipe (minus the strawberries) with this post.

I also slathered them with Elana's vegan chocolate 'buttercream" frosting (also in that lovely little book). Drool.

I suggest making them. soon. It's a really good thing these are being eaten at a work shower today... because really I just want to eat all of them!

The only change I made to Elana's recipe is I used melted coconut oil instead of the grapeseed oil called for. And that was only because it's what I had on hand.

So try them out. Let me know what you think... and let's chat about it here on the blog! And go give Elana some comment love!


Pin It!

Thursday, July 28, 2011

{Recipe Review} The Gluten Free Homemaker's Zucchini & Sausage


When Linda of The Gluten Free Homemaker posted her recipe for "Zucchini & Sausage" on Monday, I knew I had to make it! (So much for my menu plan this week! lol!) This is the kind of recipe I love. Super simple, one dish, and really it could be a meal all in itself!

I actually didn't change a thing to Linda's recipe (really, I didn't! I promise! lol). I even had fresh basil in the yard that I threw in at the last minute. This recipe makes me wonder why in the world we don't eat sausage for dinner more often. My husband and I both love fresh summer zucchini and the sausage (we buy locally made fresh sausage since we live in a major pork producing area) is just an incredibly flavorful addition.

Honestly, this might be my favorite way to eat zucchini now. We actually had three perfectly sized zucchinis from our backyard garden this year (not surprisingly about the only thing that survived the summer heat and crazy weeds -- I think zucchini plants would survive a nuclear blast... lol)

We served the zucchini & sausage with fresh corn and slices of a beautiful home-grown, vine-ripened tomato from a good friend who has a much greener thumb than I do! lol

Linda, thanks for such an easy and delicious recipe for summer! We loved it!
Pin It!

Sunday, May 8, 2011

Gluten Free Light & Lovely Angel Food Cake Recipe


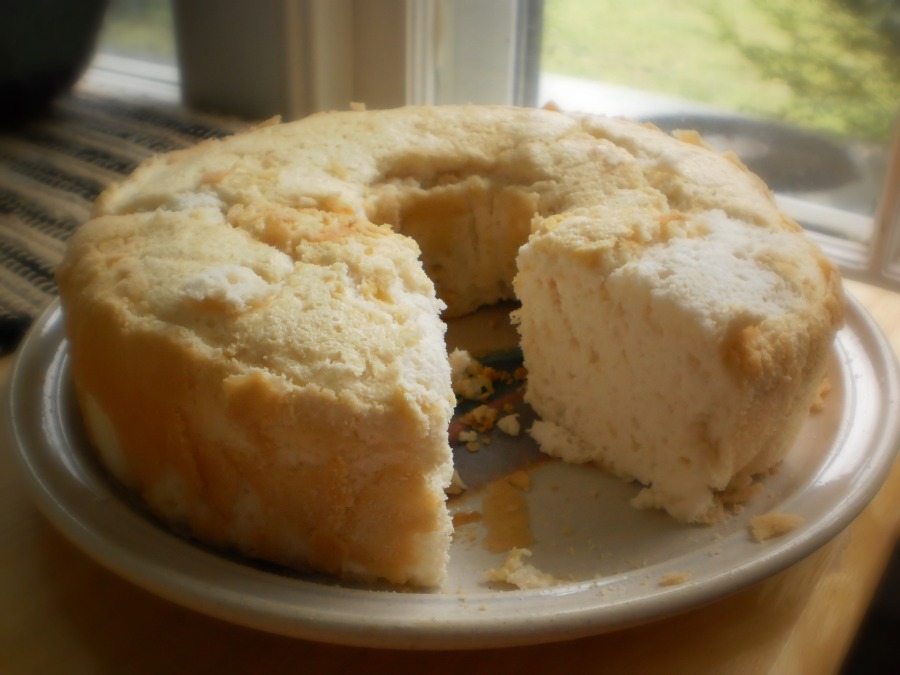
I remember a few times in high school when either mom or dad brought home a store-bought angel food cake and I simply ripped off pieces of it in pure sugary bliss! Soft, airy, and simply delicious. I had honestly forgotten how much I enjoyed angel food cake.

I think I even made it once or twice in my gluten filled years and it's a really beautiful cake to make. Angel Food cake is allowed to be messy. It doesn't have to be perfect. It seems a bit scarred with patches of crust scattered all over the cake and the pan. No frosting is needed. Maybe a sprinkling of powdered sugar for company... but this golden crusted gem of a cake doesn't need to be dressed up. Another fun thing about gluten free angel food cake? No gums are needed. The protein in the whipped egg whites is all you need for stability and great texture.

There are endless variations you could make with angel food cake. If you'd like it to be chocolate add a few tablespoons of cacao powder to the dry ingredients. For a lemon cake, add the zest of 1 large lemon.  If you want the cake to simply be studded with chocolate, fold in 1/3 cup mini chocolate chips right before pouring into the pan. It's so easy. Please make this gluten free cake. Tell me how you made it. Tell me that you loved it!


Gluten Free Light & Lovely Angel Food Cake
Adapted from this recipe by Natalie of Gluten Free Mommy
Free of gluten, dairy/casein, soy, corn, potato, and gums
Printer-friendly recipe

1/2 cup brown rice flour (75 gm, 2 5/8 oz.)
1/2 cup arrowroot starch (57 gm, 2 oz.)
12 egg whites, room temperature
1 1/2 teaspoons cream of tartar
1/4 teaspoon salt
1 tablespoon vanilla
**For a reduced sugar cake use: 
1/2 cup sugar (99 gm, 3 1/2 oz.)
3 teaspoons powdered stevia (NuNaturals is my favorite brand) -- add to dry ingredients!
**For a regular cake use: 
1 cup sugar (198 gm, 7 oz.)

Directions:
Preheat oven to 325 degrees. Grease an angel food tube pan with non-stick cooking spray, or oil and then dust it with brown rice flour. To prevent further sticking at the bottom of the pan, you could line it with cut pieces of parchment paper. In a small bowl whisk together brown rice flour, arrowroot starch, and powdered stevia (if you are using it). In the bowl of your stand mixer, using the whisk attachment, whip egg whites until they are foamy (see notes below). Add in the cream of tartar and continue to mix until soft peaks form. Beat in the sugar a little at a time until stiff peaks form and the egg whites will look slightly glossy. Stop the mixer and remove the whisk attachment. Using a hand whisk slowly fold in the vanilla. Continuing to use the hand whisk, slowly fold in the flour mixture about 1/4 cup at a time. Slowly pour the cake batter into the greased and dusted tube pan. Bake for 50-55 minutes until the cake is golden brown and a toothpick inserted in the middle comes out clean, the sides of the cake will also pull away from the pan. Allow the cake to cool for 10-20 minutes. Run a knife around the edge of the cake and turn out onto a cake plate. Serve plain, with whipped cream or ice-cream, and since it's strawberry season... make sure to place a few slices strawberries on top! :-) Enjoy!

Carrie's Kitchen Notes:

  • Whipping Egg Whites: If you are not familiar with whipping egg whites and what each "stage" looks like, here is a good guide: http://www.baking911.com/howto/egg_whites_beat.htm. Scroll to the bottom to see pictures of the foamy stage, soft peak stage, firm peak stage, etc... 
  • Brown rice flour/arrowroot starch: This cake is so adaptable you can use any whole grain you like. SO if you can't have rice, use sorghum, millet, or whatever pleases your palate! Simply make sure to use the same weight of flour. As with the brown rice flour, you can use whatever starch you prefer, EXCEPT potato starch. Potato starch is quite heavy so I would recommend either corn starch, tapioca starch, or even sweet rice flour. ADDITION: A reader wrote in and said she has never had any issues using potato starch in gluten free angel food cake. In my personal experience I've found potato starch to be a very heavy starch for baking purposes (and I do mean the starch not potato flour). Use your own judgement though, if it works for you that's fantastic!
  • Sugar: I made this lovely cake with less than half the sugar used in the original recipe and it still tastes quite sweet to me, especially with the addition of powdered stevia. Feel free to add additional sugar if you want a really sweet cake, or lessen it further. You do want a little sugar in the cake because it helps with the caramelization/ browning of the crust. I am not sure how well alternative sugars would work in this cake. 
  • Eggs: Sorry, you have to use egg whites... they are the base of this cake!
  • Variations: See notes in the post above for possible variations on this simple vanilla cake! There are so many wonderful flavors you could use! I'd love to know what you come up with! My favorites would be adding lemon zest, using almond extract, mini-chocolate chips, or even a lightly spiced angel food cake with cinnamon and nutmeg! 
  • Folding Techniques: When you're adding in the flours & the vanilla extract (or any flavor variation ingredients) use a whisk to SLOWLY fold in the ingredients. You whipped the eggs whites so they would have a wonderful texture & rise in the cake. You don't want to defeat all that hard work you did! If you quickly hand whisk/ fold in the last ingredients you can easily deflate your egg whites... and end up having a cake that doesn't rise well. So please take your time! Enjoy the process. And go make this cake!! 

Pin It!

Monday, February 7, 2011

Gluten Free Almond Flour Double Chocolate Brownies Recipe


Here's a quick lower glycemic chocolate treat for you. I made these last night and was really impressed at how well they turned out! If you can tolerate almonds & eggs, I highly recommend these tasty little brownies. They are very fudgy & chocolately without a lot of sugar or simple carbohydrates.

Since I'm seriously watching my "sweets" intake, I ate one of these little brownies and wrapped the rest of them up and froze them. Michael loved them and took 2 to work with him. I don't feel bad about him eating these little brownies because they are full of healthy fats & just a little bit of sugar.


Almond Flour Double Chocolate Brownies
free of gluten, dairy/casein, and soy
created by carrie forbes of gingerlemongirl.com
printer-friendly recipe

Dry Ingredients:
2 1/2 cups (252 grams) blanched almond flour
1/4 cup (26 grams) cocoa
1/4 teaspoon salt
1 teaspoon baking soda
1/3 cup sugar -or- palm sugar (I used palm sugar)

Wet Ingredients:
1/4 cup canola oil  -or- your favorite oil
2 eggs
1/2 cup + 2 tablespoons applesauce
1/2 teaspoons liquid vanilla stevia (optional -- but adds a bit more sweetness!)
1 tablespoon vanilla extract

Optional Add In's:
1/2 cup allergen free chocolate chips like Enjoy Life

Directions:
Preheat oven to 350 degrees. Line a 9 x 13" baking dish with parchment paper or spritz with non-stick cooking spray or oil. Whisk all dry ingredients together in a large bowl. In another bowl whisk together all wet ingredients. Stir the wet ingredients into the dry ingredients and finally fold in the chocolate chips. Pour the batter into the prepared 9 x 13" baking dish and spread evenly throughout with a spatula. Bake for 30-35 minutes until a toothpick inserted in the middle comes out (mostly) clean - you may run into chocolate chips, so there may be a little on the toothpick, or until the brownies, spring back just a little when you gently touch them. Allow to cool in the pan for 30 minutes, then cut into 24 brownies with a sharp knife. Eat one or two slowly and enjoy them! They are filling since they are made with almond flour! Wrap the rest & freeze! Pull one out when you need a chocolate fix!

Carrie's Notes:
  • I added the weight measurements for the flours in this recipe for those that weigh their ingredients. If you don't use weight measurements, please note I pack almond flour in a cup much like you would brown sugar. 
  • I used palm sugar in this recipe to lower the overall white sugar content and glycemic index. Feel free to use the sugar or sugar substitute of your choice.
  • Egg-Free - I'm fairly confident this recipe would work using a flax seed or chia seed egg substitute if you are intolerant of eggs. Here's a handy Vegan Egg-Free Baking Substitutes Chart. 
  • I used canola oil, because it's what I keep on hand... but use the oil you like best! 
Pin It!

Wednesday, December 15, 2010

A Gluten Free Holiday - Breakfast with Elana's Pantry


It's the last day of my week of "A Gluten Free Holiday - Breakfast & Brunch Recipes." I'm excited to share one last holiday breakfast/brunch recipe with you! Today it's from Elana Amsterdam, the author of one of my favorite gluten free blogs, "Elana's Pantry" and one of the most well-loved cookbooks in my kitchen, "The Gluten Free Almond Flour Cookbook."

I bought Elana's cookbook before it was even published. I couldn't wait to open this book and make easy, delicious, and low glycemic recipes with almond flour! Elana introduced me to almond flour and I've been using it for several years now. Most of the recipes I make for myself are made with almond flour. It's easier for me to digest than grains, and it's just such an easy way to bake.

I've cooked my way through Elana's cookbook during the past year. I've made her chocolate chip cookies countless times. Her chocolate cake makes frequent appearances for birthdays and anniversaries. Her vegetable quiche with an almond flour pie crust is a favorite quick dinner. My husband LOVES Elana's simple recipe for chicken fingers, it's one of his most requested main dishes! Her vanilla cupcakes are some of my favorite "sweet" treats! And her bread. Elana's bread is what I use most often if I don't have Udi's at home or don't feel like making a yeast bread. I've had many a sandwich on Elana's gluten free bread. Sandwiches are easy comfort food to me and I'm so thankful for her recipes.

Elana has graciously allowed me to share one of her recipes from "The Gluten Free Almond Flour Cookbook" today! It's a recipe for her Chocolate Chip Scones! I hope you enjoy them!

Also today is the last day to enter to win a copy of Elana's cookbook over at my reviews/giveaways page! Please visit: A Gluten Free Holiday: Breakfast and Brunch Recipes to find out how!


Chocolate Chip Scones
Reprinted with permission of Elana Amsterdam
Published in "The Gluten Free Almond Flour Cookbook" c. 2009 written by Elana Amsterdam

Makes 16 scones
Sweetness: Medium

"In college, I used to pretend chocolate chip scones were a breakfast food instead of a dessert, devouring one nearly every morning. Using agave nectar to lower the glycemic index of this scone makes my unique categorization less of a stretch. Rich in antioxidents and low in sugar, organic dark chocolate makes these decadent-looking scones a healthy indulgence." - Elana Amsterdam

Ingredients:
2 1/2 cups blanched almond flour
1/2 teaspoon sea salt
1/2 teaspoon baking soda
1/3 cup grapeseed oil
1/4 cup agave nectar
2 large eggs
1 cup coarsely chopped dark chocolate (73% cacao)

Directions:
Preheat oven to 350 degrees F. Line 2 large baking sheets with parchment paper.
In a large bowl, combine the almond flour, salt, and baking soda. In a medium bowl, whisk together the grapeseed oil, agave nectar, and eggs. Stir the wet ingredients into the almond flour mixture until thoroughly combined, then fold in the chocolate. Drop the batter, in scant 1/4 cups 2 - inches apart, onto the prepared baking sheets.
Bake for 12-17 minutes, until golden brown or until a toothpick inserted in the middle comes out clean. Let the scones cool for 30 minutes on the baking sheets, then serve.


*If you'd like to enter to win a copy of Elana's cookbook,  "The Gluten Free Almond Flour Cookbook" please visit: "A Gluten Free Holiday - Breakfast & Brunch recipes." 
Pin It!

Wednesday, November 24, 2010

How to Quick Brine a Gluten Free Turkey


I've never been a huge fan of turkey breast... until now. It wasn't until I decided to take the plunge and try a "brine" on a turkey breast did I understand what all the fuss was about.

It makes some durn good turkey!

I think the reason I never really liked turkey breast meat was because it was always incredibly dry to me. Dark meat has always been my favorite, but now I think that might just change.

Brining a turkey breast doesn't have to be a chore. Thanks to my friend Holly I learned a super quick & easy method of brining. You'll still need about 8-12 hours to allow the turkey to soak in all the goodness from the brine, but actually making the brining bath can be super easy:


Easy Brine for a 7-8 pound Turkey Breast:
1/2 cup sea salt
1/2 cup brown sugar
2-3 tablespoons peppercorns
2-3 tablespoons dried onion flakes
2 teaspoons dried garlic powder
Whatever other spices/flavors you want to add: apple cider, orange peels, bay leaves, etc...

Fill a large stockpot about halfway full of hot, filtered tap water. Add the salt and stir it up until the salt has dissolved in the water. Add all the other ingredients and then add several bowlfuls of ice to completely cool the water. Add your turkey breast to the stockpot. Add enough cold water to cover (if you don't have enough already. Place the stock pot in the fridge for 12-24 hours before cooking the turkey.

To Roast the Turkey Breast:
Remove the turkey breast from the brine. Rinse it off with cold water and pat it dry. Place in a large roasting pan, breast side up. Rub the meat & skin of the turkey with melted butter. Roast for 20 minutes per pound in a preheated 350 degree oven. (Some people say that's too high a temp to roast a turkey, but it's always worked fine for me! I'm a little nervous to roast it at a much lower temp due to food safety issues.) To help the turkey brown, make a basting mixture of 1/2 cup melted butter (I used ghee), 3 tablespoons maple syrup, 3 tablespoons soy sauce (or soy sauce substitute like coconut aminos or chickpea miso tamari -- this is what I used!). Pour or brush basting sauce over the turkey after 30 minutes of roasting and then baste the turkey again every 30 minutes or so until the turkey breast has reached an internal temperature of 165 degrees.

The drippings & basting mixture make a really awesome gravy too! :-)

To Make Gravy:
Pour pan drippings/basting mixture from turkey into a medium sized pot. Whisk in about 1/4 cup of sorghum flour or brown rice flour. When the mixture starts to thicken slowly whisk in 2-3 cups of gluten free vegetable or chicken stock. Because the basting mixture uses maple syrup & the soy sauce (or soy sauce substitute like I used) it should be naturally a rich brown color. Whisking the gravy constantly will help you to have a smooth delicious gravy. If you need to thicken the broth more, mix about a tablespoons of brown rice or sorghum flour into about 1/4 cup of additional broth, until it's smooth and then add it into the gravy, so you won't have lumps!

For an excellent video gravy tutorial, visit Gluten Free Girl & The Chef!

Happy Gluten Free Thanksgiving Everyone!

Carrie
Pin It!