Showing posts with label grain free. Show all posts
Monday, October 24, 2011
this week's menu - unplugged
I spent the past 5 days without internet access. That's probably the longest I've been without my email in years. I've often thought I wasn't too addicted to the internet. I can quit when I want too... :-) Well, I can... but I have to admit I spent a lot of time seriously jonesing to update facebook, send an email, or write a blog post! It definitely taught me how much I've let go of just enjoying time off. Time away. Time unplugged. To stave off withdrawal I played a lot of solitaire... and played around with our menu for the week.
Monday - Paleo Tacos -- hubs actually made them! Score!
Tuesday - Chicken Stirfry -- super easy, just chicken and frozen stir-fry vegetables
Wednesday - Puerto Rican Beef with sweet potatoes
Thursday - Mango Chicken (However, I'll have to leave the mango off Michael's... lol)
Friday - Beef bacon spinach salad with mandarin oranges
Saturday - Breakfast for dinner -- homemade sausage gravy, fried eggs, baked apples
Sunday - Roast Chicken, Broccoli, cauliflower rice and chicken gravy
Thursday, August 11, 2011
Reader Favorites - Carol's Gluten Free, Mostly Grain Free Heath Bar Cookies Recipe
![]() |
| Photo courtesy of Elise Bauer author of Simply Recipes. |
Using almond flour in gluten free baking is such a great alternative to wheat. It's so easy to use and you only have to keep one flour on hand for your baking. Plus, it's a low glycemic, high protein flour, so it's easier on your blood sugar. However Carol's recipe does contain a lot of sugar... so it's definitely not a health food! Make these cookies on special occasions and really enjoy them! For all the leftover almond flour you have, here are a few of my favorite almond flour recipes.
Have you made Carol's cookies? Send me a picture! Do you have a favorite family recipe you'd like to share on Gingerlemongirl! Email me and let me know the story behind your recipe and how you've made it gluten free! Carol, thank you for sharing your awesome recipe with me! I love using almond flour in gluten free baking.
Carol B.'s Gluten Free (Mostly Grain Free) Heath Bar Cookies
free of gluten, dairy, and soy (and mostly grain free)
printer-friendly version
Ingredients:
1/2 cup butter
1/4 cup organic 10x (confectioners) sugar
1/4 cup brown sugar
1/4 cup white sugar
1 egg
1 tsp vanilla
2 1/4 to 2 1/2 cups almond flour
1/2 tsp salt
3 frozen Heath Bars - smashed to smithereens
Directions:
Preheat oven to 350 degrees. Line a large baking/cookie sheet with parchment paper and set aside. In a large bowl cream the butter, all three varieties of sugar and mix with the vanilla and egg. Stir in the almond flour and salt. Fold in the broken Heath Bar bits. Drop the batter by tablespoons onto the parchment covered baking sheets. Bake for 12-15 minutes at 350 degrees until the cookies are golden brown. Let cool for 5 minutes before removing from parchment paper. Store in an airtight container on the counter.
Carol’s Notes:
Preheat oven to 350 degrees. Line a large baking/cookie sheet with parchment paper and set aside. In a large bowl cream the butter, all three varieties of sugar and mix with the vanilla and egg. Stir in the almond flour and salt. Fold in the broken Heath Bar bits. Drop the batter by tablespoons onto the parchment covered baking sheets. Bake for 12-15 minutes at 350 degrees until the cookies are golden brown. Let cool for 5 minutes before removing from parchment paper. Store in an airtight container on the counter.
Carol’s Notes:
- For those sensitive to tapioca starch or cornstarch, please be aware that most 10x confectioners sugar does contain one or the other of these starches -- also, the cookies will not be completely grain free if the sugar contains cornstarch.
- Sometimes Carol uses “vanilla sugar” instead of adding in vanilla -- which means she makes sugar that has been mixed with the scrapings of a vanilla bean -- this makes the sugar very flavorful and super “vanilla-y.”
Labels:
cookies,
desserts,
grain free,
reader favorites
Thursday, July 28, 2011
{Recipe Review} The Gluten Free Homemaker's Zucchini & Sausage
When Linda of The Gluten Free Homemaker posted her recipe for "Zucchini & Sausage" on Monday, I knew I had to make it! (So much for my menu plan this week! lol!) This is the kind of recipe I love. Super simple, one dish, and really it could be a meal all in itself!
I actually didn't change a thing to Linda's recipe (really, I didn't! I promise! lol). I even had fresh basil in the yard that I threw in at the last minute. This recipe makes me wonder why in the world we don't eat sausage for dinner more often. My husband and I both love fresh summer zucchini and the sausage (we buy locally made fresh sausage since we live in a major pork producing area) is just an incredibly flavorful addition.
Honestly, this might be my favorite way to eat zucchini now. We actually had three perfectly sized zucchinis from our backyard garden this year (not surprisingly about the only thing that survived the summer heat and crazy weeds -- I think zucchini plants would survive a nuclear blast... lol)
We served the zucchini & sausage with fresh corn and slices of a beautiful home-grown, vine-ripened tomato from a good friend who has a much greener thumb than I do! lol
Linda, thanks for such an easy and delicious recipe for summer! We loved it!
Wednesday, December 15, 2010
A Gluten Free Holiday - Breakfast with Elana's Pantry
It's the last day of my week of "A Gluten Free Holiday - Breakfast & Brunch Recipes." I'm excited to share one last holiday breakfast/brunch recipe with you! Today it's from Elana Amsterdam, the author of one of my favorite gluten free blogs, "Elana's Pantry" and one of the most well-loved cookbooks in my kitchen, "The Gluten Free Almond Flour Cookbook."
I bought Elana's cookbook before it was even published. I couldn't wait to open this book and make easy, delicious, and low glycemic recipes with almond flour! Elana introduced me to almond flour and I've been using it for several years now. Most of the recipes I make for myself are made with almond flour. It's easier for me to digest than grains, and it's just such an easy way to bake.
I've cooked my way through Elana's cookbook during the past year. I've made her chocolate chip cookies countless times. Her chocolate cake makes frequent appearances for birthdays and anniversaries. Her vegetable quiche with an almond flour pie crust is a favorite quick dinner. My husband LOVES Elana's simple recipe for chicken fingers, it's one of his most requested main dishes! Her vanilla cupcakes are some of my favorite "sweet" treats! And her bread. Elana's bread is what I use most often if I don't have Udi's at home or don't feel like making a yeast bread. I've had many a sandwich on Elana's gluten free bread. Sandwiches are easy comfort food to me and I'm so thankful for her recipes.
Elana has graciously allowed me to share one of her recipes from "The Gluten Free Almond Flour Cookbook" today! It's a recipe for her Chocolate Chip Scones! I hope you enjoy them!
Also today is the last day to enter to win a copy of Elana's cookbook over at my reviews/giveaways page! Please visit: A Gluten Free Holiday: Breakfast and Brunch Recipes to find out how!
Chocolate Chip Scones
Reprinted with permission of Elana Amsterdam
Published in "The Gluten Free Almond Flour Cookbook" c. 2009 written by Elana Amsterdam
Makes 16 scones
Sweetness: Medium
"In college, I used to pretend chocolate chip scones were a breakfast food instead of a dessert, devouring one nearly every morning. Using agave nectar to lower the glycemic index of this scone makes my unique categorization less of a stretch. Rich in antioxidents and low in sugar, organic dark chocolate makes these decadent-looking scones a healthy indulgence." - Elana Amsterdam
Ingredients:
2 1/2 cups blanched almond flour
1/2 teaspoon sea salt
1/2 teaspoon baking soda
1/3 cup grapeseed oil
1/4 cup agave nectar
2 large eggs
1 cup coarsely chopped dark chocolate (73% cacao)
Directions:
Preheat oven to 350 degrees F. Line 2 large baking sheets with parchment paper.
In a large bowl, combine the almond flour, salt, and baking soda. In a medium bowl, whisk together the grapeseed oil, agave nectar, and eggs. Stir the wet ingredients into the almond flour mixture until thoroughly combined, then fold in the chocolate. Drop the batter, in scant 1/4 cups 2 - inches apart, onto the prepared baking sheets.
Bake for 12-17 minutes, until golden brown or until a toothpick inserted in the middle comes out clean. Let the scones cool for 30 minutes on the baking sheets, then serve.
*If you'd like to enter to win a copy of Elana's cookbook, "The Gluten Free Almond Flour Cookbook" please visit: "A Gluten Free Holiday - Breakfast & Brunch recipes."
Monday, December 13, 2010
A Gluten Free Holiday - Breakfast with Silvana Nardone
![]() |
| Photo used with permission of Silvana Nardone. |
Today's recipe is from Silvana Nardone, author of "Cooking for Isaiah: Gluten Free & Dairy Free Recipes for Easy, Delicious Meals." Silvana is a former magazine editor and bakery owner. She's a writer, a cook, a wife, and a mom. Silvana learned several years ago that her son was intolerant to gluten. She made it her mission to create & provide healthy and delicious foods for her family that her son could enjoy.
Silvana graciously offered to share one of her breakfast recipes for our series this week "A Gluten Free Holiday." Silvana's cookbook is one our many giveaways this week, you can learn more about the giveaway and enter to win here: A Gluten Free Holiday - Breakfast & Brunch Recipes
Hash Brown Waffles with Sausage-Apple Patties and Fried Eggs
This recipe has diner food written all over it—exactly my intention. Instead of classic waffles, I serve up my sausage and eggs with crispy hash brown waffles, which I promise you, taste better than a side of fries. The dried apples in the sausage patties add just the right amount of sweet, caramelized flavor.
Recipe by Silvana Nardone, author of Cooking for Isaiah: Gluten-Free & Dairy-Free Recipes for Easy, Delicious Meals and founder of DishTowelDiaries.com.
Serves: 4
Prep Time: 20 min
Cook Time: 25 min
1 pound (500 g) sweet Italian sausages, casings removed
1/3 cup dried apples (about 1 ounce), finely chopped
1 tablespoon packed light brown sugar
¾ teaspoon dry mustard
¼ teaspoon paprika
Salt and pepper
3 tablespoons vegetable oil
3 Yukon Gold potatoes (about 1½ pounds/750 g)—peeled, grated and wrung dry
½ medium onion, grated
4 large eggs, at room temperature
Ketchup, for serving
1. In a medium bowl, mix together the sausage, apples, brown sugar, mustard, paprika, ½ teaspoon salt and 1/8 pepper; shape into four 4-inch patties, about 1/3 inch thick.
2. In a large nonstick skillet, heat 1 tablespoon oil over medium heat. Add the patties and cook until browned and cooked through, about 4 minutes on each side. Cover loosely with aluminum foil to keep warm.
3. In a small bowl, mix together the potatoes, onion, 1 tablespoon oil and ¾ teaspoon salt.
4. Preheat a Belgian waffle iron to medium-high heat. Grease the waffle iron with nonstick cooking spray. Mound ½ cup of the potato mixture in each waffle quarter; close and cook until golden and crisp, about 10 minutes.
5. Meanwhile, in a large skillet, heat the remaining 1 tablespoon oil over medium heat. Crack the eggs into the skillet and season with salt and pepper; cook, turning once, until whites are set and yolks are slightly runny, about 3 minutes.
6. To serve, place a waffle on each of four plates; top with a sausage patty and a fried egg. Serve with ketchup.
*If you'd like to enter to win a copy of Silvana's gluten free cookbook, "Cooking for Isaiah" please visit: "A Gluten Free Holiday - Breakfast & Brunch recipes.
Wednesday, November 24, 2010
How to Quick Brine a Gluten Free Turkey
I've never been a huge fan of turkey breast... until now. It wasn't until I decided to take the plunge and try a "brine" on a turkey breast did I understand what all the fuss was about.
It makes some durn good turkey!
I think the reason I never really liked turkey breast meat was because it was always incredibly dry to me. Dark meat has always been my favorite, but now I think that might just change.
Brining a turkey breast doesn't have to be a chore. Thanks to my friend Holly I learned a super quick & easy method of brining. You'll still need about 8-12 hours to allow the turkey to soak in all the goodness from the brine, but actually making the brining bath can be super easy:
Easy Brine for a 7-8 pound Turkey Breast:
1/2 cup sea salt
1/2 cup brown sugar
2-3 tablespoons peppercorns
2-3 tablespoons dried onion flakes
2 teaspoons dried garlic powder
Whatever other spices/flavors you want to add: apple cider, orange peels, bay leaves, etc...
Fill a large stockpot about halfway full of hot, filtered tap water. Add the salt and stir it up until the salt has dissolved in the water. Add all the other ingredients and then add several bowlfuls of ice to completely cool the water. Add your turkey breast to the stockpot. Add enough cold water to cover (if you don't have enough already. Place the stock pot in the fridge for 12-24 hours before cooking the turkey.
To Roast the Turkey Breast:
Remove the turkey breast from the brine. Rinse it off with cold water and pat it dry. Place in a large roasting pan, breast side up. Rub the meat & skin of the turkey with melted butter. Roast for 20 minutes per pound in a preheated 350 degree oven. (Some people say that's too high a temp to roast a turkey, but it's always worked fine for me! I'm a little nervous to roast it at a much lower temp due to food safety issues.) To help the turkey brown, make a basting mixture of 1/2 cup melted butter (I used ghee), 3 tablespoons maple syrup, 3 tablespoons soy sauce (or soy sauce substitute like coconut aminos or chickpea miso tamari -- this is what I used!). Pour or brush basting sauce over the turkey after 30 minutes of roasting and then baste the turkey again every 30 minutes or so until the turkey breast has reached an internal temperature of 165 degrees.
The drippings & basting mixture make a really awesome gravy too! :-)
To Make Gravy:
Pour pan drippings/basting mixture from turkey into a medium sized pot. Whisk in about 1/4 cup of sorghum flour or brown rice flour. When the mixture starts to thicken slowly whisk in 2-3 cups of gluten free vegetable or chicken stock. Because the basting mixture uses maple syrup & the soy sauce (or soy sauce substitute like I used) it should be naturally a rich brown color. Whisking the gravy constantly will help you to have a smooth delicious gravy. If you need to thicken the broth more, mix about a tablespoons of brown rice or sorghum flour into about 1/4 cup of additional broth, until it's smooth and then add it into the gravy, so you won't have lumps!
For an excellent video gravy tutorial, visit Gluten Free Girl & The Chef!
Happy Gluten Free Thanksgiving Everyone!
Carrie
Tuesday, November 16, 2010
Gluten Free Dairy Free Pao de Queijo -- "Cheese" Bread Recipe
Last week we had a potluck at work. I needed something quick to share that I could also eat. We have a small deli/sandwich shop where I work and they are constantly making garlic bread and rolls. The aroma is killer and really makes me crave garlic bread!
I decided on Pao de Queijo, a Brazilian cheese bread. It's super easy to make, only uses one flour and a few simple ingredients. The problem was the cheese. I really don't need to eat cheese. Dairy just doesn't like me and as much as I miss it, I know better.
I wondered how these rolls would turn out using a cheese alternative like "Daiya", a soy free, dairy free
"cheese" product. In general I think it's best just to stay away from processed foods, but sometimes it's nice to still feel like I get to eat cheese! Daiya is the only "cheese" alternative I've found that doesn't contain soy and it melts and gets gooey, just like real cheese. It makes an awesome grilled "cheese" and it's what I put on my homemade pizzas at home.
Turns out it works like a charm in these rolls too! I altered my friend Jaime's recipe to make them casein free and they were a hit. Make these with cheese or with Daiya. Either way I think you'll love them! :-)
Pao de Queijo aka Gluten Free "Cheese" Rolls
adapted from Just a Gluten For Punishment , by Carrie Forbes at Gingerlemongirl.com
free of gluten, dairy/casein, soy, and grains
printer-friendly recipe
Ingredients:
1 1/4 cups tapioca starch
1 teaspoon baking powder
2 teaspoons garlic powder (optional -- good, but not necessary)
2 cups shredded cheese -OR- Daiya "cheddar-style" or "mozarrella-style" shredded "cheese"
2 eggs
1/4 cup melted butter, ghee, or melted coconut oil
Directions:
Preheat oven to 450 degrees. Line a baking sheet with parchment paper or a silpat mat. In a large bowl whisk together tapioca starch, baking powder, and garlic powder (if using). Make a well in the center of the dry ingredients and add shredded Daiya "cheese", eggs, and melted butter or oil. Stir together with dry ingredients until you have a thick, wet batter. Using an ice-cream scoop or large spoon scoop 12 balls of dough and drop them onto the lined baking sheet about 2 inches apart. (Alternatively you could scoop them into paper-lined muffin tins). Bake for 8-10 minutes or until they are crusty and golden brown. Serve hot.
Carrie's Notes:
- This is one of the few recipes using tapioca starch that I actually like. I think the shredded cheese & eggs, and oil remove the tapioca starch flavor. And tapioca starch is probably key in the crispiness of these rolls. If you try the rolls with another starch please let me know how they turn out!
- This dough would also make a REALLY good pizza crust patted out and baked. Granted you'd use a lot of cheese just in the crust, but if you wanted a super easy, low maintenance, crispy, yeast free pizza crust, this dough would be awesome! Just roll it or pat it out onto parchment paper and prebake it for about 10 minutes before adding your toppings!! Enjoy!
- I buy my Daiya cheese online from Cosmo's Vegan Shoppe out of Mariette Georgia. Cosmo's has wonderful customer service and fast shipping. They are super nice folks, tell 'em I sent ya!
Tuesday, November 9, 2010
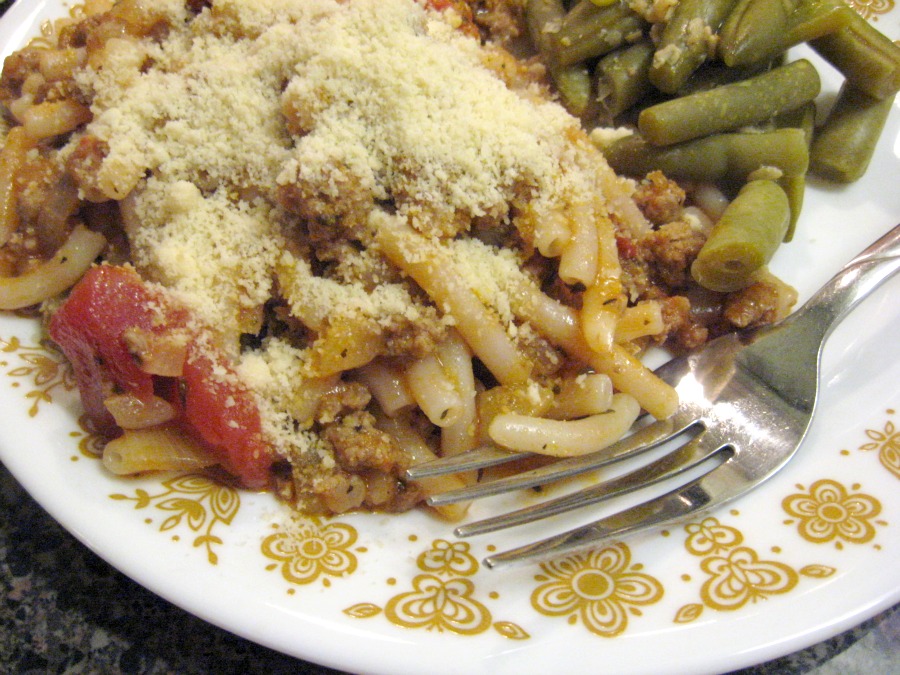
Gluten Free Beef Italian Skillet Meal (Goulash) Recipe
Here's another favorite recipe from my college days. I'm sure we all grew up eating a basic ground beef casserole like this either with rice or noodles. As a child, I remember from a cookbook that was published by my local elementary school they called this "goulash." I thought that was a really cool name!
My friend Susan shared this recipe with me when I was in college. I remember she came over to my apartment and we made this along with a salad and just enjoyed cooking together. I still have the index card that she wrote the recipe on for me.
This is a super simple, hearty meal that my husband loved. It's easy with just a few simple ingredients and gluten free noodles.
For a casein free topping, I sprinkled blanched almond flour on the top of our servings!
Susan's Beef Italian Skillet Meal
free of gluten, casein/dairy, soy, corn, and eggs
Adapted by Carrie @ www.gingerlemongirl.com
printer-friendly recipe
1 1/2 cups gluten free pasta of your choice (I used these rice noodles from a local Asian market -- they don't get mushy!)
1 lb. ground beef
1 small onion, finely diced
1 stalk celery, finely diced
3 cloves garlic, minced
1 teaspoon dried oregano
1/2 teaspoon dried basil
1/2 teaspoon sea salt
1 teaspoon freshly ground pepper
1 (8 oz.) can tomato sauce + 1/3 cup water
3 tablespoons blanched almond flour (or parmesan cheese) to sprinkle on top of each serving
Directions:
Cook gluten free noodles according to package directions until "al dente" or still slightly firm. Rinse with COLD water to completely stop the cooking process, drain and set aside. Brown ground beef in a large skillet or dutch oven. Add onions and celery and saute for about 5 minutes until onions are soft and transparent. Add garlic, oregano, basil, salt and pepper. Mix tomato sauce with water and add to ground beef and vegetables. Simmer for 10 minutes until mixture is bubbling and heated through. Add cooked pasta to skillet and stir to coat noodles with sauce. Simmer for additional 5 minutes and serve. Sprinkle servings with blanched almond flour or parmesan cheese. Serve with green beans or a salad! Picky kid & husband friendly! Enjoy!
Wednesday, October 20, 2010
Gluten Free Beans Galore Recipe
When I graduated from college (good heavens 10 years ago... yeesh!) I rented an upstairs room from Mrs. Betty B. The first meal Betty made for me was Beans Galore. I remember moving my stuff into Betty's house, a bit nervous, not sure what the future held. I didn't have a job yet, wasn't sure where life was taking me (do you ever stop wondering that?)... but I knew it was a good decision to become Mrs. Betty's roommate after tasting that wonderful bowl of Beans Galore.
No matter what you may think when you graduate from college, you're still a kid. There's a lot of growing up to be done. In that sense, Betty will always be kind of like a 2nd mom to me. She was nurturing, she cooked many meals, she put up with my dating and first job frustrations... she was and still is a great friend. She still cooks us meals and Betty's home is still a peaceful haven to me.
I'm beyond blessed to have met Betty and still have her in my life. For another awesome recipe from Betty, check out this gluten free french bread casserole!
This recipe is an old favorite. It's one of the few recipes with beans that Michael will actually ask for. He'll eat 3rd helpings. It's sweet and savory and nothing but simple. You can simmer it all day in a crockpot or you can make it on the stove and have it on the table in 30 minutes. This dish might also be known to you as glorified baked beans, chuckwagon beans, or just simply as "baked beans" depending on how your family makes it.
Every time we eat this meal it reminds me of Betty's simple & loving hospitality. Make a big pot and generously share a bowl with your friends and neighbors. Laugh, smile, and let them know how much you appreciate them!
Mrs. Betty's Beans Galore
created by Betty B., shared by Carrie @ gingerlemongirl.com
free of gluten, dairy/casein, soy, and corn
Printer-friendly recipe
1/2 pound bacon (optional - I only use if it I have it -- last night I didn't have it!)
1 pound ground beef
1 medium onion, chopped
1/3 cup brown sugar (I only use 1-2 tablespoons)
1/4 cup white sugar (we leave this out)
1/4 cup ketchup
1/4 cup of your favorite gluten free barbecue sauce
1 teaspoon dry mustard
2 tablespoons molasses
1/2 teaspoon chili powder
1/2 teaspoon ground pepper
1 teaspoon salt
2 (15 oz.) cans pork & beans (I just use a 28 oz. can of baked beans)
1 (15 oz.) can lima beans
1 (15 oz.) can light red kidney beans (I use northern beans)
Stovetop Directions:
Fry bacon in a large dutch oven. Drain off grease, crumble bacon and set aside. Brown ground beef until it's cooked through and there is no pink showing. Add chopped onions and saute until soft -or- translucent. Add remaining ingredients to dutch oven. Cook beans galore over medium heat for about 15-20 minutes until completely heated through and simmering. You may need to stir often to prevent the beans from burning on the bottom. Serve hot with a nice green salad and gluten free french bread. (Of if you're like us, just eat a small bowl... it'll do ya for a few hours! This is a delicious and filling sweet & sour chili!)
Slow Cooker Directions:
Fry bacon in a large pan. Drain off grease, crumble bacon and set aside. Brown ground beef until it's cooked through and there is no pink showing. Add chopped onions and saute until soft -or- translucent. Add crumbled bacon, browned ground beef & onions, and all other ingredients to the slow cooker. Cook on high for 4 hours, or on low for 8 hours. Allow to cool a bit before eating.
Carrie's Notes:
- To watch the sugar content in this recipe (the original has a LOT!) I don't add any white sugar, and I only add about 2 tablespoons of brown sugar. We use low sugar ketchup and low sugar barbecue sauce...so our version is not super sweet... if you make this using Betty's recipe, be prepared for a SUPER sweet and sour treat!!
- To cut the salt content of this recipe, I rinse and drain both the lima beans and the northern beans/red beans. I don't drain the can of baked beans, since it's flavoring is in the sauce. If you rinse & drain your beans you may need a little bit more liquid, so add a can or so or warm water to make the texture like a thick stew/chili.
- Optional Bacon: If you know me, you know I'm not going to skip the bacon if I don't have too! But this recipe is still absolutely delicious without the bacon. I didn't have any on hand tonight and it still turned out just fine!
Friday, October 15, 2010
Gluten Free, Grain Free Peanut Butter Cupcakes Recipe
We try to visit Michael's parents at least once a week. Sometimes it's more often, sometimes less. On a recent visit we had a wonderful southern meal prepared by Michael's mom Carol. We didn't have anything for dessert planned and I was watching Cupcake Wars on Food Network. We don't have cable or satellite television at our house, so the first thing I do when we get to Michael's parents house is head towards the living room and change the channel to Food Network! Thankfully his parents usually don't mind -- so long as a car race isn't on!
So after an hour of seeing about 1000 cupcakes being made I thought we needed cupcakes for dessert. One problem. Michael's parents aren't gluten free and therefore don't have a full pantry of gluten free flours available. So I made myself at home in Carol's kitchen and started nosing around to see what I could find.
Peanut butter = check.
Eggs = check.
Sugar = check.
Hmm... could you make cupcakes with those basic ingredients from a regular kitchen? I thought it would be worth a shot to try. Surprisingly it worked! Nut flours and butters can be used singularly as a flour in gluten free baking. It worked really well! I will admit, these cupcakes aren't perfect. I made them again last night to double check my recipe measurements and this makes a LOT of cupcakes... so I'm giving you both recipes in case you want to make a small batch or a large batch.
A few tips for grain-free peanut butter cupcakes:
- Don't overfill the cupcake liners. I made these cupcakes WAY too big, so they were starting to collapse as they cooled. Unlike most gluten free cupcakes, you don't need to add batter to the brim of the cupcake liner, I'd say only fill the liners 3/4 full MAX. (In these pictures, I still made them WAY too big and added too much batter.)
- Use SMALL or mini chocolate chips. I used regular sized chocolate chips in both batches, and I think the large size makes them heavier and that's contributing to the cupcakes falling slightly when they are cooling.
- You can use "real" peanut butter (which is what I prefer) that is simply peanuts that have been ground, or if your family prefers a peanut butter with additives like "Jif" that works too. The only peanut butter Michael's parents had was Jif, and at home I had Maranatha natural peanut butter. The cupcakes turned out great with both kinds. You could also use almond butter or another nut butter of your choice.
Gluten Free, Grain Free Peanut Butter Cupcakes
free of gluten, dairy, soy, gums, corn, and other grains
created by carrie forbes of gingerlemongirl.com
printer-friendly recipe
Large Batch (15-18 cupcakes)
2/3 cup sugar, agave nectar, or honey
2 teaspoons baking powder
1 1/4 cups peanut butter
4 eggs
1/4 cup water
1 tablespoon gluten free vanilla
1/4 cup mini-chocolate chips
Small Batch (7-9 cupcakes)
1/3 cup sugar, agave nectar, or honey
1 teaspoon baking powder
1/2 cup + 2 tbsp. peanut butter
2 eggs
2 tablespoons water
1 1/2 teaspoons gluten free vanilla
2 tablespoons mini-chocolate chips
Directions:
Preheat your oven to 350 degrees. Line cupcake pans with paper liners. In a medium sized bowl mix together sugar and baking powder. To the sugar, add peanut butter and cream the mixture together. In another bowl whisk together the eggs, water, and vanilla. Pour the egg mixture into the peanut butter/sugar mixture and mix it together with a fork until it's very creamy and light, like a cake batter. You may need to use a little elbow grease to completely mix the wet ingredients with the peanut butter/sugar mixture. Spoon the cupcake batter into the paper lines until they are NO more than 1/2 - 3/4 full. These cupcakes definitely need room to rise! Lightly sprinkle a few mini-chocolate chips on top of the cupcakes and place in the preheated oven. Bake for 15-18 minutes until they are golden brown and a toothpick inserted in the middle of a cupcakes comes out clean. Allow the cupcakes to cool for about 20 minutes on a wire rack before serving. They are delicious hot or cold. Store leftovers in an airtight container in the refrigerator.
Sunday, September 26, 2010
Gluten Free Black Bean and Butternut Squash Chili Recipe
Gluten free black bean and butternut squash chili is a welcome change for fall. I've been ready to cook fall squashes for several weeks now and I'm finally getting the chance. It's still hot here in Eastern NC, but I've already transitioned to fall foods. Apples, pumpkin, fall greens like kale, and squash are abundant right now and they are the foods I really want. The great thing about seasonal eating is that our bodies become accustomed to the foods that are (or should be) available locally. Right now I want apples. I want the taste of squash. I want filling soups and stews. By early March I'll be more than tired of them and ready for spring foods... but right now... it's time for hearty beans, lentils, and squashes.
We're still receiving incredibly fresh produce from our CSA. Last week I received a butternut squash and an acorn squash in the box (along with many other things). This week I received the first pumpkin of the year. I was almost teary-eyed at seeing the bright orange peeking through the box. Right now I'm enjoying the mere site of that perfect pumpkin... but in a few weeks it will become our first pie for the season!
I wasn't feeling well last week so I decided to make a hearty, healthy stew. I found a recipe for a vegetarian black bean and butternut squash stew and made a few changes to make the stew with what I had on hand.
Hearty butternut squash, healthy black beans and tomatoes, spicy cumin and chili powder, with the soft crunch of kale at the end of each bite. We ate this stew for two meals and then had it for lunch 3 days last week. Honestly I don't often repeat recipes (it can be hard to do that when you're constantly trying to create new recipes) but this is a fall stew we'll be making often. It's vegetarian but you will never miss the meat. Try this for a filling lunch or a hearty dinner.
This recipe is being featured on the gluten free recipe carnival: "Go Ahead Honey, It's Gluten Free." This month is being hosted by Ali of Whole Life Nutrition Kitchen and the theme is: Packing a Healthy Lunch.
Gluten Free Black Bean and Butternut Squash Chili
free of gluten, dairy/casein, soy, and corn
adapted from this recipe by carrie forbes of gingerlemongirl.com
printer-friendly recipe
2 tablespoons olive oil
1 medium sweet onion, chopped
3 cloves garlic, minced
3 tablespoons gluten free chili powder
2 teaspoons cumin
2 1/2 cups butternut squash, cooked & cubed
2 (15 oz.) cans black beans, rinsed and drained
2-4 cups vegetable broth (depending on how thick or thin you like your stew/soup)
1 (14 oz.) can petit diced tomatoes in juice
2-3 cups fresh kale, washed, patted dry, and cut or torn into bite size pieces
1 teaspoon sea salt (optional)
Freshly ground pepper, to taste
Directions
In a large dutch oven heat olive oil. Saute onions and garlic until soft. Add chili powder and cumin and cook for 1-2 minutes to release the aroma of the spices. Add butternut squash, black beans, and can of tomatoes. Add 2 cups of vegetable broth. If you want the chili a bit more thin, add additional vegetable broth. Cook on low heat for 30-40 minutes. About 10 minutes before serving add the fresh kale. After simmering for 6-8 minutes the kale will be a beautiful bright green. Taste the chili. Add salt if needed, along with freshly ground pepper.
Ladle the soup into bowl into bowls and let cool for 5 minutes before serving. Serve with fresh gluten free bread.
Carrie's Notes:
- This chili would work really well in a slow cooker. Simply saute the garlic and onions, and then add all ingredients (except kale) to your slow cooker and cook on low for 4-6 hours and high for 2-3 hours. Add the kale, salt, and pepper to the slow cooker about 10 minutes before serving.
- We don't use a lot of salt in our cooking for health reasons. If you need more, feel free to add it! I've learned that if you add salt at the end of the cooking process you'll be less likely to oversalt your food.
- Any type of cooked, cubed squash would work well in this chili.
- I actually used a beef broth in this chili because it's what I had on hand at the time. It made a delicious stew.
- After reviewing this post for me, my husband said, "You used butternut squash in the chili? I thought it was cubed sweet potatoes!" So feel free to substitute cooked, cubed sweet potatoes in place of the squash.
This post is part of a monthly roundup of gluten free recipes called "Go Ahead Honey, It's Gluten Free." The theme for this month is healthy lunches. Ali of Whole Life Nutrition Kitchen is the host for September 2010. Make sure to stop by her blog this month to see the awesome roundup of healthy gluten free lunches, especially for kids!
Saturday, September 11, 2010
Gluten Free Chicken Lettuce Wraps by The Gluten Free Notebook
Today's guest post & recipe is shared by celiac sisters Shelley and Suman of the blog, The Gluten Free Notebook.
Gluten Free Chicken Lettuce Wraps
I made these on a whim one day, wanting something light and fresh on a very hot summer day. They turned out delicious!
Chicken:
• 1-2 boneless skinless chicken breasts, cut into bite sized strips or pieces
• salt and pepper to taste
Add a drizzle of olive oil in a frying pan and heat on med-high heat and sauté chicken until no longer pink. Season with salt and pepper and set aside.
Noodles:
1 package A Taste of Thai Peanut Noodles or any other flavoured gluten free rice noodles of your preference.
Cook as per directions on the package.
Vegetable mixture:
• 1/2 small onion finely chopped
• 1 celery stalk finely diced
• 2 carrots grated (reserve one grated carrot for topping the lettuce wraps at the end)
• 6-7 button mushrooms diced
• 1/2 teaspoon olive oil
• 1 teaspoon gluten free soy sauce
• salt and pepper to taste
In a frying pan, heat the olive oil and add all chopped vegetables except mushrooms. Sauté for 2-3 minutes until onion has softened slightly. Add the mushrooms and the soy sauce and continue to cook until the mushrooms reduce. Remove mixture from heat.
Fresh Toppings:
• 1 grated carrot (reserved from above)
• 5 green onions chopped (green and white parts)
• blanched peanuts-coarsely chopped
You will also need:
• 1 head of iceberg lettuce, washed and carefully separated
• sweet chilli sauce
• gluten free plum sauce (optional)
To assemble: Take one piece of lettuce; add a few spoonfuls of the veggie mixture. Add chicken, and then add noodles, fresh grated carrot and sprinkle with some of the chopped green onions. Sprinkle some chopped peanuts over top. Finish with a drizzle of sweet chilli sauce and/or plum sauce. I used both. Just remember that a little of each goes a long way. Wrap and enjoy. If you are a vegetarian, just leave the chicken out and the recipe tastes just as good.
Serves 3-4
Gluten Free Chicken Lettuce Wraps
I made these on a whim one day, wanting something light and fresh on a very hot summer day. They turned out delicious!
Chicken:
• 1-2 boneless skinless chicken breasts, cut into bite sized strips or pieces
• salt and pepper to taste
Add a drizzle of olive oil in a frying pan and heat on med-high heat and sauté chicken until no longer pink. Season with salt and pepper and set aside.
Noodles:
1 package A Taste of Thai Peanut Noodles or any other flavoured gluten free rice noodles of your preference.
Cook as per directions on the package.
Vegetable mixture:
• 1/2 small onion finely chopped
• 1 celery stalk finely diced
• 2 carrots grated (reserve one grated carrot for topping the lettuce wraps at the end)
• 6-7 button mushrooms diced
• 1/2 teaspoon olive oil
• 1 teaspoon gluten free soy sauce
• salt and pepper to taste
In a frying pan, heat the olive oil and add all chopped vegetables except mushrooms. Sauté for 2-3 minutes until onion has softened slightly. Add the mushrooms and the soy sauce and continue to cook until the mushrooms reduce. Remove mixture from heat.
Fresh Toppings:
• 1 grated carrot (reserved from above)
• 5 green onions chopped (green and white parts)
• blanched peanuts-coarsely chopped
You will also need:
• 1 head of iceberg lettuce, washed and carefully separated
• sweet chilli sauce
• gluten free plum sauce (optional)
To assemble: Take one piece of lettuce; add a few spoonfuls of the veggie mixture. Add chicken, and then add noodles, fresh grated carrot and sprinkle with some of the chopped green onions. Sprinkle some chopped peanuts over top. Finish with a drizzle of sweet chilli sauce and/or plum sauce. I used both. Just remember that a little of each goes a long way. Wrap and enjoy. If you are a vegetarian, just leave the chicken out and the recipe tastes just as good.
Serves 3-4
About Shelley & Suman
Shelley and Suman are two celiac sisters discovering the gluten-free way of life in the Lower Mainland and Fraser Valley! Having been diagnosed since 2004, they are constantly learning about the gluten-free lifestyle and hope to help others through their website (www.glutenfreenotebook.com).
The Gluten Free Notebook is a collaboration of Shelley and Suman’s gluten-free findings in Vancouver, Canada and its surrounding suburb Lower Mainland and Fraser Valley. On their website, one can find a compilation of places to shop for GF items, a list of their favourite GF products, their favourite recipe books and websites. In addition, they include any gluten free restaurants they have discovered in the area. Shelley and Suman love to find great new recipes, healthy alternatives and are passionate about finding new gluten free products and dining options. All this information is shared on their website as a resource in the hopes of helping others find more GF options.
Friday, August 20, 2010
Grilled Chili-Lime Tilapia with Peach Salsa
I can't tell you how many times I've ruined a good piece of fish. Absolutely ruined it. Either didn't cook it long enough or burned it to a crisp.
I'm excited to say I finally got it right! The tilapia we ate for dinner one night this week was turned out beautiful and truly tasty! Flaky and moist on the inside. Crisp and full of flavor on the outside. I think fish might begin to make a regular appearance on our dinner table.
At first I wasn't sure how to fix this fish (I did not want to ruin ANOTHER dinner!), so I googled for a few ideas. I was looking for a recipe that would be fast, have few ingredients, and would be super easy for the beginner fish chef that I am.
This recipe really fits that description! It is so easy and has such great results! You simply coat the fish in a dry rub made of three ingredients. Let the flavors come together for about 30 minutes in the fridge and grill it for about 6 minutes. Easy peasy.
If you are intimidated by the thought of cooking fish, please give this super easy recipe a try. I used frozen tilapia that I thawed partially in the microwave for 6 minutes on defrost and then allowed the fish to sit on the counter for about 20 minutes. Worked just fine. No fishy flavor at all. It tasted fresh & delicious and the chili is not overpowering. Michael, who has never been a fan of fish, ate the entire piece and said, "You know honey, I really didn't think I was going to like this... but it's great!"
Personally, I loved the addition of peach salsa on the fish to give a tiny bit of sweetness to cut the heat of the chili. If you're not a fan of peach salsa, use what you like... heck, Michael would probably eat it with ketchup!
Grilled Chili-Lime Tilapia with Peach Salsa
Adapted from a recipe on Foodnetwork.com
Free of gluten, dairy/casein, and soy
Printer-friendly recipe
1 lb. fresh tilapia (2 filets)
1 tablespoon chili powder
1 teaspoon garlic powder
1/4 teaspoon salt (optional)
2 tablespoons olive oil
1 tablespoon lime juice
3 tablespoons gluten free peach salsa
Directions:
Rinse & pat dry the tilapia and set on a large plate. In a small bowl stir together the dry rub: chili powder, garlic powder, and salt. Rub the spice mix over the fish until they are fully coated. Cover plate of fish with plastic wrap and refrigerate for 30 minutes to allow the spices to meld. Heat grill pan 10 minutes before cooking. Get the grill pan very hot (a droplet of water should sizzle immediately). Brush olive oil on the spice-rubbed fish and place onto the grill. Cook 3-4 minutes on each side until the fish is fork tender & gently flakes. Plate grilled fish and sprinkle each serving with lime juice. Add 1 1/2 tablespoons of salsa on top of each filet and serve with fresh spinach or steamed broccoli!
Enjoy!
Wednesday, August 18, 2010
Quick Mashed Sweet Potatoes
This is one of the easiest side dishes I have ever made. One night a few weeks ago I needed something super quick for dinner. I picked up a roasted chicken from the Food Lion Deli (yep! They are gluten free!), but I wasn't sure what to make to go with it.
I finally decided on a spinach salad and mashed sweet potatoes. Ever since we had the 30 Days Gluten Free Quick & Easy Meals series I've been looking for fast and easy ways to make meals and side dishes. Shirley's microwave meatloaf reminded me that I don't use that appliance nearly often enough. Especially in the summer.
I know there is some debate on how safe it is to use a microwave. Opponents say that the radio waves (microwaves) used to cook the food changes the molecular structure of the food itself and therefore makes it unhealthy for our bodies to process. There are also many arguments stating that nutrients in natural foods are lost/destroyed by the microwave cooking process. (However, keep in mind that heating any food will kill some of the nutrients regardless.)
I'm not a scientist or a nutritionist so I can't really give an opinion one way or the other on the safety of microwave cooking. But during these hot summer months I will admit that I find the microwave a useful cooking tool both in energy efficiency and saving my kitchen from the heat generated from our regular electric oven.At any rate, I made these super easy mashed sweet potatoes in the microwave. It was quick and made a delicious side dish for our roasted chicken. No matter how you choose to cook your sweet potatoes, acorn squash, butternut squash, pumpkins, etc... enjoy them as a wonderful & healthy side dish!
Quick Mashed Sweet Potatoes
a simple side dish technique
free of gluten, dairy, and soy
for 2 servings
2 medium sweet potatoes, peeled & cubed
2 tablespoons coconut oil
1 teaspoon cinnamon
2 tablespoons honey
1/4 teaspoon salt
Place cubed sweet potatoes into a glass bowl. Fill bowl with enough water to cover sweet potatoes by 1". Cook on medium heat for 5-10 minutes until cubed sweet potatoes are fork tender. Pour through a colander to drain water. Pour sweet potatoes back into your glass bowl and mash with a fork or a potato masher. Stir in coconut oil, cinnamon, honey, and salt. Serve immediately.
Carries Notes:
- If you are in the anti-microwaving camp simply cook the cubed sweet potatoes in simmering water until they are fork tender.
- You can use ghee or butter if you do not have coconut oil available.
- Agave, molasses, or regular ol' brown sugar would also be delicious on these sweet potatoes if you don't want to use honey.
- Our favorite addition to the mashed sweet potatoes is adding toasted chopped pecans to the top just before serving!
* This post is also shared with "A Gluten Free Holiday" hosted by Diane of The WHOLE Gang on 12/2/2010.
Sunday, August 15, 2010
Ground Flax Seeds
Ground flax seeds are one of my favorite ingredients for baking. Somehow I left these humble, healthy little seeds out of my post on my favorite gluten free baking ingredients.
Full of amazing omega 3 fatty acids, healthy fiber, and phytochemicals (like antioxidents)... these little seeds are incredibly healthy. They not only add a great "whole grain" nuttiness to your baked goods... they are good for your heart, your cholesterol levels, and are a fantastic source for b vitamins, magnesium, and manganese.
Ground flax seeds can be used for so many things. Most often I toss a few tablespoons into baked goods (no matter what it is --
- chocolate cake --they will never know
- fruit/green smoothies -- a perfect source of healthy omega 3's and extra fiber, you'll never taste it!
- cookies -- seriously
- breads -- i love the nutty "whole-grain" appearance these seeds give to bread!
- pancakes -- hey, you need something to combat all that sugar in the maple syrup! Add flax seeds and you can eat pancakes with a smile!
- muffins -- does this even need an explanation? Always throw some into your muffins for extra fiber & nutrition!
Most baking experts recommend not replacing more than 2 eggs in a recipe with ground flax seeds. If you replace 3 or more eggs, you will drastically change the texture & possibly the taste of your baked good.
Keep in mind that unlike eggs, ground flax seeds will not help your baked good rise (those wonderful egg whites do that!) nor will they provide the moisture or texture qualities that egg yolks have.
For a basic egg replacer use 1 tablespoon of ground flax seeds mixed with 3 tablespoons hot water, this equals 1 egg.
Some of my favorite recipes that use ground flax seeds are:
- Elana's gluten free almond flour bread
- Banana nut muffins -- toss in a few tablespoons
- Chocolate chip cookies - seriously I add a tablespoon or so... nobody notices!
- Our favorite pancakes - add a tablespoon or so
- Chocolate cake - add 2-3 tablespoons
- Carrot cake -- add 2-3 tablespoons
- Gluten Free Sandwich Bread
- Gluten Free Master Baking Mix (like Bisquick) -- I usually add about 1/4 cup to the mix.
Do you use ground flax seeds? What do you add them too?
Tuesday, August 3, 2010
Gluten Free Raw Berry Blueberry Pie & Pudding Recipe
I really like pudding. It was one of my favorite foods as a child and I still love it. Unfortunately most puddings are made with milk, which is a no-no. They are also usually very processed and contain ingredients that I no longer want myself or my family to eat.
I've attempted making coconut milk pudding in the past, but I wasn't able to perfect the texture and flavor. After doing a little research, I realized that chia seeds (which I had only been tossing into smoothies) can naturally thicken up a non-dairy pudding or pie filling. Chia seeds are a great natural vegetarian alternative to gelatin to create a gel-like texture to foods. They are often used in egg free baking because ground chia meal and whole chia seeds become gelatinous much like an egg white when mixed with warm or hot water. Chia seeds are a great source of super healthy soluble and non-soluble fiber, omega 3 fatty acids, and are an excellent vegetarian source of protein.
I wish I had thought of creating this recipe while my nephew Christopher was visiting with us. He loves yogurt and I think I could have convinced him to eat this wonderfully healthy "pudding!" Especially if I had put it in a Dan-o-nino cup... lol...
This was my first non-smoothie experiment in my new (refurbished) Vitamix. I am so impressed that it completely pulverized the chia seeds into a beautiful & delicious pudding! (Reconditioned Vitamix's are still on sale for only $374, a STEAL compared to their regular price! They are selling out quickly so act fast if you'd like to get one at the reduced price! I don't make any money from recommending them! It's just such an amazing price, if you have been pining for a VM... now's the time!)
Purists may not consider this a raw recipe since I used simmering water mixed with the chia seeds to create the texture for the pie. I'm okay with that. I love the fact that this is such a healthy "dessert" that comes simply from berries, chia seeds, and a little agave.
I will post my almond flour pie crust later this week. I need to tweak the liquid measurements just a bit to get a better texture. Please stay tuned for a super easy pat-in-the-pan, low glycemic, gluten free pie crust that is perfect for this berry pie!
Raw Berry Blueberry Pudding & Pie Filling
Created by Carrie @ Gingerlemongirl.com
Free of gluten, soy, dairy/casein, grains, eggs, granulated sugar, and yeast
Printer-friendly recipe.
1 quart fresh strawberries, tops removed
1 cup fresh or frozen blueberries
3 tablespoons chia seeds
1/2 cup water
1/4 cup agave nectar -or- sweetener of choice
1 prepared 9" gluten free pie crust
Directions
Heat 1/2 cup of water until it just comes to a simmer. Remove it from the heat and add the chia seeds. Stir quickly as the mixture becomes gelled. If the mixture is too stiff stir in up to 2 tablespoons additional water until it is pourable. Add sweetener to the chia mixture and stir until combined. Add chia mixture to your blender or vitamix. Add strawberries & blueberries. In the Vitamix, slowly bring up to 10 and process for 1-2 minutes until mixture is completely smooth and blended. Pour mixture into your prepared pie crust. Refrigerate at least 2 hours (and up to overnight for the best flavor and texture). Cut into slices and serve.
Enjoy!
Monday, August 2, 2010
Gluten Free Almond Flour Pizza Crust Recipe
The kid may not like peanut butter, chocolate, chocolate chips, lettuce, or most vegetables... but he loves pizza. I'm not sure if there are too many kids who don't.
While Chris was at our house, most of his meals were gluten free... simply because I just won't buy things with gluten. It's a scary monster that I don't want in my kitchen. My husband is very lucky that I still let him buy "regular" wheat bread and cereals... or maybe I'm the lucky one, since he puts up with me! Yes. It's most definitely the latter.
One afternoon we decided to make pizza. And not just any pizza. Pizza made primarily from almond flour. Amazingly I told Chris it was just pizza, and he didn't even question what the crust was made of. Score one for the aunt.
I've been using almond flour in most of my recent baking. It's low glycemic and it's easier on my blood sugar than using a lot of gluten free grains and starches.
This is how the crust turned out. It was beautiful. I almost reached for a tissue. I was proud! I made a thick crusted 12" pizza with this dough, but I think next time, I would split this dough in half and make two thin crust pizzas. The crust was golden & crusty on the outside, and soft and pliable on the inside.
It made a perfect gluten free pizza. No one complained. Even the husband ate 3 pieces. And they had no idea that it contained something healthy other the almond flour.
White beans. Cleverly hidden little mashed white beans for some extra fiber and just because I wanted to see if it would work. My husband is not a huge fan of beans and I suspect my nephew isn't either. And they never knew it was hiding in their pizza.
We used regular mozzarella on this pizza. I was completely out of my non-dairy casein free Daiya cheese. I knew better. In hindsight the next time this happens, I'll just leave a few slices cheese-less so my tummy will be happy. My tummy was not happy. I think just this once though, it was worth it to watch my nephew create that happy smile on our delicious almond flour crust pizza.
My tummy has since forgiven me.
Gluten Free Almond Four Pizza Crust
Adapted from The Comfy Belly
(Free of gluten, soy, casein, yeast, and grains)
Printer-friendly recipe.
Makes 1 large 12"-14" thick pizza crust -or- 2 medium sized gluten free thin crust pizzas.
Dry Ingredients:
2 cups almond flour
1/2 teaspoon salt
1/4 teaspoon baking soda
1 teaspoon oregano
1 teaspoon garlic powder
1 teaspoon basil
Wet Ingredients:
3/4 cup mashed white beans, such as navy beans or cannellini beans
3 eggs
3 tablespoons olive oil
Directions:
- Preheat oven to 350 degrees. Line a 12" round pizza pan with parchment paper.
- In a large bowl mix all dry ingredients together.
- Make a well in the center of the dry ingredients and add all the wet ingredients.
- Mix the wet & dry ingredients together thoroughly. You will have a very wet dough.
- If you're making two pizzas split the dough in half.
- Spread the dough in a circle on the parchment paper with a spatula. It may help to wet the spatula with water or spritz it with non-stick cooking spray to keep the dough from sticking.
- Pre-bake the dough in the preheated 350 degree oven for 10-12 minutes until they are golden brown.
- Add toppings and bake an additional 10-15 minutes until your toppings are cooked through or melted.
- Cool pizza for about 5 minutes and then serve!
- Enjoy!
Subscribe to:
Posts (Atom)
This work is licensed under a Creative Commons Attribution-Noncommercial-No Derivative Works 3.0 Unported License