Showing posts with label Kid-Friendly Food Fridays. Show all posts

Monday, August 30, 2010

Gluten Free Homemade Marshmellows by Zoe of Z's Cup of Tea

Today's guest post is written by Zoe of  Z's Cup of Tea. Zoe is a gluten free Canadian teen blogger who loves to cook. Her recipe today is for homemade marshmallows that are sweetened with honey. I can't wait to give these babies a try when I get back from Seattle! Please visit Zoe and thank her for filling in for me! 


My early attempts at marshmallow-making were dismal. Two years ago I tried making marshmallows using honey, gelatin, and egg whites in accordance to the Specific Carbohydrate Diet or SCD (a diet that was originally designed to cure celiac disease by eliminating all grains and starches, with honey as the only sweetener allowed. It has also been found to help with other gastrointestinal or autoimmune diseases including Chron’s, IBS, and colitis, and has also found popularity in the autism community for its success-oriented results.) I baked the marshmallows, in an effort to cook the egg whites so they wouldn’t be raw and though they firmed up in the fridge, they weren’t marshmallows in the least.

November of last year I tried making marshmallows again at the behest of my little brother, using a Martha Stewart recipe and replacing the corn syrup with honey, which I documented on my blog at the time. My brother was reading Calvin and Hobbes comics and he wanted to be like Calvin, having hot chocolate with marshmallows when he came inside from playing out in the cold. Those marshmallows didn’t really work out either. I remember feeling distinctly discouraged at the time because a) they didn’t work out when I felt they should have and b) every recipe I saw used a stand mixer - a kitchen appliance that I do not own - and every piece of marshmallow-making advice I found online generally said that it was next to impossible to make marshmallows without one.

I’m a determined person and I endeavor to be a perfectionist about what I do for lack of a better word, so I wasn’t going to let up easily on marshmallow-making but I decided, after that attempt, to take a bit of a break.

Eight months later after my marshmallow disaster, I discovered a recipe for marshmallows that were made without corn syrup. I was excited. This recipe, too, used a stand mixer but I decided that I would try to mix it with my own girl power, since I was already whipping egg whites to stiff peaks by hand. (The Martha Stewart recipe I’d attempted I had mixed alternately by hand and with an electric hand or stick blender.)

These marshmallows worked. Pouring in the syrup into the gelatin with one hand while whisking with the other simultaneously, I whisked with hardly a break and slowly but surely the marshmallow came together: it became that opaque white, it congealed, it thickened... it was true marshmallow! I called my siblings and we all crowded around the bowl, oohing and aahing over it. Instead of corn syrup, agave nectar was used; it also used sugar, but for my next try I didn’t use the sugar and it still worked out. In fact, without the sugar, I noticed the marshmallow set much faster: I’m not a scientist and only have a basic understanding of food science, though I suspect that the crystals in the refined sugar slowed the marshmallow setting. The marshmallow made without refined sugar didn’t stick to the bowl or make strings everywhere either - making clean-up much easier.


I also found out that marshmallows can be made with honey also, after I took the plunge again in response to a reader’s question about if honey would work instead of the agave. (It was asked if maple syrup could also be a possible substitution, though as of this time, I haven’t yet made marshmallows with maple syrup.) To be truthful, I had my doubts about it working, based on my past experiences with using honey in marshmallow as I’ve already described, but my perseverance paid off in the end and I can show that marshmallows can be still be made even if you don’t have a stand mixer.

Gluten Free Marshmallows, Sugar & Corn Syrup free
Originally posted at Z’s Cup of Tea
  • Because I don’t have a stand mixer, as I have already stated, my instructions are written for mixing the marshmallow by hand. Do not feel obligated, however, to do it by hand if you have already have a stand mixer. The marshmallow tends to splatter a bit, so I recommend wearing an apron or something over your clothes so they don’t get dirty. 
  • There is no need to coat the marshmallows as they don’t stick, although you can if you wish to. Use toasted coconut flakes for coating if following the Specific Carbohydrate Diet. 
This makes a small amount of marshmallows, so increase the recipe as needed.
Makes 18 (1-inch) marshmallows, using a square 6” by 6” pan or dish

Ingredients: 
1 1/2 tablespoons gelatin
1/2 cup ice cold water
1/2 cup agave nectar or honey
1/8 tsp. salt
1/2 tsp. vanilla extract

Method: 
Chill a large mixing bowl and balloon whisk (the bigger the better) in the freezer for a few minutes, or longer. Soften the gelatin with half the water (1/4 cup) in the chilled bowl.

Cook the remaining 1/4 cup of water, agave nectar or honey, and salt over medium heat, covered, for 3 minutes. Increase heat slightly to bring it to a gentle boil. If using agave syrup, cook until it registers 235 to 240 degrees Fahrenheit on a candy thermometer. If using honey, cook until it registers 200 degrees Fahrenheit on a candy thermometer.

Pour the syrup slowly, in a steady stream, into the softened gelatin, whisking gently at the same time. When all the syrup is poured in, increase your speed and mix vigorously. It will start frothing and soon become white, although it will still be thin at this point. Keep whisking and it will gradually thicken. (I made a video demonstrating this.) At some point during the mixing, as the marshmallow gets thicker, you may wish to switch to a smaller balloon whisk for better dexterity and ease of control.

When the marshmallow has reached a stage similar to smooth, soft peak meringue (but bouncier), add the vanilla extract and whisk for about a minute or two longer. If using honey, you will have to mix it longer than if you were using agave nectar. Marshmallow sweetened with honey won’t be as thick, initially after finishing mixing, as agave-sweetened marshmallow but it will continue to thicken as it sets.

Scrape the marshmallow with a rubber spatula, preferably flexible, into a small square 6” by 6” inch pan or dish lined with wax paper or parchment paper. Spread evenly. Cover with plastic wrap and wait until fully set (if it’s a hot day, storing it in the fridge may help). To test if it’s set, touch the surface with your fingertip: it shouldn’t stick to your finger at all, without any marshmallow left on your finger. When the marshmallow is set, turn out on to a plate and use a length of dental floss to cut into squares. A knife may also be used for this, but the dental floss will ensure more smoothly cut marshmallows. Enjoy!
  • Zoe's marshmallows sweetened with agave nectar originally posted here.
  • Zoe's marshmallows sweetened with honey originally posted here.
Zoe of Z’s Cup of Tea is a passionate foodie: a term she uses endearingly to describe herself and her gastronomic interests. She started cooking and baking gluten-free, dairy-free, and Specific Carbohydrate Diet (SCD) friendly foods for her brother recovering from autism and shares her recipes on her blog.
Pin It!

Monday, August 2, 2010

Gluten Free Almond Flour Pizza Crust Recipe


The kid may not like peanut butter, chocolate, chocolate chips, lettuce, or most vegetables... but he loves pizza. I'm not sure if there are too many kids who don't.

While Chris was at our house, most of his meals were gluten free... simply because I just won't buy things with gluten. It's a scary monster that I don't want in my kitchen. My husband is very lucky that I still let him buy "regular"  wheat bread and cereals... or maybe I'm the lucky one, since he puts up with me! Yes. It's most definitely the latter.

One afternoon we decided to make pizza. And not just any pizza. Pizza made primarily from almond flour. Amazingly I told Chris it was just pizza, and he didn't even question what the crust was made of. Score one for the aunt.

I've been using almond flour in most of my recent baking. It's low glycemic and it's easier on my blood sugar than using a lot of gluten free grains and starches.


This is how the crust turned out. It was beautiful. I almost reached for a tissue. I was proud! I made a thick crusted 12" pizza with this dough, but I think next time, I would split this dough in half and make two thin crust pizzas. The crust was golden & crusty on the outside, and soft and pliable on the inside.

It made a perfect gluten free pizza. No one complained. Even the husband ate 3 pieces. And they had no idea that it contained something healthy other the almond flour.

White beans. Cleverly hidden little mashed white beans for some extra fiber and just because I wanted to see if it would work. My husband is not a huge fan of beans and I suspect my nephew isn't either. And they never knew it was hiding in their pizza.


We used regular mozzarella on this pizza. I was completely out of my non-dairy casein free Daiya cheese. I knew better. In hindsight the next time this happens, I'll just leave a few slices cheese-less so my tummy will be happy. My tummy was not happy. I think just this once though, it was worth it to watch my nephew create that happy smile on our delicious almond flour crust pizza.

My tummy has since forgiven me.


Gluten Free Almond Four Pizza Crust 
Adapted from The Comfy Belly
(Free of gluten, soy, casein, yeast, and grains)
Printer-friendly recipe

Makes 1 large  12"-14" thick pizza crust -or- 2 medium sized gluten free thin crust pizzas.

Dry Ingredients:
2 cups almond flour
1/2 teaspoon salt
1/4 teaspoon baking soda
1 teaspoon oregano
1 teaspoon garlic powder
1 teaspoon basil

Wet Ingredients:
3/4 cup mashed white beans, such as navy beans or cannellini beans
3 eggs
3 tablespoons olive oil

Directions:

  1. Preheat oven to 350 degrees. Line a 12" round pizza pan with parchment paper
  2. In a large bowl mix all dry ingredients together.
  3. Make a well in the center of the dry ingredients and add all the wet ingredients. 
  4. Mix the wet & dry ingredients together thoroughly. You will have a very wet dough. 
  5. If you're making two pizzas split the dough in half. 
  6. Spread the dough in a circle on the parchment paper with a spatula. It may help to wet the spatula with water or spritz it with non-stick cooking spray to keep the dough from sticking. 
  7. Pre-bake the dough in the preheated 350 degree oven for 10-12 minutes until they are golden brown. 
  8. Add toppings and bake an additional 10-15 minutes until your toppings are cooked through or melted.
  9. Cool pizza for about 5 minutes and then serve!
  10. Enjoy!
Pin It!

Monday, July 26, 2010

2 weeks with the kid...


Over the past week my husband and I have had our 6 year old nephew staying with us. It's been both a fun and challenging ride for us and for Chris.

For one thing, I'm not sure how moms in general blog. Where do you find the time?

My husband says our house (which seemed small before) seems absolutely tiny now. If we ever have kids he says we have to get a bigger house and a dishwasher and 4 bathrooms. 4 bathrooms hon?

I have learned that this once unpicky kid will not eat on command. EAT IT... that doesn't work. And don't tell him it's good for him. That doesn't work either.

I have learned that he can eat gluten free without knowing it and he likes it anyway!

I've learned that kids need to not only come with an instruction manual, but a first aid kit. So far we've had 2 nosebleeds, a bunch of scrapes and scratches, lots of bandaids, and a bad cut on the forehead from accidentally falling. A cut that nearly caused this aunt & uncle to have a panic attack, not only from worrying about the cut & the kid, but worrying that the kid's mom will have our heads for letting her child get hurt.

I've learned that hearing bedtime stories read by your husband can really melt your heart.

Every day is filled with giggles, sneaky smiles, bananas (which is a SNACK by the way, NOT dessert), and sticky hugs & kisses.

While this kid decidedly doesn't want to eat lettuce, he'll eat carrots, bacon, and macaroni and cheese like it's going out of style.

Meals with the kid this week have been simple & kid friendly and actually quite nutritious:
  • gluten free mac & "cheese" made with Daiya (so it won't hurt my tummy) carrot sticks, and apple slices.
  • pizza made on a gluten free almond flour crust (recipe to come!) with fresh watermelon as a side.
  • a very simple homemade chicken soup: homemade chicken stock, chicken, a little brown rice, salt & pepper, carrots, and celery.
  • the kid's favorite ham & provolone (the round cheese per Chris) sandwiches, made of course with mustard & ketchup. And served on almond flour bread. (He said they were delicious sandwiches!)
  • gluten free spaghetti noodles with homemade "loaded with veggies" spaghetti sauce made from our CSA box earlier this summer. The sauce was so chock full of zucchini, squash, mushrooms, tomatoes, and peppers, we didn't even serve additional vegetables, which the kid thought was a super cool treat.
  • Saturday morning breakfast: homemade oatmeal from Bob's Red Mill GF rolled oats. This kid devoured two bowls of homemade gluten free honey & cinnamon oatmeal and declared we needed to make it for dinner! I was so excited he enjoyed this!
  • Treats & Sweets: a cinnamon variation of these almond flour cookies have been a huge hit, along with cinnamon toast (the kid likes cinnamon & vanilla... must be genetic!) made from almond flour bread. Bananas are a popular snack, we've been through more bananas than I probably eat in 2 months!
We have another week with the kid and I have to admit despite feeling exhausted from all the activities we're squeezing in during the week I'll really miss him!

I hope we can make this a summer tradition with our nephew and I'll share more about the kid-friendly meals & snacks & breakfasts we make in the upcoming week.

What are your favorite gluten free kid-friendly meals and snacks?

The winners from our 30 Days of Gluten Free Quick & Easy Meals Giveaway will be announced soon!


Pin It!

Wednesday, May 19, 2010

Raw Apple & Banana Sauce Recipe


I used to be an applesauce fanatic. During college I constantly bought those little cups of pre-portioned apple sauce servings. It seemed like a frugal option at the time. (And hey, I always reused the cups, so I figured that justified the purchase! :-)

But especially in the last year I've become very wary of extra ingredients (either for flavor, color retention, or longer shelf life) that are added to storebought canned & jarred goods. I was reminded of this when I stopped by the grocery store today to pick up a few things for my husband who has a bad bout of the stomach flu. I looked at the jar of unsweetened applesauce and I noticed while it didn't contain added sugar, it did contain erythorbic acid, a type of ascorbic acid or in layman's terms: manufactured Vitamin C. A food additive used to preserve color in canned goods.

Vitamin C is a really good thing. Especially when you are trying to build immune health! But to get Vitamin C in the form of an extremely processed food additive isn't the best way. I worry about how this additive was manufactured. What it was made from? Where did it come from? Will it be metabolized the same way that natural Vitamin C is in our body. I don't know.

I looked at the jar of applesauce and decided I could do better than that. How hard would it be to go home and throw a regular apple in the blender and make a raw applesauce without any super processed additives? It wasn't hard at all.

From now on when I need applesauce I won't be buying it in a jar. This was so easy to prepare and so delicious!

So often we choose what we think is the faster way to make food. The easier way. The way that's most convenient. Yet, so often it can be just as easy & convenient to make at home.

If you've never made a raw applesauce (which you could also just consider an apple smoothie!) I really suggest you give it a try. I love that you don't waste any of the apple. Simply remove the seeds & core and toss in the rest, skin and all! (Note: If you have a Vitamix - you lucky duck- just toss in the whole fruit!)

Voila... instant, raw, healthy, delicious, vegan, naturally sweet & gluten free applesauce!


Raw Apple & Banana Sauce
An "unrecipe" by: Carrie Forbes @ Gingerlemongirl.com
Free of gluten, dairy, soy, eggs, sugar, and a ton of other completely unnecessary things!

Printer friendly recipe.

3 large apples, any variety, preferably organic, cored & cut in large pieces
1 banana
1 pear, cored and cut into large pieces
1/2 cup water (may not be needed if you own a Vitamix)
1-2 tablespoons fresh lemon juice

In your high-powered blender (or your Vitamix and I'm seriously jealous if you have one) add cut up apples, the banana, and the cup up pear pieces. With regular high powered blender: add water & blend with fruit. Blend on highest speed until smooth and the consistency of applesauce. Pour apple & banana sauce into a jar and stir in lemon juice. (The lemon juice will help to retain the light color of the sauce.)

Serve applesauce chilled with cinnamon sprinkled on top!

**In a Vitamix you MAY be able to leave out the additional water needed to help blend the sauce. In my high-end (but not a Vitamix) blender, I needed the water to help break up the fruit and blend into a smooth consistency.
Pin It!

Thursday, May 6, 2010

Gluten Free, Vegan Chocolate Cake Recipe


It took a great deal of restraint not to make another "trial" run of this cake tonight. I really think I could eat it for dinner.

My wonderful friend Clara started making a vegan version of my original gluten free Everyday Chocolate Cake for her husband's co-workers. She said the cake was always completely demolished by her husband's friends.

I decided to try the vegan version of the cake late last year when I was trying a vegan diet for a few months. Clara's right on the money... it's great veganized!

Who needs eggs to bake a good cake?

The cake is slightly more dense than a baked good made with eggs, but that just adds to the wonderful chocolately goodness of this gluten free cake.

I love being able to bake without eggs. Not only is it easier on your wallet and a very frugal option, it's also great to be able to get all your ingredients out of the pantry. It's also a great skill to be able to bake for people with multiple food allergies or for people who choose to follow a vegan or vegetarian diet!

Many thanks to Clara, of Six Food Intolerance Living for helping me learn how to remake my Everyday Chocolate Cake. You rock Clara girl!


Gluten Free, Vegan Chocolate Cake

(Free of gluten, soy, dairy/casein, & eggs)
Created by Carrie Forbes @ Gingerlemongirl.com
Adapted to be vegan by Clara Ogren, Six Food Intolerant Living

Printer-friendly recipe.

Dry Ingredients:
1/3 cup brown rice flour
1/3 cup arrowroot starch -or- tapioca starch
1/3 cup sorghum flour
1/4 cup unsweetened baking cocoa
1/2 teaspoon xanthan gum
3/4 cup sugar
2 teaspoons baking powder
1/4 teaspoon baking soda

Wet Ingredients:
3/4 cup rice milk -or- almond milk
1/4 cup canola oil -or- melted coconut oil
1/2 teaspoon vanilla
1/2 cup applesauce

Optional Add In's:
1/4 cup allergen free chocolate chips (Clara says the chocolate chips really MAKE this cake!)

Directions:
Preheat oven to 350 degrees. Spritz an 8" cake pan with non-stick cooking spray or grease with canola oil. Alternately you can line a cake pan with parchment paper to make sure the cake doesn't stick to the pan. In a large bowl whisk together all dry ingredients and set aside. In a smaller bowl blend together all wet ingredients. Mix wet ingredients into dry ingredients. Fold in chocolate chips. Pour batter into greased or parchment paper lined cake pan. Bake cake for 18-25 minutes. Test the cake for doneness with a toothpick or a butter knife. If the toothpick or knife comes out clean after being inserted in the middle of the cake, it's done. Make sure not to over bake. Allow the cake to cool before frosting with your favorite icing. This recipe also makes 12 regular sized cupcakes.
Pin It!

Friday, April 9, 2010

Gluten Free Peanut Butter Honey Cookie Recipe (Casein Free, Soy Free, Egg Free)


Is there anything better than a good peanut butter cookie? My husband doesn't think so. He actually asked for these over chocolate chip cookies the other day. I checked his forehead to make sure he didn't have a temperature. No worries, he's okay...

These cookies are another venture into egg free baking. As I've found so far, cookies are extremely forgiving... and honestly it's so easy to make them without eggs. Plus when you use a ground flax seed "egg replacer" you get some amazing benefits from the wonderful fiber and the healthy omega 3 fatty acids that are in the natural oils of flax seeds. For more information on the benefits of adding ground flax seeds into your diet, please visit this site.


Peanut butter cookies were one of the first cookies I learned how to make as a child. I remember bringing them to many a church potluck. This version is actually modified from the recipe that I used as a girl.

Spring is here and I'm planning on featuring a delicious array of easy recipes using fresh summer fruits and vegetables. What are your favorite things to make during the spring and summer? Do you have any recipe requests? Please share your thoughts in the comments on these cookies and on recipes you'd like to see this spring and summer.


Gluten Free Peanut Butter Honey Cookies
Created by Carrie @ Gingerlemongirl.com
(Gluten Free, Soy Free, Casein Free, Egg Free)

Printer-friendly recipe

Wet Ingredients
1/3 cup coconut oil
1/2 cup all-natural peanut butter
1/2 cup sugar
1/4 cup honey
1 tablespoon ground flax seeds mixed with 4 tablespoons hot water, set aside to let gel

Dry Ingredients
1/3 cup sorghum flour
1/3 cup brown rice flour
1/3 cup arrowroot starch
1/4 cup potato starch
1/2 teaspoon baking soda
1/2 teaspoon baking powder
1/2 teaspoon xanthan gum

Directions
Preheat the oven to 375 degrees. Line two cookie sheets with parchment paper and set aside. In a large bowl mix coconut oil, peanut butter, sugar & honey together until very smooth. Add in the gelled ground flax seed mixture. Set aside. In a medium bowl whisk together all dry ingredients. Fold the dry ingredients into the wet ingredients and stir well. Scoop about a tablespoon of dough into your hands and roll the dough into a ball. Place balls onto the cookie sheet. With a fork flatten the peanut butter cookies. Place in preheated oven and bake for 7-9 minutes until cookies are golden brown on the edges. Remove from oven and allow to cool on the cookie sheet for about 5-10 minutes before moving to a wire cooling rack. Eat & Enjoy!
Store cookies in an airtight container, if there are any left to store! :-)
Pin It!

Wednesday, March 24, 2010

Soft, Chewy, Gluten Free Chocolate Chip Cookies


I’ve been experimenting with creating a lot of egg free recipes lately. I like being able to have the flexibility to bake egg free. Gluten free can be a challenge, but I think egg free is an even greater challenge and it’s fun to see what can happen in my kitchen without using eggs.

Today’s chocolate chip cookies are a little edgy. They are soft, chewy, and prone to be overeaten.

I’ve been using honey a lot in my baking lately and one truly nice thing about honey is that makes cookies soft and delicious.

Honey is a humectant. It help to keep baked goods moist naturally. I like that.

I adapted this recipe from a basic chocolate chip cookie recipe in the old Betty Crocker standby. The thing I love about converting “regular” recipes is that you have to be creative. Try what works. Use what’s in your pantry. See what happens.

I think you’ll like how these cookies turned out. They are not super crunchy on the outside like my favorite chocolate chip cookies, but these are perfect for those of you who want a chewy, soft throughout cookie!

The combination of using a “flax egg” (1 tbsp. ground flax seeds mixed with 3 tbsp. HOT water & set aside to gel) + the addition of honey in these cookies creates the chewy texture and soft mouth feel.

Feel free to substitute raw honey, agave nectar, or even molasses in place of the honey used in this recipe. I think molasses would add a raw kiss of spunk to your cookies!

Enjoy!


Gluten Free Soft & Chewy Chocolate Chip Cookies
Gluten Free, Casein Free, Egg Free, Soy Free, Corn Free
Created by Carrie Forbes @ www.gingerlemongirl.com

Printer-Friendly Recipe

Preheat oven to 375 degrees.

In the bowl of your stand mixer or in a large mixing bowl add:
  • 1/3 cup coconut oil
  • ½ cup + 2 tablespoons granulated sugar
  • 2 tablespoons honey
  • 1 teaspoons vanilla
Thoroughly mix the above ingredients until they are “creamed” together using the paddle of your stand mixer or by hand, using a fork.

In a small bowl mix together your "flax egg" (or use 1 large egg):
  • 1 tablespoon ground flax seeds
  • 3 tablespoons HOT water (I generally use boiling water, I think it helps the flax to “gel” better)
Let this mixture set aside for 5 minutes to “gel.” Once “gelled” mix into your wet ingredients.

In a medium sized bowl whisk together the following dry ingredients:
  • 1/3 cup sorghum flour
  • 1/3 cup brown rice flour
  • 1/3 cup arrowroot starch
  • ¼ cup potato starch
  • ½ teaspoon baking soda
  • ½ teaspoon xanthan gum
  • ¼ teaspoon salt
Slowly add the whisked dry ingredients into your wet ingredients.

Lastly fold in:
  • 1 cup allergen free chocolate chips
  • *Optional: 1/4 cup gluten free rolled oats

Drop cookie batter by teaspoons onto a cookie sheet that has been lined with parchment paper or a silpat mat. Bake for 8-10 minutes until cookies have spread into a 2-3” diameter and are golden brown on the edges. Remove cookies from oven and allow to cool on pan for 2-3 minutes. Move cookies to wire cooling rack until completely cool. Store in an airtight container. Makes 24 (2-3”) cookies.
Pin It!

Monday, January 11, 2010

Easy Banana Pudding Recipe (Gluten Free, Casein Free)


To my knowledge, I'm not sure that I ever had banana pudding growing up. My dad will probably read this and call me immediately and remind me of all the times that I had banana pudding, but I honestly don't remember it!

I do know that when I moved to Eastern NC, suddenly banana pudding was everywhere. At every special meal with my husband's family, at Thanksgiving, Christmas, summer picnics, barbecues, and every restaurant around... seriously. Everywhere. Because of this my husband is something of a banana pudding connoisseur.

3 years ago I had to give up banana pudding. It's made with "real" (read that: gluteny name brand "Nabisco") vanilla wafers (don't you dare make it with the cheapie store brand cookies... Michael knows...), real homemade vanilla pudding (although Jello-brand instant will suffice when Michael's mom is short on time), bananas, and topped with cool whip or a beautifully baked egg white meringue topping.

So between the gluten-filled cookies and the milk-based pudding: traditional, eastern NC banana pudding would just be a recipe for disaster for this sensitive gluten free, casein free tummy.

Over the holidays I really wanted to make gluten free, casein free banana pudding. Not just for me, but for Michael.


Since I've never been able to make pudding successfully from scratch, I decided to use 2 packages of Dr. Oetker's Organic Vanilla Pudding mix. This made 4 cups of pudding, enough for a small assembled banana pudding. The dry mix is gluten free and casein free. In place of the milk called for to create the pudding, I used a mixture of half vanilla hemp milk and half lite coconut milk. (This is a cooked filling and it will need to be chilled at least 8 hours before using in the assembled pudding.) I made the vanilla pudding at night, chilled it, and then assembled it with the cookies and bananas the following day.


For the vanilla wafers, I decided to use Mi Del Arrowroot Animal Cookies. Do be aware that while these are gluten free cookies, they are made with soy flour. (One more reason to double check that food label when you are at the store! *sigh*) However, there are several other brands of vanilla gluten free cookies that would work perfectly for banana pudding!

I skipped the traditional topping of cool whip or meringue on this easy pudding. I realized it didn't really need it, and honestly we enjoyed this banana pudding just as much without it. Sometimes keeping it simple is the best thing to do! Enjoy!


Easy Gluten Free, Casein Free Banana Pudding

3-4 slightly ripe bananas, sliced
2 packages gluten free vanilla pudding mix
2 cups vanilla hemp milk (for pudding)
2 cups lite coconut milk
1 (8 oz.) package gluten free, casein free arrowroot cookies -or- other gluten free vanilla cookies of your choice, reserve 1/4-1/2 cup cookies for crumbling on top of casserole.

Cook the vanilla pudding using the vanilla hemp milk and lite coconut milk according to package directions. Chill the pudding overnight or for at least 8 hours.

To assemble the pudding: In a small 1-2 qt. casserole dish layer cookies, then banana slices, and then pudding. Repeat.

Crush 1/4 -1/2 cup of the arrowroot cookies and sprinkle on top of the last layer of pudding. Feel free to add a final layer of cool whip, whipped cream, or you can even bake a simple meringue topping on top of the banana pudding (and chill afterwards).


** If you want to make homemade gluten free casein free vanilla pudding try this recipe from The GF/CF Experience.


**If you are up for making homemade gluten free vanilla wafers, you may want to try this recipe.
Pin It!

Friday, August 14, 2009

Chicken Pot Pie Recipe - Gluten Free, Casein Free, Soy Free


Is there anything that screams comfort food more than a chicken pot pie? My favorite chicken pot pie is this one, but since we don't eat dairy/casein anymore I haven't had the time to revise the recipe to leave out butter.

I remember in my old gluten-filled days I used to often make a chicken pot pie with a biscuit crust and I wondered if I could do the same with almond flour. I love almond flour because it is a high protein, low carbohydrate flour and it really works well in gluten free baking.

So after getting a little inspiration from Elana's new book (which you MUST buy if you love baking with almond flour!) I created this recipe for chicken pot pie.

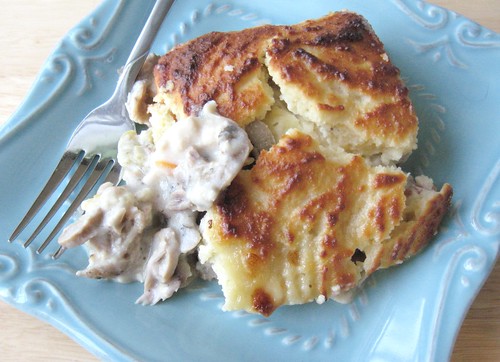
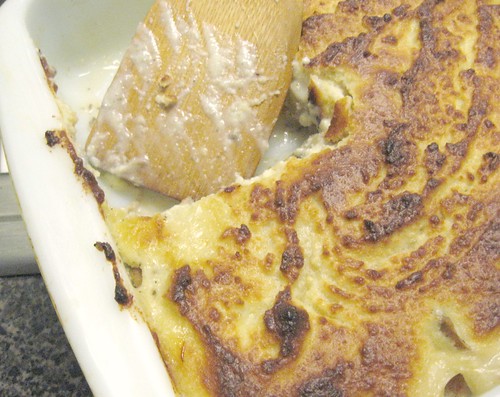
It takes a little time to make the dairy free/casein free sauce to go over the chicken, but the biscuit topping is a cinch to make using almond flour and it turns out a beautiful golden crust. We LOVED this casserole and it will be in our menu rotation, especially as we enter into fall in the coming weeks! (And fall cannot get here SOON enough!)

Please don't let the long list of ingredients scare you away! This is really a very simple recipe to make and you can easily make the gluten free white sauce and the biscuit topping ahead of time if you need to!


Chicken Pot Pie with a "Buttermilk" Biscuit topping

Created by Carrie @ www.gingerlemongirl.com
(Free of gluten, dairy/casein, and soy)
*Inspired by Elana's biscuit recipe in her new book*


"Buttermilk" Biscuit Topping Ingredients:

2 1/2 cups blanched almond flour
1/2 teaspoon salt
1 teaspoon baking powder
1/4 cup melted coconut oil -or- olive oil
1 teaspoon sugar
2 large eggs
1/4 cup unsweetened hemp milk -or- other non-dairy milk
2 teaspoons lemon juice

Directions:
Whisk together almond flour, salt and baking powder in a large mixing bowl. In a smaller bowl mix together oil, sugar, eggs, hemp milk, and lemon juice. Mix wet ingredients with dry ingredients and set aside. The mixture should resemble a wet cake mix.


Gluten Free, Casein Free White Sauce recipe for pot pie:

4 tablespoons sweet rice flour
2 cups unsweetened hemp milk
salt & pepper, to taste
1/2 cup drippings from roasted chicken -or- 1/2 cup chicken broth
1-2 teaspoons granulated gluten free chicken bouillon

Directions:
Melt dripping from roasted chicken in a large saucepan. In a glass measuring cup whisk hemp milk and sweet rice flour together. Add to saucepan with chicken drippings or chicken broth. Add salt and pepper to taste and granulated chicken bouillon. Cook on medium heat for 5-10 minutes, whisking constantly until mixture is thick like a cream soup or gravy consistency.


Assembling the Chicken Pot Pie:

2-3 cups roasted chicken, cut or torn into bite size pieces
1 small can button mushrooms, drained
1 (12 oz.) can mixed vegetables, drained
1 recipe Gluten Free, Dairy Free White Sauce (see above)
1 recipe "Buttermilk" Biscuit Topping (see above)

Directions:
Preheat over to 350 degrees. Grease a large and deep 9x13" casserole dish. Place chicken in the bottom of the greased casserole dish. Pour mushrooms and vegetables evenly over chicken in the baking dish. Pour prepared gluten free white sauce over the chicken and mix to combine throughout casserole. Finally spoon the "Buttermilk" biscuit topping over the casserole evenly. (I like to use a rubber spatula that has been rinsed with water to spread the biscuit topping over the casserole.) Bake the casserole for 25-30 minutes until biscuit topping is golden and crusty. You may need to set the oven on the "broil" setting for about 3 minutes to get a nice golden crust, just make sure to watch the time so you won't burn the casserole!

Let cool for 5-10 minutes and serve with a simple green salad!

Printer-friendly version.


Carrie's Cooking Notes:
  • The biscuit topping should be "wet" enough to easily spread over the casserole. The longer the topping sits, the more the almond flour will soak up the liquids. Feel free to add additional non-dairy milk or water until the batter will spread easily.
  • I think the biscuit topping tastes almost like a "sourdough" topping on this pie! Almond flour is slightly sweet, so feel free to leave out the sugar called for in the biscuit topping. You can also use any type of non-dairy milk you like. Although I love the texture, taste, and feel of hemp milk!
  • The White Sauce: I LOVE this gluten free/dairy free white sauce! This recipe is very versatile and you can add the flavors and seasonings of your choice. Hemp milk really is a wonderful choice in this sauce because it has such a mild flavor. Feel free to use other non-dairy types of milk, but I think the hemp milk gives the best overall flavor to the sauce.
  • If you don't have a roasted chicken available, simply boil several chicken breasts and cut them up for the pie or use canned chicken!
Pin It!

Friday, July 17, 2009

Gluten Free Snickerdoodle Cookie Recipe


When I was a little girl “snickerdoodles” were one of the first cookies I learned how to make. Deliciously simple vanilla cookies with a coating of cinnamon and sugar! I often made snickerdoodles for youth gatherings at church, for my teachers at school, and just for fun.

I’m always looking for ways to make baking gluten free easier and less time consuming. Last week I needed a dessert for a small dinner party and I decided to come up with a recipe for Snickerdoodles using my favorite gluten free master baking mix.

These cookies come together quickly and are a true crowd pleaser! By the end of our gathering last week not one cookie was left! It’s such an easy cookie to make that I’ll be adding them to my list of super easy gluten free desserts! You could add endless additions to these cookies: nuts, chocolate chips, butterscotch chips, peanut butter chips, raisins, you name it!

Healthy? Well, not particularly… but they are really delicious, kid-friendly gluten free cookies!

Perfect for lunch boxes, office gatherings, or just because, these cookies will be sure to please anyone who tries them!


Gluten Free Snickerdoodles
(gluten free, soy free, *casein free)

½ cup Spectrum shortening
3/4 cup sugar
2 eggs
2 ¾ cups Gluten Free Master Baking Mix, or GF/CF Homemade Master Baking Mix (or other leavened gluten free baking mix)
1 teaspoon vanilla

Mixture for dipping cookies in:
3 tablespoons sugar
2 teaspoons cinnamon


Directions:

Preheat oven to 350 degrees. Cream shortening with sugar. Mix in eggs and vanilla. Stir in Gluten Free Master Baking Mix. (You can chill dough to make it easier to work with at this point, but it is not necessary!) Roll dough into 1” balls. In a small bowl mix together cinnamon and sugar. Roll cookie balls in mixture and place 2” apart on a greased baking sheet (or a baking sheet lined with parchment paper or silpat mat). Flatten cookies by using the bottom of a heavy cup or glass that has been covered in the cinnamon/sugar mixture. (Cookies will not spread while baking, so it’s important to flatten them with the bottom of a glass or with a fork!) Bake for 8-10 minutes in 350 degree oven until cookies are golden brown on the edges. Let cool on cookie sheets for several minutes before moving to cooling rack. Store in an airtight container on the counter.

Makes 2 dozen cookies.

(Printer-friendly recipe.)


Carrie's Notes:


  • Make sure to try out my revised gluten free/casein free master baking mix
  • I have not tried these cookies with agave nectar, but I think it would work with only 1/3 cup of agave in cookie dough. 
  • For a different flavor basic cookie, try using almond extract or lemon extract instead of the vanilla called for!
Pin It!

Friday, January 9, 2009

Chocolate Chip Granola Cookies (Gluten Free, Casein Free, Soy Free)


One of the joys of cooking on winter evenings in my kitchen is the fact that no matter how delicious the cookies are, you WILL NOT get a decent picture of them. The lack of good light seems to do that.

So therefore you get a picture of a squirrel in the quaint seaside town of Beaufort, NC. The squirrel says the cookies are very good, and quite healthy and you need to try them even without a picture!

Actually, these cookies look very similar to how mine turned out, so if you really need a picture, there you go.

These cookies are actually a revision of Heidi's cookies. I added an egg and a small amount of natural sweeteners and I varied the fiber and bulk of the cookie.

The past few weeks I have been following a low-carb diet to try to lose some weight and lower my blood pressure. I am not completely sure of the actual carb count of these cookies, but I know they contain a LOT of natural fiber, and other than a few tablespoons of honey and natural sugar from the bananas, they are extremely healthy for you.

Ground flax seeds are a great source of protein, omega 3 fatty acids, natural fiber, and B vitamins. Quinoa also provides additional protein, natural fiber, and a high amount of nutrients such an manganese, magnesium, and iron. Blackstrap molasses also adds potassium, manganese, magnesium, and calcium! These cookies are really an oasis of good nutrition!

I LOVE how they turned out! I have been eating these cookies as my mid-morning snack all week and they are just delicious! If you have a chocolate craving, these cookies will hit the spot. For the chocolate chips I used a 85% cocoa dark chocolate bar cut up into bits. It worked perfectly and I love the texture it added to these cookies.

Enjoy!


I was finally able to get a good picture of these cookies, I think you will really enjoy them! They are chewy and delicious!


Chocolate Chip Granola Cookies
(AKA... pretty darn tasty and healthy cookies! No added refined sugar, gluten free, soy free, and casein free)

Wet Ingredients:
2 large ripe bananas, mashed to oblivion! (about 1 cup of mashed bananas)
1 teaspoon vanilla extract
1 egg
*1/4 cup coconut oil, slightly warmed (will mix better with bananas this way!)
2 tablespoons blackstrap molasses
* 3 tablespoons raw honey (optional -- add if you need additional sweetness)

Dry Ingredients:
*1 cup gluten free rolled oats
*1 cup flaked quinoa
1/3 cup ground flax seeds
1/3 cup unsweetened coconut, finely shredded
1/3 cup almond meal
1/2 teaspoon cinnamon
1/4 teaspoon salt
1 teaspoon baking powder

Possible Add In's:
6 ounces chocolate chips (or a high quality dark chocolate bar cut into pieces)
1/2 cup raisins (optional)
1/2 cup dried cranberries (optional)

Directions:
Preheat oven to 350 degrees. In a large bowl mash bananas, egg, and coconut oil together. Add remaining wet ingredients. Set aside. In another bowl whisk together all dry ingredients, except chocolate chips. Pour wet ingredients into dry ingredients and mix together until thoroughly combined. Mixture will be thick! Fold in chocolate chips and any other add in's that you would like!

Using a spoon, drop mixture by tablespoons on to a greased cookie sheet (or use a silpat mat or parchment paper). Shape the cookies by hand into circular cookie shapes. (Cookies will NOT spread!)

Bake for 12-14 minutes until cookies are lightly browned. Cool on wire racks and store in a tightly sealed container on the counter (if they last that long!)

Makes approximately 30 (2") cookies.

(Printer-friendly version.)

Carrie's Recipe Notes:

-An estimated carbohydrate count is 10 carbs per cookie, if you make 30 cookies. So these are still relatively high in carbs, but they are a nice naturally sweet treat if you are saving carbs for something special. I may to to make another version of these cookies using shredded zucchini and no oats to see if I can make them with very few carbs.

-If you do not have access to gluten free rolled oats you can use 2 cups of flaked quinoa instead (or vice versa.) You can also use puffed millet for part of the amount of either grain.

- The honey is completely optional. There is enough sweetness with the banana, cinnamon, and chocolate chips that you do not really need additional sweetener, but it also adds a nice texture to the cookie dough if you choose to use it.

- If you do not have coconut oil, I suggest using softened butter or a lightly flavored oil such as extra virgin olive oil, or canola oil. Use the same amount.


Pin It!

Saturday, August 2, 2008

Apple Berry Fruit Leather (Gluten Free)


So what do you do with 4 apples that have seen better days and a small pint of strawberries showing their age? Make fruit leather! That's what's you do!

Inspired by a recent post on Simply Recipes, I knew just what to do with my withering fruit.

I didn't exactly follow Elise's instructions, but I was able to figure out how to create these yummy fruit strips with no problems! Make sure to visit her site for a great step-by-step post!

Here is how I made the fruit leather! I've found another great use for my rice cooker! Have fun!!


How To Make Fruit Leather


1. Peel, core, and dice the fruit you wish to use. I used 4 old apples and about 1 pint of very ripe strawberries. Next time I will try to use more fruit since my strips were thinner than I really wanted them to be!

2. I placed all the fruit in my rice cooker with about 1/4 cup of water and set it on the COOK setting for about 1 hour, or until the fruit is REALLY mushy and well done.

3. Next I mashed the fruit together with a potato masher. Once the fruit was all completely combined and mashed, I set it aside to cool for about 30 minutes.

4. Pour the cooled fruit into your blender and puree until the fruit is very, very fine like a smoothie.

5. Line a jelly-pan with plastic wrap. I sprayed the plastic wrap with non-stick spray, but I don't think this is actually necessary. Pour the pureed fruit onto the plastic wrap and spread out until about 1/8th inch thickness.

6. Turn your oven onto 150 degrees and place the pan of fruit in the oven, and leave it there forever. Really. Forever. ;-P

7. Okay, not forever, but you'll leave it there for about 8 hours, or until the fruit leather feels like those fruit-rollups that you used to love as a kid. (Except without all that terrible high fructose corn syrup, preservatives, and food coloring!!! Yay!!)

8. Cut the fruit leather up into strips and serve! Enjoy!!

Have fun and let your kids help out with this!


COOKING NOTES:


- Elise felt the need to add spices and some sugar to the mashed fruit. I found this completely unnecessary. The fruit was sweet enough on it's own and the combination of strawberries and apples was delicious!


- Next time I will definitely use more fruit for a thicker fruit leather. You can find better measurements for fruits on
Elise's post.


Pin It!

Friday, June 13, 2008

Kid-Friendly Food Fridays - Chocolate Fudge Glaze!


Welcome back to Kid-Friendly Food Fridays! We started this weekly event to feature healthy, yummy, delicious, and quick recipes to make for kids! For more information on this weekly event, please visit the Kid Friendly Food Fridays Headquarters! We welcome you to submit recipes and ideas for this feature to gingerlemon_girl at yahoo dot com!


This is my favorite chocolate cake! I made it for the first time as our Easter dessert this year. It was a hit!! We've made the cake several times since and this weekend it will be joining us at the beach! It's easy, fast, and really delicious. It's also fabulously gluten and casein free!


I've been trying to use less dairy in my cooking and baking lately because:

1) I know I've got a lot of gluten free and casein free readers and bakers out there!!
2) I'm trying to lose weight and this happens more easily when cheese is off the menu!
3) I have a sneaking suspicion that dairy doesn't always agree with me, so we're experimenting with casein-free recipes!


A chocolate cake just isn't complete without chocolate icing. This simple EASY recipe for Chocolate Fudge Glaze is one great reason to fore-go the dairy. Coconut milk is used in this glaze/icing and it works beautifully. The "cream" of the coconut milk gives the glaze a beautiful silky appearance. There is no cooking involved in this recipe and your kids could whip this up in a heartbeat!

If you want a thicker frosting simply use more confectioners sugar until you get the consistency you desire. You can also add a couple of teaspoons of coconut oil for a more rich - "buttercream-like" frosting! Enjoy and have fun!


Chocolate Fudge Glaze
(Gluten Free, Casein Free)


2/3 cup coconut milk

2/3 cup baking cocoa
1 teaspoon vanilla
1-2 cups confectioners sugar (depending on thickness you desire!)

Optional Ingredients for a thicker/ "buttercream-like" frosting:
Additional confectioners sugar (about 1 cup)
1-2 teaspoons of coconut oil


Directions:
Mix coconut milk and baking cocoa together. Add vanilla. Slowly add 1-2 cups of confectioners sugar until you reach the glaze consistency you desire. For a more rich, "buttercream-like" frosting, add 1-2 teaspoons of coconut oil and 1/2 cup - 1 cup of additional confectioners sugar until frosting is thick, rich, and smooth. Frost as desired on 12 cupcakes or my favorite chocolate cake!

Store leftover frosting in a tightly sealed glass jar in the refrigerator for up to one week.

For a printer friendly version, click here.
Pin It!

Tuesday, May 20, 2008

How to make Gluten Free Chocolate Chip Cookies - A Step by Step Guide


Okay. I will admit it. When it comes to baking, I am a perfectionist. Especially when it comes to baking something that I think I am especially good at. In today's case: Michael's favorite chocolate chip cookies. This is one of my favorite recipes and one that I am very proud of. I used to make these cookies with wheat flour. When I started the gluten free diet this is one of the first recipes I converted. We love these cookies and it's one recipe I can always count on to turn out well.

I've had many, many compliments on these cookies. I think Gluten Free Steve declared me a friend for life when he made these cookies, and he never fails to make me blush by reminding me how much he enjoys them! I've had many readers of the blog to let me know how much they enjoy them... but for all the people who love them, there are many who said they didn't work.

The biggest complaint is that the cookies spread too much when baking. Another complaint was that they were too salty. Up until this experiment I've never had a problem with these cookies.

Today I will share a tutorial with you on how I make perfect gluten free chocolate chip cookies.


I ended up making 2 batches of cookies because I thought I overcooked the first batch -- they spread! Make sure to keep your eyes open at the end of the post for what happened between the first batch and the second batch of cookies, to see WHY they spread!

A revised gluten free chocolate chip cookie recipe will be included at the end of this post!

One thing to remember is that: all baking is a scientific experiment! Baking is a science and the ingredients have to be measured properly and used properly for the recipe to work. It is also important to follow recipe directions exactly the FIRST time you are making something. That way you have a standard to compare too when you want to experiment!


How to Make Gluten Free Chocolate Chip Cookies


  • First preheat your oven to 350 degrees. USE an oven thermometer to make sure your oven is baking at the correct temperature. This is VERY important! My personal oven underheats by 30 degrees, so I have to adjust for this!

  • Line your cookie sheet with parchment paper or a silpat mat. Then gather together all your ingredients. I completely forgot to take a picture of this, but here's what you will need for the dry ingredients: sorghum flour, brown rice flour, tapioca flour, salt, xanthan gum, and baking powder. Now we are going to measure out the dry ingredients into our bowl.

  • Add 1 1/4 teaspoons baking powder. Make sure to level your measuring spoon. This is very important in baking!


  • Add 1/2 teaspoon of salt. Again, try to make sure it's close to level. The salt is important in chocolate chip cookies because it makes a perfect balance to the sweet chocolate. If you leave out the salt, you'll know!


  • Now add a level 1/4 teaspoon of xanthan gum.


  • Now it's time to measure the flours. With each flour, first OVERFILL your measuring cup.


  • Then, using the straight side of your knife, level off the cup. I pack down the flour as I level off the cup. When you are measuring tapioca flour or any starch, you may have to overfill the cup several times and level off with the knife to make sure you have the correct amount.


  • This is what a correctly measured cup should look like. Very even on the top, level with the lip of the cup. Add your measured flours to the baking powder, xanthan gum, and salt. Some gluten free bakers like Gluten Free Mommy, actually weigh their measuring cups for accuracy. I've never done this, but if you have trouble with your baking, you may want to look into it!


Before whisking


After whisking

  • Next, we will whisk together all the dry ingredients. This is a very important step because whisking will thoroughly mix all of the ingredients together. I definitely recommend DOING this step, if you don't: you may get a clump of baking powder or xanthan gum in one area of your dough, and you'll definitely notice! Your cookies will also bake more evenly if the dry ingredients have been thoroughly whisked together. Now at this point, you could stop and bag your dry mix. You would have a pre-made mix for a batch of chocolate chip cookies! All you would have to do is add the sugar and wet ingredients later! But, I'm hungry... so let's continue with these cookies! Set aside your whisked dry ingredients.


  • In the bowl of your stand mixer add 3/4 cup brown sugar, 1/4 cup granulated sugar, and 1/2 cup butter-flavored Crisco.


  • Use your paddle attachment for mixing and lock the stand mixer into place.


  • Cream your sugars and butter flavored Crisco on medium speed in the mixer bowl. You will mix these together for about 3-5 minutes. You want the mixture truly creamed. Here is what you DO NOT want:


  • Here, the sugar and cream are just barely mixed together. There are still large clumps of sugar and Crisco. This is what you DO NOT want. Often when I made cookies by hand, I thought this was "creamed." Stand-mixers are a baker's best friend!


  • THIS is what your creamed butter and sugar should look like. Light, fluffy, and really creamy. YOU should not be able to tell where the sugar and Crisco separate.


  • Next, add your egg, and 1 1/2 teaspoons of vanilla.


  • Again, we want to then mix them in on medium speed, until you no longer can see wet streaks of egg. The mix should be fully incorporated like this on the paddle attachment:


  • Perfect! That's what you want! The dough should be clinging to the paddle and you should just barely see the sugar granules! Let's continue!


  • Now we are going to add in the dry ingredients to the dough, 1/4 cup at a time.


  • Mix in each addition of dry ingredients completely on medium slow speed. Your finished batter should look similar to this:


  • Use a rubber spatula occasionally to scrape the dough down from the sides to the bottom of the mixing bowl, to make sure it's combined evenly. Once your dough is mixed, it's time for the good part!


  • Ahh... the chocolate chips! These chips are from my assorted chocolate chip bag. The bag that gets all the leftover chocolate chips from random bags. So we have a nice assortment here! Use whatever chips you like best! Enjoy Life sells allergen free chocolate chips.


  • Fold in the chocolate chips by hand, using the rubber spatula. Now it's time to get the lined cookie sheet. Let's make some drop cookies!


  • Using a small spoon get around 1 tablespoon of dough. This does NOT have to be a perfect measurement. If you want bigger cookies use a larger amount of dough, but be aware they will take longer to cook!


  • Drop the dough about 2 inches apart on the silpat mat. This was a large pan so had 5 rows of 3 cookies each. Place into the oven for baking. DO not overcrowd your oven. If you do, the cookies may not bake evenly.


  • Keep an eye on the cookies. YOU DO NOT want them to overbake!! I baked these for exactly 8 minutes.


  • Remove the cookies from the oven, THEY WILL NOT look completely done. That's okay! These are perfect! Allow them to cool on the cookie sheet for about 10 minutes before moving them to the cooling rack. If you do not let them cool, they may fall apart!! The cookies will look puffy and underdone when they come out of the oven! That's good! As they cool they will slightly deflate and harden into their shapes.


  • See the difference, now that the cookies are cool? If your husband or kids haven't eaten all the cookies yet; let them rest on the wire rack until they are COMPLETELY cool. I normally leave them on the rack for at least an hour before moving them!


  • The underside of the cookie should look like this! There will be lovely little air pockets, evenly spaced. The edges will be very slightly brown and crisp!


  • The inside of the cookies are chewy and the chocolate should still be hot and "melty." Mmmmm... Michael says thank you to everyone who had problems with these cookies... he hopes the home experiments will continue! The cookies are now done and you can move them into an airtight container for storage! I have no idea how long they will last since they don't last 2 days at our house.


NOW.... this is the fun part of what I discovered last night!

In my first batch of cookies, I didn't follow this recipe exactly. I was ONE tablespoon short of butter-flavored Crisco, so I added ONE tablespoon of Spectrum non-hydrogenated organic shortening in place. Here is what happened to the finished cookies:


Look familiar anyone?? These cookies spread and they darkened very quickly! Now, these were STILL very good cookies... but that ONE tablespoon of non-hydrogenated shortening caused this to happen to the whole batch! I imagine if you used a gluten free margarine, butter, or non-hydrogenated shortening for the WHOLE half cup called for, the cookies would spread over the whole pan and you'd have one big cookie! Notice a side-by-side difference here:


These cookies (Darker cookie is Batch #1, Lighter cookie is batch #2) were both cooked for exactly 8 minutes on the same pan at the same time. The difference is remarkable!

The only additional difference in the lighter cookie of batch # 2 is that I just used 1 1/4 teaspoons of baking powder and skipped the baking soda called for in the original recipe. This batch of cookies used a whole half cup of butter flavored Crisco. Michael preferred this lighter, chewier batch.


Here is my slightly revised recipe of Michael's Favorite Chocolate Chip Cookies:


Ginger Lemon Girl's BEST Chocolate Chip Cookies


(Before or After going Gluten-Free!)


1/2 cup butter flavored Crisco (NO SUBSTITUTES!!)

1/4 cup granulated sugar

3/4 cup brown sugar

1 egg

1 1/2 tsp. vanilla extract

1/2 cup tapioca flour

1/2 cup sorghum flour

1/4 cup brown rice flour

1/2 tsp. table salt

1/4 tsp. xanthan gum

1 1/4 tsp. baking powder

6 oz. GF chocolate chips


Directions:


Preheat oven to 350 degrees. In a large bowl: cream crisco with sugars until light and fluffy. Add egg and vanilla. In a separate bowl mix together flours, salt, xanthan gum (opt.), baking powder, and baking soda. Slowly add flour mixture to crisco and sugar mixture. Last, mix in chocolate chips. Drop dough by tablespoons, 2 inches apart on an parchment paper -or-silpat mat lined cookie sheet. Bake 7-9 minutes or JUST UNTIL edges are light brown.


(The cookies WILL NOT look completely cooked when you pull them out of the oven! That's what you want! That's part of the secret to these awesome cookies! DO NOT overbake them!)


Let cookies cool on a wire baking rack or the cookie sheet for 5-10 minutes. This will allow cookies to retain their shape for eating!


This recipe doubles easily!


For a printer-friendly version, click here.


** I hope this post helps people make these gluten free cookies better!! I learned a lot from this experiment and this is really what I love about gluten free baking! You only learn when you make mistakes! Embrace them and move on!
Happy gluten free chocolate chip cookie making!!**


Pin It!