Showing posts with label almond flour. Show all posts

Saturday, April 26, 2014

Banana Double Chocolate Almond Flour Donuts (gluten-free, soy-free, dairy-free, and grain free)


Today I woke up to gorgeous sunlight in my kitchen. When that sunlight hits the table just right at about 9am on Saturday mornings it's perfect for taking food photography! I'm no expert, but it's a great time to pull out the camera and practice different techniques and angles. I prefer natural morning light to any other type of light for photography. It just works SO well with food. Of course that means you end up baking a lot of breakfast items to take pictures of! :-)

Charlie thought they looked pretty dang tasty!

I asked Michael what he wanted me to make. He said waffles... except... I'm pretty sure I goodwill-ed the waffle iron in a kitchen purge. It didn't have a dual purpose in life... it just made waffles, so out it went! (This logic makes no sense to my husband! lol) But when you have a tiny kitchen and very limited cabinet space... out goes the waffle maker... but I think I'm getting side-tracked...


So then I started thinking donuts. I made vegan powdered sugar donuts last weekend when we had friends come over for dinner. My friend Heather is also gluten-free and hadn't had donuts in years, so we gladly ate donuts and coffee for dessert! The donuts were still on my mind. Even though, technically, a baked "cake-like" donut is basically a muffin in disguise, it just seems a lot more fun because it's round and has a hole in the center! lol... Funny how life plays little tricks on us like that isn't it! 


Below is the recipe for the donuts I came up with. I based the recipe loosely from the low glycemic chocolate donut recipe I have in my cookbook, "The Everything Gluten-Free Baking Cookbook."  Michael likes chocolate chip anything, so I thought that would be fun to throw in the batter. I also had some bananas that were a bit past their prime, so I used the banana in place of 1 egg and some additional liquids in the original recipe. I also used both almond flour and arrowroot starch, because I think the combination of the two give a great texture for gluten-free baked goods.

Banana Double Chocolate Almond Flour Donuts
--created by Carrie Forbes, author of Gingerlemongirl.com
--adapted from a recipe in "The Everything Gluten-Free Baking Cookbook"
--free of gluten, dairy, soy, and grains
--printer-friendly version

Yields: 6 large donuts

Dry Ingredients:
3/4 cup (81 grams) blanched almond flour
1/2 cup (61 grams) arrowroot starch
2 tablespoons cocoa powder
1/4 teaspoon salt
1/4 teaspoon baking soda
1/2 teaspoon ground cinnamon

Wet Ingredients:
1 large (98 grams) banana
1 large (49 grams) egg
1/3 cup (56 grams) brown sugar
2 tablespoons light tasting olive oil
1 tablespoon pure vanilla extract

Add In's:
1/3 cup (55 grams) chocolate chips

Directions: 
  1. Preheat oven to 350 degrees. Spritz a large donut pan with non-stick cooking spray or grease with coconut oil or butter.
  2. In a large bowl whisk together all the dry ingredients. 
  3. In a smaller bowl mash the banana with a fork until pureed. Stir in remaining wet ingredients. Add wet ingredients to the dry ingredients and stir until you have a wet batter. 
  4. Spoon batter evenly into the donut pan for each donut. You should have exactly enough batter to fill each donut mold/indention about 3/4 full.
  5. Bake for 10-13 minutes until donuts have doubled in size and are crisp and dark brown around the edges. 
  6. Allow donuts to cool in pan for 5-10 minutes before transferring to a wire rack or plate to cool completely. 
  7. IF DESIRED, you can create a white glaze for the donuts by simply mixing 1 cup of powdered sugar with 2 tablespoons water or almond milk. Dunk each donut in the glaze and allow to rest on the wire rack for an additional 20 minutes or so to let glaze harden.  Serve immediately. These donuts are best the day they are made, but will also freeze well. 
Pin It!

Wednesday, March 26, 2014

Light and Fluffy Gluten-Free Pancakes (and a Vegan recipe too!)


Ahhhh pancakes. One of my absolute favorite foods. You know I go through these stages. It might be muffins one month, pizza the next... the past two months? It's been pancakes. I started playing around with ratios back in December or January when I was experimenting with gluten-free sourdough bread. I found the recipe over at "The Art of Gluten-Free Baking" and I was able to make a really good starter that made loaf after loaf of sourdough bread! It was wonderful! Until..... my starter died. Well it didn't die, it started to smell funky and when I tossed it and tried again (and again, and AGAIN...) I never was able to replicate that first starter. I'll try again soon... but I decided maybe it wasn't the right season for sourdough!

So how does this have anything to do with pancakes? I started thinking more about baking ratios. For the first time in months I started feeling creative in the kitchen again and I wanted to play! I know, I know... I'm a little late to the game. I've fought the use of kitchen scales for years because I don't think it's the easiest way to bake in the US. I grew up using cups & teaspoons, my grandmother cooked with cups and teaspoons and her mother before her... why change?


Consistency. Plain and simple. Most often if you follow a ratio, you get good results. And when you're gluten-free and ingredients cost 5x more than "regular" ingredients... you WANT good results. And it just so happened that Michael Ruhlman did too. I read his post on pancake ratios and I was intrigued. I knew I'd have to play around with the additional ingredients to make good gluten-free pancakes... but I bet this would work!

The basic ratio for pancakes is: 
2 parts liquid : 1 part egg : 1/2 part butter : 2 parts flour


Of course you add additional items like a leavener to help the pancakes rise, but basically this is how you create a recipe for pancakes. So.... I made gluten-free pancakes. I made LOTS of gluten-free pancakes! They were so good we had them for dinner twice, and for breakfast the past few weekends... until... (since we're budgeting our money very carefully) I was out of eggs... and butter...


Can you even MAKE good pancakes without eggs or butter?? I wasn't sure to be honest. I had tried them in the past when I was on a vegan diet and I probably tried making them a dozen times and they were each an epic failure.... except then I wasn't using ratios...

Would it still work using ratios?


You betcha! Those pancakes right above here? Yep those! Those are vegan gluten-free pancakes. The very first picture is this post is of the gluten-free vegan pancakes as well! They are THAT tall and fluffy!

Now there are a few catches... I have a sneaking suspicion these pancakes WILL work with different types of gluten-free flours, BUT I have not tried different variations (other than those I list below)... SO if you happen to be allergic to almonds or nuts and can't use almond flour, I do not know what a good substitute would be... however, if you try another flour make sure to use the correct ratio/amount of flour so that the batter will have the same consistency. Also, I did use a scale to get my measurements, but I've also included cup measurements as well. However, be aware that different flours have different weights, so if you use different flours, you need to measure them to get the same weight as the flours I used below.

Light & Fluffy Gluten-Free Pancakes (see vegan version below)
free of gluten and soy
adapted by Carrie of Gingerlemongirl.com
makes 9-10 pancakes
printer-friendly version

Dry Ingredients:
  • 8 ounces gluten-free flour (I use about 3/4 cup brown rice flour, 3/4 cup blanched almond flour, and 1/3 cup arrowroot starch) 
  • 2 tablespoons sugar
  • 2 teaspoons baking powder
  • 1 teaspoon salt
  • 1/4 teaspoon xanthan gum (optional, I think they would work fine without it!
Wet Ingredients:
  • 8 ounces milk or non-dairy milk (I use about 1 cup almond milk)
  • 2 large eggs
  • 4 tablespoons butter (or ghee), melted
  • 1 teaspoon pure vanilla extract
Directions: 
  1. Preheat griddle as directed or place a large heavy-bottomed (well-seasoned cast iron) skillet on the stove. 
  2. In a large bowl whisk together all dry ingredients. Make a well in the center of the dry ingredients and add the wet ingredients. Stir together well to create a thick batter. Allow batter to rest 5-10 minutes before using (can also be made the night before and placed in the refrigerator to make the next morning.)
  3. On the preheated griddle or greased, heated cast iron skillet drop batter 2-3 tablespoons at a time to make 2-3" pancakes. Cook each pancake for about 2 minutes on medium-high heat. When the pancake has cooked through on one side, the edges will appear dry and you will see bubbles come up through the batter and pop when the first side is done. Flip pancake and cook an additional 1-2 minutes until the underside is golden brown. Serve pancakes hot with butter and pure maple syrup or molasses. 


Light & Fluffy VEGAN Gluten-Free Pancakes
free of gluten, dairy, eggs, soy, and animal products
adapted by Carrie of Gingerlemongirl.com
makes 9-10 pancakes
printer-friendly version

Dry Ingredients:
  • 8 ounces gluten-free flour (I use about 3/4 cup brown rice flour, 3/4 cup blanched almond flour, and 1/3 cup arrowroot starch) 
  • 2 tablespoons sugar
  • 3 teaspoons (1 tablespoon) baking powder
  • 1 teaspoon salt
  • 1/4 teaspoon xanthan gum (optional, I think they would work fine without it!
Wet Ingredients:
  • 8 ounces non-dairy milk (I use about 1 cup almond milk)
  • 1/2 cup unsweetened applesauce or pure pumpkin puree
  • 4 tablespoons light tasting olive oil
  • 1 teaspoon pure vanilla extract
Directions: 
  1. Preheat griddle as directed or place a large heavy-bottomed (well-seasoned cast iron) skillet on the stove. 
  2. In a large bowl whisk together all dry ingredients. Make a well in the center of the dry ingredients and add the wet ingredients. Stir together well to create a thick batter. Allow batter to rest 5-10 minutes before using (can also be made the night before and placed in the refrigerator to make the next morning.)
  3. On the preheated griddle or greased, heated cast iron skillet drop batter 2-3 tablespoons at a time to make 2-3" pancakes. Cook each pancake for about 2 minutes on medium-high heat. When the pancake has cooked through on one side, the edges will appear dry and you will see bubbles come up through the batter and pop when the first side is done. NOTE that vegan pancakes will seem a bit more fragile when flipping than non-vegan pancakes do, they will still be okay! Flip pancake and cook an additional 1-2 minutes until the underside is golden brown. Serve pancakes hot with pure maple syrup or molasses. 
Pin It!

Thursday, June 6, 2013

Easy Gluten-Free Almond Flour Cookies


I really need to keep my "good" camera around my neck at all times.. because when I don't you are forced to suffer through my terrible phone camera pictures...

But you know what's funny? I really like the imperfection of the phone camera pictures. I love the grainy quality. It's like adding some cool instagram filter, minus instagram.

At any rate, here are some cookies for you. And this imperfect, grainy picture... it's comfortably fitting for these tasty treats. They aren't amazing bakery cookies. They are easy, simple 4-ingredient cookies for a sweet tooth fix. They are low glycemic, so they won't spike your blood sugar and then send you sinking down, down, down on a Tuesday afternoon.

They are easy, kid-friendly, snack-size little gems of almond flour and coconut palm sugar... and will make you smile.

Who needs perfection? Have a cookie instead!

Easy Gluten-Free Almond Flour Cookies
free of gluten, dairy, soy, grains, and easily egg-free
printer-friendly recipe

Ingredients
2 cups blanched almond flour
1/2 cup - 3/4 cup coconut palm sugar (or: honey, sugar, maple syrup, date sugar...)
1 egg (or egg replacer, 1/4 cup applesauce would work just fine)
1 teaspoon pure vanilla extract

Directions
Preheat oven to 350 degrees. Line a baking sheet with parchment paper or a silpat mat. In a large bowl whisk together the almond flour and coconut palm sugar. Make a well in the center of the dry ingredients and add the egg (or egg replacer) and the pure vanilla extract. Stir the wet ingredients into the dry ingredients until you have a very stiff and sturdy dough. It should be stiff enough to stir into a ball. If it's too crumbly (and it could be, depending on the humidity levels where you live), add water a teaspoon at a time, until the dough will stir into a stiff ball. Scoop the dough out with a cookie scoop and place 1" apart onto the cookie sheet. I usually get about 12 medium-size cookies. Shape them with your fingers into circular cookies and flatten them slightly with your palm. Bake for 12-15 minutes until cookies are a bit puffy and are golden brown around the edges. Allow cookies to cool for 10-15 minutes before eating... if you can wait that long!


Pin It!

Tuesday, May 21, 2013

Gluten-Free Focaccia Bread Recipe


One of the recipes I love to teach in my gluten-free baking classes is focaccia. An Italian flat bread thats made with gluten-free flours, yeast, eggs, olive oil, and herbs. The taste and texture of a thick focaccia bread is different than any other bread you will try. It's chewy, yet crunchy, and incredibly full of flavor.

Rich olives and sundried tomatoes, dried oregano and basil, fresh garlic... personally I'd rather eat a thick slice of toasty focaccia with a hearty homemade soup, than a piece of pizza! This recipes make two round 8" loaves or "cakes" of focaccia. You can easily freeze one loaf for later if it's too much. For those of you who need a lower carbohydrate/ "paleo-ish" version of focaccia, I plan on posting one next week, so stay tuned!

This gluten-free recipe makes a very thick, sturdy dough that can be a bit hard to handle when just stirring by hand. So if you have a heavy-duty stand mixer, it's the perfect appliance to mix this dough. Whether you're using a little elbow grease, or you'd using the stand mixer, try out this recipe and have it simply with a fresh salad and a homemade soup. It makes a delicious and fun gluten-free meal to share with your family!

I learned how to make this fantastic gluten-free dough while visiting the Whole Foods Gluten-Free Bakehouse in Morrisville, NC. Lee Tobin, the bakehouse team leader and head baker, shared his techniques and his recipe with our local gluten-free support group while we toured the facility. This incredibly chewy and crunchy bread would also make an outstanding deep dish pizza crust!


Gluten-Free Focaccia Bread 
free of gluten, dairy, and soy
recipe adapted by carrie forbes of gingerlemongirl.com
printer-friendly recipe

Yields: 12-16 slices of focaccia 

Dry Ingredients 
  • 1 ½ cups brown rice flour
  • 1/2 cup sorghum flour
  • 2 cups arrowroot starch or tapioca starch
  • 2/3 cup blanched almond flour or non-fat dry milk powder (if you can tolerate dairy - we use the blanched almond flour
  • 1 tablespoon xanthan gum
  • 2 teaspoons Saf Instant-Yeast, Red Star Rapid Rise or “Bread Machine” Yeast, or Fleischmann’s “Bread Machine” Yeast
  • 1 teaspoon salt
Wet Ingredients:
  • 1 ½ cups water heated to 110 degrees
  • 3 tablespoons olive oil
  • 4 egg whites, brought to room temperature
  • 1 clove garlic, finely minced
  • Fresh herbs, finely chopped (such as rosemary, oregano, or thyme)
  • Olive oil for spreading dough
  • Optional toppings: chopped and seeded kalamata olives and roma tomatoes
Directions: 
  • Line a 9x14” baking dish with parchment paper and grease parchment paper with non-stick cooking spray or olive oil.  In a large bowl whisk together brown rice flour, sorghum flour, arrowroot starch or tapioca starch, almond flour or non-fat dry milk powder, xanthan gum, and salt. 
  •  In another bowl whisk together heated water, olive oil, egg whites. Pour wet ingredients into dry ingredients and stir together thoroughly into a stiff dough. Continue to mix as much as you can (it is a VERY stiff dough!) for an additional 3-4 minutes. 
  • Transfer the dough to the prepared baking dish. Drizzle the dough with a little olive oil and then evenly spread dough over the entire baking dish. Cover the dough lightly with plastic wrap and allow to rise in a warm place for about 35 minutes. 
  • When ready to bake, preheat oven to 400 degrees. Gently poke the dough all over with your fingers so small wells appear over the dough. Drizzle with additional olive oil and sprinkle on the minced garlic and any of the additional toppings you would like. 
  • Bake for 15-20 minutes until focaccia is golden brown and crispy. Allow to cool for 10 minutes, then slice into squares and serve.

Pin It!

Wednesday, April 17, 2013

Gluten-Free (Paleo-ish) Carrot Cake Bread


Sometimes it's amazing what you can come up with in the spur of the moment! We needed some additional pictures for my upcoming baking cookbook and we needed something colorful... an editor suggested a bread with carrot flecks. Carrot flecks? Who makes bread with carrot flecks??

So I strummed my fingers for a while... what can I make? What can I make? And then it came to me... why not make a very lightly sweetened version of a carrot cake... put it in a loaf and make it a bread! Why not?

One of my favorite aspects of this new book is that it will include a chapter of lower glycemic gluten-free baked goods. This means the primary ingredients will be almond flour and coconut flour. There's also going to be a vegan chapter as well (although not a low glycemic, vegan chapter!) so this cookbook will have a LOT of different options for people on all kinds of gluten-free diets.

While this bread isn't anywhere NEAR as sweet as a carrot cake would be, it definitely has hints of carrot cake and a lovely sweet flavor accented by ground cinnamon. It's a snap to make and has a great texture. Try it out and tell me what you think! If you're not a fan of banana bread, this is a perfect alternative! It's also really tasty spread lightly with sunbutter or almond butter!

AutiMom asked what the green flecks were in the bread... and strangely enough they are a magic (ie... chemical) reaction of the baking soda, almond flour, and carrots! I have no idea why this happens, but I'm sure we could google it! :-)


Gluten-Free Carrot Cake Bread
This moist, slightly sweet loaf is perfect for breakfast. If you can tolerate dairy it is delicious with a smear of cream cheese. It's also a fun and tasty base for a peanut butter and jelly sandwich!

Free of gluten, dairy/casein, soy, and corn
Yields 2 (7 1/2" x 3 1/2") loaves of bread
Recipe created by Carrie of Gingerlemongirl.com
Printer-Friendly Recipe

Ingredients
2 1/4 cups blanched almond flour
3/4 cup arrowroot starch
1/2 teaspoon ground cinnamon
1/4 teaspoon sea salt
1 teaspoon baking soda
2 tablespoons olive oil or coconut oil
3/4 cup coconut palm sugar (or brown sugar)
3 large eggs
2 cups shredded carrots
1/2 cup almond milk or other non-dairy milk
1/2 teaspoon apple cider vinegar
1/2 cup raisins (optional)

Directions:
Preheat oven to 350 degrees. Heavily grease 2 (7 1/2" x 3 1/2") loaf pans with non-stick cooking spray or coconut oil. In a medium bowl whisk together blanched almond flour, arrowroot starch, ground cinnamon, sea salt, and baking soda. Set aside. In a large bowl mix together olive oil, coconut sugar, eggs, carrots, almond milk, and apple cider vinegar Stir the whisked dry ingredients into the wet ingredients. Fold in the raisins, if desired. Divide the batter evenly between the two pans. Bake for 350-40 minutes until a toothpick inserted in the middle comes out clean and the tops of the loaves are golden brown. Allow loaves to cool on a wire rack for one hour before slicing and serving.

OR You can make donuts instead:


My friend Diane decided to make Carrot Cake Bread DONUTS instead!! (Pure Genius Diane!) Simply pour the batter evenly into well-greased donut pans and bake at 350 degrees for 15-18 minutes until a toothpick inserted in the middle comes out clean!


Pin It!

Thursday, January 17, 2013

Gluten-Free, Vegan, Cane Sugar-Free, Chocolate Chunk Cookies -- Adapted from Real Sustenance


YUM, right?! They really are. I rarely get so excited about making SOMEONE ELSE'S recipe... but this time I genuinely am. And well, like with nearly all recipes, I have to tweak them and change them along the way. I'm not really sure why... I think it might have something to do with having a rebellious personality... my grandmother always called me defiant... so maybe these are defiant chocolate chunk cookies.. who knows!

At any rate, Brittany Angell... the amazing author of the blog "Real Sustenance" and books: "The Essential Gluten-Free Baking Guides" (Part 1 and Part 2) shared these cookies on her blog a few days ago. They reminded me of cookies I had seen on Elana's Pantry several years ago, sort of combined with chocolate chunk cookies from Lauren of Healthy Indulgences, also quite a few years back. I've made both of those cookies as well and hubs (the cookie monster at our house) thought both versions were pretty good (not as good as THESE chocolate chip cookies) but ate them all regardless. He's really not that picky when it comes to cookies.

So I played. I loved that Brittany made them vegan and offered a cane sugar-free and an agave-free version... But I remembered when I tried Lauren's version I threw in a hefty few tablespoons of ground flax seeds, because I love them. Love all that extra fiber, omega-3-fatty-acid-goodness, and the tiny bit of nutty flavor they add. So I added them. And because I went a little wild and crazy with the flavor extracts (ADD the almond extract -- TRUST ME -- it doesn't make them taste like cherries, it makes them AWESOME), I had a really wet dough and decided to throw in some arrowroot starch to thicken it up.

For the chocolate, I had 70% dark chocolate (3.5 oz) Lindt bars which I chopped into chunks.(These Lindt bars do not contain gluten ingredients, and the company uses stringent manufacturing practices to avoid cross-contamination, but it is a possibility and they are honest about it -- so use the chocolate you like best, if you're not a fan of Lindt.) One bar provided about 1 cup's worth of  "chocolate chunks" so it worked perfectly for this recipe!

I've made these cookies 4 times now... and they ARE really, really, REALLY awesome. I can't believe how delicious they turn out with no eggs, no gums, and no cane sugar. Right out of the oven they have an incredible crunch on the outside and a perfect chewiness inside. I can totally see why Brittany named them "Worlds Best Chocolate Chunk Cookies" --  cuz' they TOTALLY live up to the name, especially if you are limiting sugars and trying more lower glycemic, lower carb recipes! Try Brittany's awesome recipe, try my version... either way... MAKE THEM!


Gluten-Free, Vegan, (Almost) Grain-Free Chocolate Chunk Cookies
Adapted from Brittany Angell's recipe
free of gluten, dairy/casein, eggs, soy, and options for grain-free
printer-friendly recipe

Dry Ingredients: 
2 cups packed, blanched almond flour
1/2 cup coconut palm sugar
3 tablespoons arrowroot starch
1 teaspoon baking powder (this brand is corn-free or make your own -- it works SO much better than storebought!)
2 heaping tablespoons ground flax seeds
1/4 teaspoon salt

Wet Ingredients: 
3 tablespoons Spectrum Palm Shortening (or butter, if you can tolerate dairy)
1 tablespoon pure vanilla extract
2 teaspoons pure almond extract
3-4 tablespoons almond milk (start with 3, then add 1 more if you need additional moisture)

Add In's:
1 cup gluten-free, vegan chocolate chunks or chips (I used a 3.5 oz, 70% dark chocolate bar, chopped up)
1/2 cup chopped walnuts or pecans (optional)

Directions: 
Preheat oven to 350 degrees. Line a large cookie sheet with parchment paper or a silpat mat. In a large bowl whisk together all dry ingredients. Cut in Spectrum Palm Shortening or butter into the dry ingredients with a pastry blender or a knife and fork until the shortening resembles very small peas evenly throughout the dry ingredients. Make a well in the center of the dry ingredients and add the vanilla extract, almond extract, and 3 tablespoons of almond milk. Using a little elbow grease, stir the wet ingredients into the dry ingredients until you have a very thick, batter (it might be a bit crumbly). This may take several minutes to be incorporated well. If necessary, use an additional tablespoon of almond milk. The batter WILL be VERY thick though, DO NOT add tons of extra milk, or the cookies will not turn out right. Scoop the dough into golf-ball sized mounds and place on cookie sheet about 2" apart. Flatten lightly and shape with your hands into round cookies. Bake for 12-15 minutes depending on how crispy you want your cookies. The edges should be golden brown when done. Makes 12-15 cookies depending on how large you make them. I'd tell you to store leftovers in an airtight container on the counter or the fridge for 2-3 days and then freeze them for up to 1 month.. but seriously, there won't BE any leftovers!

Carrie's Notes: 

  • Almond pulp, leftover from making almond milk will NOT work in this recipe. I tried! It's just too moist and it makes a pile of mush for a cookie. You may be able to make it work with a dehydrator, but in the oven, it just didn't work. 
  • You can probably use another nut flour/meal to make the cookies, but I haven't tried it, so I don't know how it works. If you don't want to use a nut flour see the note below: 
  • If you are allergic to nuts, just make my regular ol' gluten-free chocolate chip cookies, they are awesome too!
  • Use your favorite non-dairy milk in the recipe if you don't like almond milk -- it will work. 
  • If you don't have coconut palm sugar: use regular sugar or even brown sugar. I don't know how it would work with liquid sugar substitutes, if you have agave nectar, try Elana's cookies


Pin It!

Wednesday, March 21, 2012

Gluten Free Almond Flour Lemon Muffin/Cake Recipe

Almond flour lemon muffins - this was my favorite flavor.
The past two weeks I've been slowly working towards making all of my meals and snacks paleo (basically no grains, sugar, legumes, or dairy).  I feel so much better when I eat less sugar, less grains, and less baked goods... however... I just can't help it. I love to bake. (Although admittedly, not really as much as I used too... I'm starting to think I like cooking more than baking now... what is happening to me? lol!)

So a few weeks ago I made an amazing lemon cake for a friend's birthday. It was SO good. Especially since I made it using Meyer lemons which are just wow. So I wanted "lemon" something else. I couldn't decide between cake or muffins and honestly, they aren't that different... so the recipe I'm sharing today could be used either as cake or a muffin. You pick. Don't you like it when you get to pick?

Just pretend you don't notice the stray cathair on the up front cupcake. No, you don't see it. And if you want to make that nut-butter frosting, here you go:  http://www.whole-body-detox-diet.com/sugar-free-carrot-cake.html

This cake is lower in sugar than most gluten free cakes. For the main sweetener I used coconut palm sugar. If you don't like coconut palm sugar or can't find it... just use plain ol' white sugar. It will work just as well. I also used lemon gelatin in this cake for flavor. I've tried in the past to use a lot of citrus and/or lemon juice in cakes and it never goes well. SO I'm sorry if you're opposed to lemon gelatin... if you come up with another alternative let me know! All I know, is I made a vanilla version of this cake minus the lemon gelatin and I didn't like it nearly as much... so apparently I like the lemon gelatin. I'll pretend it's paleo.

I also used liquid stevia in this recipe. I used the "NOW" brand, but there are many different brands available. The cake would probably taste fine without it and honestly I wasn't a fan of using the stevia in the plain vanilla version... so take it or leave it... again, you pick. See how easy this is?

I'm including the vanilla variation at the bottom of the recipe, but I will tell you, it wasn't my favorite. ALSO... the almond flour batter is heavy... therefore it rises better as muffins or cupcakes. They are taller, prettier, and much less dense as cupcakes than it is as a cake. SO... you pick. :-)


Gluten Free Almond Flour Lemon Muffins or Cake, with a Vanilla Variation
free of grains, soy, dairy/casein, and gluten (also low in processed sugar)
created by Carrie Forbes of Gingerlemongirl.com
printer-friendly version

Dry Ingredients:
2 cups blanched almond flour, gently packed in the cup
1/2 cup arrowroot starch
1/2 teaspoon salt
1/2 baking soda
1/2 cup coconut palm sugar
1/2 teaspoon freshly grated nutmeg
3 tablespoons lemon gelatin (about half of a 3 oz. package)

Wet Ingredients:
1 teaspoon lemon extract
10-12 drops liquid stevia
3 large eggs
1/2 cup almond milk

Directions:
Preheat oven to 350 degrees. Line a 12 cup muffin/cupcake pan with paper liners -or- an 8" cake pan with parchment paper on the bottom and grease pan with non-stick cooking spray or olive oil. In a large mixing bowl whisk together all dry ingredients. In a smaller bowl whisk together all wet ingredients. Pour wet ingredients into dry ingredients  and whisk until thoroughly combined. Pour batter into lined muffin/cupcake pan or cake pan. For cupcakes/muffins bake for 18-20 minutes until golden brown or until a toothpick inserted in the middle of a cake comes out clean. For one-layer cake bake for 30-35 minutes until golden brown or until a toothpick inserted in the middle of the cake comes out clean. Allow to cool in pan for 10 minutes then transfer to a wire rack until completely cool. For cupcakes frost with your favorite frosting or you can use a low sugar/low glycemic nut frosting such as this one.

Vanilla Variation -- If you want plain vanilla cake/muffins instead of lemon simply use 1 tablespoon of vanilla extract in place of the lemon extract and leave out the lemon jello. You may want to leave out the stevia in a vanilla version as I felt you could really taste the stevia since the cake was so plain. Using vanilla paste or the seeds from a vanilla bean might really improve the flavor of the plain cake. If you try it, please let me know what you think!

Pin It!

Saturday, October 29, 2011

gluten free, grain free banana spice muffins recipe


I originally published this recipe in June of 2008. It's amazing to me that I was experimenting with grain free eating a year into my gluten free journey. And now, 4 years later -- grain-free is finally starting to become my way of life. Since 2008 I've made these muffins countless times and in the past few months they have become a breakfast staple.

I often vary the spices. Sometimes it's nutmeg, or cardamom, or ginger, or cloves... use whatever strikes your fancy. Even a pinch of tumeric can make an enticing addition. I love warm spices, so it's the perfect season to revisit these hearty muffins.

I've changed the recipe only slightly since I first shared it. It now calls for less sweetener, and I've chosen honey instead of agave nectar or sugar. Feel free to use what you prefer.

Don't want to use bananas? Use a cup of plain pumpkin puree instead. Or unsweetened applesauce. Just make them your own and enjoy their simple, just-sweet-enough goodness!

Share in the comments below or chat with me here on the blog and let me know how you would spice up these muffins!

Gluten Free, Grain Free Banana Spice Muffins
free of gluten, grains, dairy/casein, soy, and corn.
created by Carrie @ http://www.gingerlemongirl.com
printer-friendly recipe

Dry Ingredients
3 cups blanched almond flour
1 teaspoon baking soda
1 teaspoon cinnamon
1 teaspoon freshly grated nutmeg

Wet Ingredients
1 tablespoon pure vanilla extract
1/2 teaspoon apple cider vinegar
1/3 cup honey
2 large ripe bananas, mashed
3 eggs, whisked
3 tablespoons olive oil

Directions:
Preheat oven to 350 degrees. Line a muffin pan with paper liners and spritz with nonstick cooking spray, set aside. Whisk dry ingredients together in a large bowl and set aside. In another bowl, mash bananas. Add honey. Mix in eggs, oil, apple cider vinegar and vanilla. Mix wet ingredients into dry ingredients. Spoon batter into lined muffin pans until they are at least 3/4 full. Makes 12 large muffins. Bake for 18-25 minutes until a toothpick inserted in the middle comes out clean. Let cool on a wire rack. Store in airtight container in refrigerator. These are moist muffins.

Pin It!

Wednesday, October 19, 2011

so about this whole "paleo" thing...

I've known for a long time that my body just doesn't like sugar. Or simple starches. Or grains. Or soy. Or dairy....  Which to be honest...sometimes sucks. Especially when you like to bake. 

But a few months ago I realized how much I hated feeling like crap. And I spent a lot of days feeling like crap. Even with going to the gym, watching my "diet", losing a little bit of weight in the process, and even keeping a food journal... I still often felt like crap. 

So about 2 1/2 months ago I decided it was time to seriously change the way I eat... and bake. I've been working with nutritionist Cheryl Harris since February of this year. She is amazing and very intuitive. She already knew I needed to radically change the way I was eating. Me, though? I was resistant. Very. Very. Resistant. 

Who wants to change the way they eat? I knew I needed help. And I wanted advice... but this girl can be rather stubborn about actually accepting help and making real change. For many people it takes time and usually a rock-bottom experience to get to the place when you absolutely know it's time for change. That place when you are simply compelled to change. 

Cheryl understood that though. She didn't push. She suggested. She listened. She planted seeds of change. And eventually those seeds took root.

You may remember me talking about Overeater's Anonymous a month ago... the events that led up to that was my rock-bottom moment. That was when I KNEW I had to change. And so it began... I slowly started removing carbohydrates and grains from my diet. Gluten, of course, was already out. Dairy was already out (except for butter, which doesn't bother my tummy), soy was already out, I had been avoiding legumes (other than peanut butter) for months, so honestly this transition to meats, vegetables, fruits, nuts & seeds, healthy fats, and eggs almost seemed natural. 

Now... several months or so into this new "food" journey, I realized there was a name to the type of food plan my body likes best. "The Paleo Diet." I really hate labeling things, it seems like anything labeled becomes a fad. A trend. But it was kind of cool to hear a "name" for the way I need to eat. 

I've always had problems digesting grains, beans, and dairy. You know... the staples of the American diet. None of them liked me. Not one little bit. 

So with the help of my friend Heather, I jumped into Paleo. We both wanted to feel better. We both wanted our tummies to start behaving. So we just took the plunge and went shopping. Shopping for real food. For vegetables like kale, purple cabbage, celery, broccoli, carrots, onions, garlic, zucchini, and avocados (oh how I love avocados!). For proteins, meats like fresh ground beef, roasts, chicken, turkey, bacon... Mmmmm... bacon! And eggs, and lots of 'em! Fruits like mangoes, apples, raisins, cranberries, bananas, and pineapple. Healthy fats like almond butter, tahini, olives, olive oil, butter, coconut oil, and coconut milk. For the occasional treat -- baking with almond flour or coconut flour and sweetening with honey, dates, or fruit. We started learning simple ways to prepare food. I started using ingredients like balsamic vinegar, and different types of stone-ground mustard to flavor and season meats, chicken, and salads. 


I started using amazing books like newly published Sarah Fragoso's "Everyday Paleo" from Victory Belt Publishing -- chock full of healthy, easy, ONE dish meals that I could make in minutes to serve for dinner. I felt blessed to receive a review copy of this cookbook from Victory Belt at just the right time. I have truly NEEDED cookbooks like this for so long. Cookbooks that focus on using fresh vegetables, healthy lean meats, eggs, and fruit. SO many cookbooks, especially gluten free cookbooks focus on the starches. On the pasta. The bread. The muffins. The cake. The things that simply don't work for my body.  I'm so glad paleo-type cookbooks like this are finally becoming readily available! (Sarah's book in particular is so easy to use, focuses on EASY family meals, and even includes shopping lists, meal plans, and a workout strategy at the end. I highly recommend reading her blog, or purchasing her book for great recipes and ideas!) Sarah, your basic, real food recipes have helped me more than you could ever know!

I have loved the process of FINALLY finding meals that simply make me feel good. Fresh food, happy tummies, a better attitude, and great outlook on life... this paleo thing has been good to me. 

I know it's not for everybody. Some people really do perform and feel better with more carbohydrates in their system. Yet, I believe everyone can benefit from more fresh, real foods. For me though, it's been realizing that my body TRULY cannot tolerate processed carbohydrates. No more white sugar, no more baking with gluten free grains & starches, no more gluten free pasta. And finally, I can honestly say I rarely miss those things anymore. I've enjoyed the challenge of baking with almond flour and coconut flour. I've enjoyed wholesome, real meals without the starch. And the vegetables? I don't think I'd be able to function very well without them now. Fresh vegetables have become a true daily staple. 

So that's why I'm doing this... to feel better. To be better. To be on the right track for my body. And I finally feel like I'm heading down the right track... how about you? 

And if you're wondering about the husband.... well he's slowly adjusting. He's still in that lovely little resistance phase... so I understand... and I appreciate that he's being a good sport! :-) All good things take time. And I'm thankful he's at least willing to try!

Pin It!

Tuesday, September 20, 2011

gluten free peach crisp for one -- an almond flour recipe


The past few weeks I've been using a lot of blanched almond flour in my baking. I am doing this to cut back on sugar and carbohydrates in my overall food plan. Over the past few years I experimented with this low glycemic flour thanks to Elana Amsterdam and her cookbooks... but I've never used it as exclusively as I have the past few weeks... and you know what?

It is SO stinkin' easy!

I had forgotten how incredibly easy it is to use almond flour in baking, especially when you're gluten free. Almond flour is quite healthy as it's high in protein and fiber. To learn more about why I use this flour, check out my GF Baking 101 page.

I've been meaning to share my recipe for an almond flour peach crisp the past few weeks.  I've made it in the oven, in the slow cooker, and now even in the microwave. I meant to make another batch this week so I could take a few good photos of the crisp, but so far I haven't had the time. Yet.... I had a real hankerin' for peach crisp tonight. So I decided to make a personal peach crisp for one. To lightly sweeten the peach crisp, I used a little bit of coconut sugar... but if you'd rather, feel free to use regular sugar or leave it out completely.

I'd say I made this crisp just for you, but I didn't... it was for me. :-P All me. And I enjoyed every single bite of it! But I will be nice enough to share the recipe...

Gluten Free Peach Crisp for One
free of gluten, grains, white sugar, eggs, corn, soy, dairy/casein
created by Carrie of Gingerlemongirl.com
printer-friendly recipe

1 ripe peach, sliced, and peeled if you prefer
3-4 tablespoons blanched almond flour
4 teaspoons coconut sugar, divided
1/4 teaspoon cinnamon
tiny pinch salt
2 teaspoons butter, coconut oil, or canola oil

Directions:
  1. Place sliced peach in a microwave safe (or glass) cereal or soup bowl. Sprinkle 1 teaspoon of coconut sugar over the peaches. 
  2. Microwave peaches on high for 3 minutes until they are softened and sugar has caramelized. 
  3. In a small bowl mix together blanched almond flour, remaining coconut sugar, cinnamon, and salt. Using a fork, cut in the butter or coconut oil into the almond flour mixture. 
  4. Sprinkle almond flour mixture on top of the peaches. Cook in microwave on high for 2 minutes. 
  5. Allow to cool for 2-3 minutes before eating. Don't share. Eat the whole thing and enjoy every single gluten free, grain free morsel!! :-) 

Pin It!

Tuesday, November 9, 2010

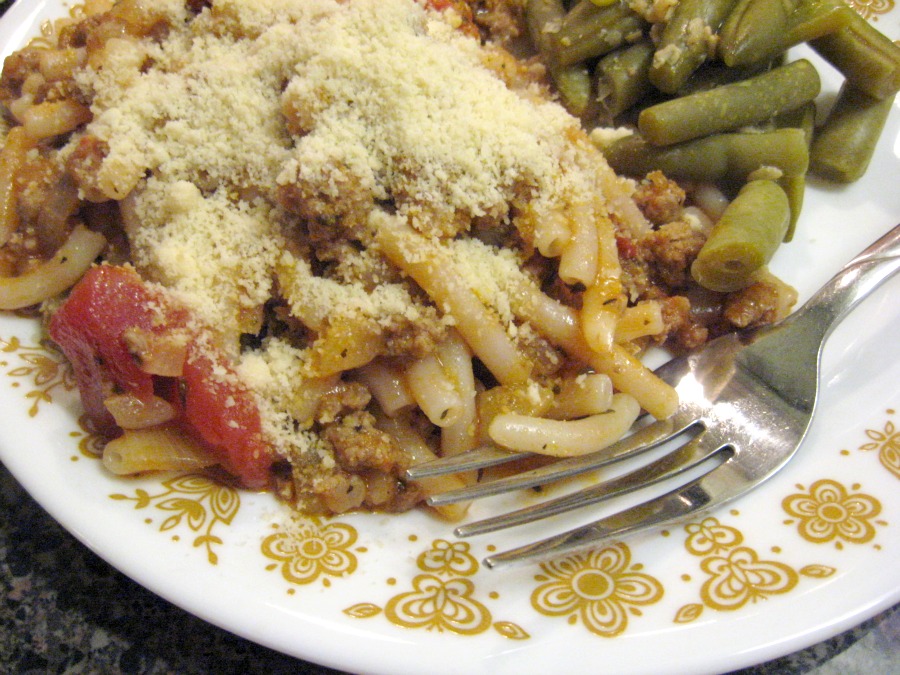
Gluten Free Beef Italian Skillet Meal (Goulash) Recipe


Here's another favorite recipe from my college days. I'm sure we all grew up eating a basic ground beef casserole like this either with rice or noodles. As a child, I remember from a cookbook that was published by my local elementary school they called this "goulash." I thought that was a really cool name!

My friend Susan shared this recipe with me when I was in college. I remember she came over to my apartment and we made this along with a salad and just enjoyed cooking together. I still have the index card that she wrote the recipe on for me.

This is a super simple, hearty meal that my husband loved. It's easy with just a few simple ingredients and gluten free noodles.

For a casein free topping, I sprinkled blanched almond flour on the top of our servings!

Susan's Beef Italian Skillet Meal
free of gluten, casein/dairy, soy, corn, and eggs
Adapted by Carrie @ www.gingerlemongirl.com
printer-friendly recipe

1 1/2 cups gluten free pasta of your choice (I used these rice noodles from a local Asian market -- they don't get mushy!)
1 lb. ground beef
1 small onion, finely diced
1 stalk celery, finely diced
3 cloves garlic, minced
1 teaspoon dried oregano
1/2 teaspoon dried basil
1/2 teaspoon sea salt
1 teaspoon freshly ground pepper
1 (8 oz.) can tomato sauce + 1/3 cup water
3 tablespoons blanched almond flour (or parmesan cheese) to sprinkle on top of each serving

Directions:
Cook gluten free noodles according to package directions until "al dente" or still slightly firm. Rinse with COLD water to completely stop the cooking process, drain and set aside. Brown ground beef in a large skillet or dutch oven. Add onions and celery and saute for about 5 minutes until onions are soft and transparent. Add garlic, oregano, basil, salt and pepper. Mix tomato sauce with water and add to ground beef and vegetables. Simmer for 10 minutes until mixture is bubbling and heated through. Add cooked pasta to skillet and stir to coat noodles with sauce. Simmer for additional 5 minutes and serve. Sprinkle servings with blanched almond flour or parmesan cheese. Serve with green beans or a salad! Picky kid & husband friendly! Enjoy!
Pin It!

Tuesday, October 12, 2010

Easy Gluten Free Bolognese (Meat) Sauce Recipe


Spaghetti is a comfort food at our house. I really like a a hearty meat and tomato sauce. This is the type of sauce we generally had over spaghetti when I was growing up. Michael's mom makes a similar sauce, although she basically just serves a simple meat chili over spaghetti.

Mark Bittman's "How to cook everything" is one of my favorite cookbooks. The techniques are simple and encouraging for home cooks. Who cares how you cut your onion, just make sure it's diced somewhat evenly and it will turn out fine... especially in this delicious sauce.

I love sauces and soups that really have to simmer. The prep work takes about 30 minutes, but then you leave the sauce alone. The flavors will simmer and dance in the pot while you get the chance to catch up on that book you've ignored for a week...or maybe the laundry. (Personally I'd pick the book! :-P)

Prepare all of your ingredients before you start to cook. It makes life easier. Trust me.
 Chop your veggies and the bacon. Open the crushed tomatoes.... then enjoy the process of cooking!

Some recipes take time and this is one of them. A slow cooker would be perfect for this if you need to leave the house... but there's something innately comforting and homey about having a pot of stick-to-your-ribs spaghetti sauce simmering on the back burner.

While your sauce is cooking you'll have time to mix up a few loaves of gluten free french bread. Let them rise and on the counter and by the time your loaves have baked and cooled... it will be time for dinner!


Ragu Meat Sauce, Bolognese-Style
adapted from How to Cook Everything by Mark Bittman
free of gluten, soy, and options for dairy-free
printer-friendly recipe

2 tablespoons olive oil
1 small onion, minced
1 carrot, peeled and minced
1 celery stalk, minced
1/4 cup minced bacon
1/2 pound lean ground pork (or use all beef)
1/2 pound lean ground beef
1 cup dry white wine (or reserved juice from the canned tomatoes)
1 (28 ounce) can crushed tomatoes, drained (reserve juice, if needed instead of wine)
1 cup beef or chicken stock, preferably homemade
Salt and freshly ground black pepper to taste
1 cup cream, half-and-half, or milk (We just left this out altogether and added an additional cup of tomato juice to the sauce)
Freshly grated Parmesan cheese (optional)

Directions:
Dust off your favorite cast iron dutch oven. Add the olive oil to the pan and allow it to get hot enough to sizzle a drop of water. Add the minced bacon, onions, carrots, celery (and garlic if you live in my family). Saute for about 5-8 minutes or until the bacon has rendered fat in the pan and the onions are beginning to brown. Add the ground beef and ground pork (we used all beef) and cook for an additional 5-10 minutes until the meat has browned through and there is no pink showing. While the beef is cooking, using a wooden spatula break up the meat so it is in very small pieces. Once the meat has browned add the crushed tomatoes and white wine or reserved tomato juice and the beef stock. Turn the heat to very low and allow the sauce to simmer for at least 2 hours and if you have time... let that sauce simmer for 4-5 hours. The sauce will have a much deeper flavor if it's allowed to simmer for 3-4 hours. If you're using cream, milk, or half and half, swirl it into the sauce right before serving and allow it to heat through. Serve it over gluten free pasta, rice, raw zucchini noodles, lightly sauteed spinach, or even on top of french bread for "manwiches" etc... just eat this stuff up and enjoy every bit of it! :-) Serve with shaved parmesan on top if you’d like, or if you’re dairy free sprinkle on some blanched almond flour! You’ll be amazed as how much it tastes like finely grated parmesan!

Enjoy!
Pin It!

Monday, September 27, 2010

Gluten Free Vegan Crusty Bread Recipe


Gluten free vegan bread, a few slices from the first batch.
When I first went gluten free I had no idea that I would learn to make my own bread. To be honest, I didn't really eat a lot of bread before I went gluten free. It makes sense to me now -- that by default I instinctively often avoided foods that hurt my body.

Several weeks into being gluten free, I decided to give gluten free bread a try. I used a few recipes from Bette Hagman. I used a bread machine. I made okay bread.

Gradually over the past 4 years I've learned how to make really good bread. I love the techniques involved in baking. I'm always learning more.

Part of this journey has included learning about other foods that also hurt my tummy or cause allergic reactions. I never thought I'd be a person who people considered "picky" when it came to eating. I was the buffet girl. I'd eat anything you put in front of me.

Now that dairy/casein, soy, corn, and shrimp are also not a part of my diet it makes me have great empathy for people with restricted diets.

Many people who cannot tolerate gluten also cannot tolerate eggs, especially while they are still healing. One thing you'll learn about gluten free baking is that normally it uses a LOT of eggs. Thankfully my body can handle the eggs, but I know this is a huge struggle for some people. It can also be costly for everyone else.

Below is a tutorial on making this bread. It's a beautiful process. This "5 minutes a day" technique takes a bit longer time-wise than a loaf of sandwich bread, but I think it is more rewarding and has a much better flavor. Also since you're splitting the dough into two loaves the yeast doesn't have to work quite so hard to help the bread have a higher rise. While these loaves aren't quite as high as a wheat-based french bread, they have a fantastic texture, a beautiful appearance, and slice up well.


Time for bread.

The recipe is below the tutorial. Make this bread by hand at least once so you know what to expect with the texture of the dough. When you feel comfortable with the process, then try making the bread with your stand mixer if you'd like.

First measure out and whisk together the flours, xanthan gum, guar gum, sea salt, and baking powder. Whisking helps incorporate air into your dry ingredients along with making sure the ingredients are mixed evenly.

Next add the rapid rise yeast & honey (or maple syrup) to the warm water. Allow it to sit alone for about 5 minutes to proof. Once the mixture has a yeasty aroma, has turned cloudy, and has started bubbling at the top, it's time to proceed.

Next, you'll add the oil to your yeast mixture and then pour it into the dry ingredients.
Begin to stir. I really enjoy using a wooden spoon. Not sure if it's for nostalgia's sake or if it just seems to incorporate the ingredients well. At first it will look like a wet biscuit dough. Keep stirring.

After the dough looks like biscuit dough, it will slowly thicken up once the gums start working. Next it will look like a thick cake batter. Finally, you'll be able to stir the dough into a stiff batter that will form a loose shape. Gently shape the dough into a ball with the wooden spoon.

Once you have the dough in a ball, pour a few tablespoons of olive oil on it to coat the dough, so you can work it into a solid mass. With your hands, spread the oil over the dough and move the dough to an oiled bowl to rise.

I love using this salad bowl to let the dough rise. A wooden dough bowl works well too. I prefer not to rise dough in a metal bowl because when I used to make wheat-based sourdough, it was said that the metal could interfere with the action of the natural yeast. Now it's time to let the bread rise. Cover the bread with plastic wrap or a tea towel. Allow it to rise in a warm place in the kitchen. Go play. Wash the dishes. Read a good book. This will take 2-3 hours. Give the bread time.

Once the dough has doubled in size it's time to shape the bread into loaves. There is nothing in this world that will make you feel like a baker more than creating your own loaves of bread. Enjoy this.

To shape your dough, you first must move the dough to a floured surface, preferably parchment paper on a cookie sheet that you can slide onto a hot pizza/baking stone. Flour the parchment paper with millet flour or brown rice flour to help give it a crusty bottom. Gently pour the dough from the bowl onto the floured surface.

Using a very sharp knife cut the dough into two loaves or boules (rustic oval loaves of bread) Gently pat them into an oval, careful not to flatten the dough. It will sink slightly while you are shaping it. Don't be alarmed. Now it's time to preheat the oven. If you're using a pizza/baking stone, place the stone (not the bread) in the oven and preheat to 400 degrees. You want the stone to become very hot.

Next, with a sharp knife, add 3 small 1/4" slits on the top of each loaf. This is to decorate your bread and give it an artisan touch. Try not to make the cuts too deep.

While the oven is heating, it's time to allow the bread to rest and rise one more time.  If you want the bread to have a "floury" appearance, like "real" bakery bread, simply sprinkle and gently pat extra millet flour or brown rice flour over the two loaves. Then gently cover the two loaves with plastic wrap or a tea towel and leave them in a warm spot in your kitchen for about 30 minutes. They will rise slightly. After 30 minutes slide the parchment paper with your bread onto the hot pizza stone in the oven -OR- slide the cookie sheet  with your parchment paper and loaves on it into the oven. You'll bake the bread for about 35-40 minutes.
Your bread is finished when you can tap on it and it sounds a bit hollow. It should be golden brown and if you check the temperature with a food thermometer it should be around 180-190 degrees. Allow the bread to cool for at least an hour.

Ideally you can cool the bread on a wire rack, that works really well. It really is important to allow the bread to cool for at least an hour if not more. Because the bread is still warm after being pulled from the oven it's technically still "cooking" and if you slice into it too soon, it will be a bit gooey, especially since it doesn't have eggs.

In the very top picture of sliced bread, I allowed the loaf to cool over an hour which resulted in perfectly textured bread. With this loaf, I was in a hurry to get good pictures and I sliced it after about 30 minutes. I should have waited a bit longer. This loaf is just slightly more moist and doughy than the first loaf. Patience is important with good bread.


Now it's your turn. Time to make bread. Gluten free, egg free, soy free, dairy free yeast bread. Baking bread is a soothing, patient process. Give it time. If it doesn't work the first time, try it again. Good bread takes practice. Allow your hands to learn the movements of mixing the dough and shaping the loaves. Enjoy the process. Go. Make bread.

Gluten Free Vegan Crusty Bread Recipe
free of gluten, dairy/casein, soy, and eggs
created by carrie forbes of gingerlemongirl.com
print-friendly recipe

1 1/4 cups almond flour (5 1/8 oz., 144 grams)
1/2 cup brown rice flour (2 1/2 oz., 71 grams)
1/2 cup sorghum flour (2 1/2 oz., 72 grams)
1/2 cup arrowroot starch (2 1/8 oz., 59 grams)
1/2 cup potato starch (2 7/8 oz., 81 grams)
1 teaspoon gluten free, corn free baking powder
2 teaspoons xanthan gum
1/2 teaspoon guar gum
1/2 teaspoon sea salt
1 1/2 cups warm water ( heated to 110 degrees)
1 tablespoon rapid rise yeast
3 tablespoons honey, agave nectar, or maple syrup
1/4 cup olive oil

Directions:
  • In a large bowl whisk together almond flour, brown rice flour, sorghum flour, arrowroot starch, potato starch, baking powder, xanthan gum, guar gum, and sea salt. 
  • Heat 1 1/2 cups of water in your microwave for about 40 seconds or until it's 110 degrees, measured with a food thermometer.
  • Add rapid rise yeast and honey to the warm water. Stir to combine and set aside for 5 minutes until it's bubbly and smells yeasty. 
  • Add the oil to the yeast mixture and pour the yeast mixture into the dry ingredients. 
  • Stir the wet ingredients into the dry ingredients with a wooden spoon. Stir for several minutes until the dough is like a very thick cake batter and you can form it into a loose ball. Oil the inside of a large glass, ceramic, or plastic bowl and set aside.
  • Pour about a tablespoon of olive oil over the bread dough. Using your hands, coat the dough with the oil. Place the ball of dough into the oiled bowl to rise. Cover the bowl loosely with plastic wrap or a tea towel and set in a warm area of your kitchen.
  • Allow the dough to rise for 2 hours, or until it's doubled in size. 
  • Place a large piece of parchment paper or a silpat mat onto a cookie sheet. Dust it with millet flour or brown rice flour. Gently pour the risen dough onto the dusted surface. 
  • Using a sharp knife, cut the dough into two pieces. Shape each piece into a "boule", or a rustic oval shape. Place each loaf several inches apart on the dusted surface. 
  • Using a sharp knife, place three small 1/4" slits on the top of each loaf. 
  • Preheat the oven to 400 degrees. If using a pizza stone, place it in the oven now to get very hot. 
  • While the oven is heating cover the dough with plastic wrap or a tea towel and allow it to rest and rise for an additional 30 minutes. This is your 2nd rise. 
  • After the dough has risen a bit (around 30 minutes) it's time to put it in the oven. If you're using a pizza stone, use the cookie sheet to slide the parchment paper with the bread loaves onto the hot stone. If you're just using the cookie sheet, place it carefully in the oven. 
  • Bake the bread for 30-45 minutes. When finished the bread should be golden brown, should sound a bit hollow if tapped, and should reach an internal temperature of 180-190 degrees if tested with a thermometer. 
  • Place the bread loaves on a wire rack and allow to cool for AT LEAST an hour if not longer. The longer you allow the bread the cool, the better the texture will be when you slice into it. 
  • To store: Place in a ziplock bag. The bread will keep on the counter for about 3 days. After that slice it and freeze any remaining bread. 

Carrie's Notes: 
  • Almond flour is fairly key for the bread to work well. Yet, if you cannot tolerate almonds, I would suggest trying a bean flour in it's place (for the protein and fat content.) I used Honeyville Almond Flour.
  • If you cannot tolerate rice, use additional sorghum flour in place of the brown rice called for. 
  • Olive Oil: This recipe calls for a large amount of oil compared to most gluten free bread recipes, that is to help replace the fat from the eggs. Oil also acts as a humectant and assists with the texture and moisture content of the bread. 
  • Honey, Agave Nectar, or Maple Syrup: This bread also calls for a fairly large amount of "sugar" compared to other gluten free bread recipes. Obviously, if you are a strict vegan, do not use honey in this recipe, please use agave nectar or maple syrup in it's place. The sugar not only helps activate the yeast, but like the oil acts as a humectant to help the bread stay moist and retain it's texture. The sugar also helps to give this bread such a beautiful golden crust. Make the recipe first with the amount of sweetener called for. If you think it's too sweet, try it next time with a lesser amount.
  • Many Thanks: I borrowed and combined several techniques, methods, and ingredient suggestions to create this gluten free vegan bread! Many thanks to Shauna & Danny Ahern of Gluten Free Girl and the Chef, Jeff Hertzberg and Zoe Francois of Artisan Bread in 5 Minutes A Day, and Jennifer of The Cinnamon Quill. These incredible people have helped to pave the way for people who need to bake gluten free.

This post is linked to Amy Green's Slightly Indulgent Tuesday's at Simply Sugar and Gluten Free. Make sure to visit her blog today for another wonderful weekly roundup of delicious and healthy gluten free treats!


This post is also linked to this month's "Go Ahead Honey, It's Gluten Free" recipe roundup. There are two themes this month, one being gluten free breads. The bread roundup is being hosted by Choupichen at It's Gluten Free 


Pin It!