Showing posts with label main dish. Show all posts

Saturday, August 30, 2014

Celebrating Local NC Food: Baby Back Ribs with the NC Pork Council


This month's signature cut with the NC Pork Council is RIBS! OTHER than my husband (who isn't a fan of any meat on the bone....I know... I have no idea...???)... WHO doesn't love ribs?

I love them! And honestly, I don't make them as often as I should. Especially in the summer, as ribs just seem like the ideal hot summer meal.

I've chosen my slow cooker as my cooking element of choice for these recipes with the pork council! I love using a slow cooker, it's so easy and since we don't grill out much, it's a great option. Also, proteins are not my cooking specialty and it seems like whenever I go the easy route and make them in the slow cooker, they're always perfect!

When I think of ribs, I generally think of savory, crispy pork slathered in a tangy barbecue sauce. I didn't have any barbecue sauce on-hand and I wanted to go in a different direction. I wanted to do something with an Asian flavor, so I started looking up recipes in my cookbooks at home.


I ran across a recipe in "The Food Lover's Make it Paleo" cookbook by Bill Staley and Haley Mason. The recipe sounded good to me because it had Asian flavors, but also didn't use soy sauce, which is really helpful since I'm allergic to soy.

I changed the recipe a bit, just adding several additional spices that we enjoy. You basically make an easy rub for the ribs and then several hours into slow cooking you drizzle a sesame ginger glaze over them.

The ribs caramelize will then caramelize a bit and with the fat that cooks through, they have a wonderful flavor and texture. When they have finished cooking they are fall-off-the-bone delicious. We served the ribs with slow cooked collard greens &amp (made in another slow cooker) and cinnamon sugar sweet potatoes, which I covered in foil and placed beneath the ribs. The sweet potatoes cooked right underneath the ribs, a technique I love using with root vegetables and even ears of corn. (You can find both of those recipes in my Everything Gluten-Free Slow Cooker Cookbook.)

That's another fun thing about using a slow cooker, you can cook several components of a meal in addition to one-dish meals! Super easy peasy and kinda fun as well!


Slow Cooked Chinese Spiced Ribs
adapted from a recipe in "The Food Lover's Make it Paleo" by Bill Staley and Haley Mason
free of gluten, dairy, soy, eggs, and nuts
printer-friendly recipe

Rub Ingredients: 
  • 3-5 pounds baby back ribs
  • 1 tablespoon Chinese five-spice powder
  • 1 teaspoon curry powder
  • 1 teaspoon ground ginger
  • 1/2 teaspoon ground cardamom
  • 1/4 teaspoon Saigon cinnamon
  • 3 tablespoons brown sugar or crystallized maple sugar or coconut palm sugar
Glaze Ingredients: 
  • 3-4 tablespoons sesame oil
  • 1/3 cup coconut aminos (a savory substitute for soy sauce, if you're cool with soy, use GF soy sauce!)
  • 1 teaspoon fish sauce
  • 2 cloves garlic minced
  • 1 tablespoon ginger root, minced
  • 2 tablespoons apple cider vinegar
  • 1 tablespoon molasses or brown sugar
Directions:
  1. In a large bowl of a bag mix together Chinese five-spice powder, curry powder, ground ginger, ground cardamom, Saigon cinnamon, and brown sugar. 
  2. Pat the rub generously over the baby back ribs, that have been cut into portions. Place the ribs into a greased 4-6 quart slow cooker and cook on LOW heat for 4-5 hours. (Alternately, you can cook on HIGH for 2 hours)
  3. Around the 4-5 hour mark mix the glaze ingredients together in a small bowl or glass measuring cup. Pour evenly over the ribs and continue to cook ribs another 2-3 hours on low heat. (Alternately, IF you are cooking on HIGH heat, around the 2-3 hour mark, mix the glaze together, pour over ribs and cook an additional 2 hours on HIGH heat.)
  4. When ready to serve, cut slow cooker off and allow ribs to cool for 30 minutes before serving. We served with slow cooked collard greens and cinnamon-sugar sweet potatoes. 


Previous Posts written in conjunction with the NC Pork Council


GLG Disclosure: 
This post is part of a new monthly series featuring local NC pork products sponsored by the North Carolina Pork CouncilThe NC Pork Council provided me with a gift certificate to purchase pork products and create a recipe to share. The opinions and photography in this post are completely my own.

Pin It!

Monday, July 7, 2014

Celebrating Local NC Food: The Porterhouse Chop with the NC Pork Council


You may remember that last month I started working with the North Carolina Pork Council to help promote local pork products. I'm thrilled to partner with NCPC because Eastern North Carolina is a major producer of pork and it provides many jobs in our area. Many of our restaurants and grocery stores support local farmers and ranchers and so the pork products we generally buy in this area are from regional farms.

The cut being shared this month is the Porterhouse Chop (formerly known as the bone-in loin chop). If you're confused about the names of different cuts of pork, you're definitely not alone. The industry recently changed many of the names of different cuts in the hopes of cutting down confusion on the previous names. You can read more about reasons why the names changed in this article. To see exactly what cuts have changed and how to recognize them, please check out this helpful pdf

A few of the ingredients for this dish: chopped bacon, sliced onions,
chicken stock, bay leaves, and brown sugar.
No worries, there is NO cherry jello in this recipe! lol

I thought about many different ways to cook these chops... whether to grill them, to roast them, to pan sear them... I wasn't sure what I wanted to do. Finally, I settled on using my old standby... the slow cooker! I can always count on my slow cooker for a tasty and relatively easy meal. My first cookbook was centered around gluten-free slow cooker recipes, so I was excited to figure out a way to make these chops super delicious and tasty in my favorite appliance. 

Cooking the pork chops in the bacon fat to brown them before
placing in the slow cooker. 

I researched a lot of different recipes, both in my cookbook, in Stephanie's cookbook, and several online recipe databases, but I just couldn't find exactly what I was looking for. I wanted something savory without a lot of added sweetness like apples or jam. And I generally try to avoid recipes calling for soy sauce because I react to it, and I haven't found a good savory substitute for 1/2 cup of soy sauce! (You'd be amazed how many pork chop recipes call for 1/2 cup of soy sauce! yeesh!) 

Rendering the fat out of the bacon, to use as our cooking fat for the chops,
the onions, and the garlic. 

I also checked out a few food bloggers and finally found this recipe that really appealed to me. I loved that the sauce didn't contain any soy sauce, and since the pork is slow cooked, it basically creates it's own stock for a quick sauce/gravy while it's cooking.

Overall I made the recipe very similarly to the original recipe, however I did change things along the way just to make things a little easier. I didn't need to use canola oil, I actually used 6 chops, used less stock to make a thicker sauce, and well... you get the picture..

Random cat picture.... you're welcome... :-) 

The finished recipe really produces a great flavor on the chops and the gravy is just killer! While I enjoy grilled meats, I'm not a big fan of grilling personally, so using the slow cooker was right up my alley.

Do take the time to brown the chops and cook the onions before adding them to the slow cooker. IT really gives the meat and gravy a great flavor and color, that you don't get by just tossing the ingredients in the cooker and letting them go.


Slow Cooked Smothered Porterhouse Chops
adapted from this recipe and shared by Carrie of Gingerlemongirl.com
free of gluten, dairy, eggs, and soy
printer-friendly recipe

Pork Ingredients:
4-6 porterhouse loin chops
4 slices of thick cut bacon, diced into small pieces
1 large yellow onion, sliced thinly
2 teaspoons freshly minced garlic (about 2 small cloves)
1/4 cup water
2 bay leaves

Initial Sauce Ingredients:
1 tablespoon brown sugar
1 tablespoon Dijon mustard
2 cups low sodium chicken stock
1 tablespoon Worcestershire sauce (Lea & Perrins is gluten-free)

Later Sauce Ingredients:
2 tablespoons water
2 tablespoons cornstarch
1 tablespoon apple cider vinegar
1 teaspoon dried parsley (+ more for serving)

Directions: 

  1. Add a sprinkling of salt and pepper over the raw pork on both sides. Set aside. 
  2. Heat a heavy-bottomed skillet on medium high heat. Once the pan is hot add the diced bacon. Cook for 5-6 minutes until the fat has rendered from the bacon and the diced bacon bits are golden and crispy. Remove the bacon bits onto a paper-towel lined plate and allow them to cool. Then refrigerate bacon bits until serving the pork. 
  3. Add the pork chops to the hot pan of bacon fat and cook for 2-3 minutes on each side just until browned. Add pork chops to the slow cooker. 
  4. Add the sliced onions and 1/4 cup water to the same pan of bacon fat and cook onions until softened and translucent, about 5-6 minutes. While the onions are cooking, stir around the pan getting up all the brown bits from the bacon and pork. Then add garlic and cook just until fragrant, about another minute. Pour this mixture over the chops in the slow cooker along with the bay leaves. 
  5. In the same pan add the chicken stock, brown sugar, Worcestershire, and Dijon mustard. Whisk until dijon is combined into the stock and cook on high until the sauce mixture is boiling. Pour over the meat in the slow cooker. 
  6. Cook browned pork and sauce on high for 4 hours or on low for 8 hours. 
  7. Once the pork is fully cooked and you're ready to serve, remove the pork, most of the onions, and the bay leaves from slow cooker. Discard the bay leaves. The pork chops should be tender enough to pull away from the bones. Cover the pork chops with aluminum foil and put in a hot oven while you continue to prepare the sauce. 
  8. Pour the remaining sauce from the slow cooker into a large sauce pan and place on medium-high heat. 
  9. In a small bowl mix together the cornstarch, 2 tablespoons of water, cider vinegar, and dried parsley. Whisk into the sauce. 
  10. Allow the sauce to cook until boiling. Cook an additional 5-6 minutes until sauce has thickened to your likeness. If you want it thinner add a bit more water. If you prefer it thicker, add a bit more cornstarch that's been added to a little bit of water (a cornstarch slurry = 1 tablespoon cornstarch + 1 tablespoon water.)
  11. When ready to serve sprinkle each piece of pork with some of the crispy bacon bits and then ladle the thickened sauce over each chop. Also, you can add additional parsley sprinkled over each serving. We ate this with seasoned rice and broccoli. Refrigerate any leftovers for up to 3 days. 

NOTES: 
  • Alternately, instead of using a slow cooker you could bake the browned pork chops in a large casserole dish with the initial sauce, covered with aluminum foil at 300 degrees for 3-4 hours. Finish the sauce as directed above. 
  • I had a hard time finding the exact type of pork chop that was needed for this post. The pork chops I found were simply listed as QUARTER LOIN CHOPS, which I think is an older term that's not used in all grocery stores anymore. But they worked great for this recipe, so don't sweat it if you can't find the exact bone-in cut called for. 
  • If you want an even more flavorful, smooth, and silky sauce/gravy, you can stir in 2 tablespoons of butter when you're ready to serve the sauce. Allow it to melt and dissolve into the sauce and you're ready to go. 


GLG Disclosure: 
This post is part of a new monthly series featuring local NC pork products sponsored by the North Carolina Pork CouncilThe NC Pork Council provided me with a gift certificate to purchase pork products and create a recipe to share. The opinions and photography in this post are completely my own.

Pin It!

Tuesday, May 20, 2014

Celebrating Local NC Food: Pork Tenderloin with the NC Pork Council


My grandmother, whom we affectionately called "Nan", LOVED pork tenderloin. She wasn't necessarily the world's greatest cook, although she made a killer dish called skillet dinner, the most rockin' pound cake you've ever eaten, and a sirloin tip roast that would melt in your mouth...

Her biscuits though? Hard as a rock... coffee? Don't even ask!

But pork tenderloin? She could knock it out of the park. I still haven't figured out EXACTLY how she made it, because it still never tastes quite the same when I make it... but it's still one of my favorite dishes!


When the NC Pork Council emailed me several months ago I was surprised and intrigued. I LOVE supporting local North Carolina products and I was more than happy to be on board with the NC Pork Council as one of their NC bloggers and recipe developers!

Pork is a North Carolina tradition. It's especially prominent here in Eastern NC. You'll find pork barbecue restaurants in nearly every town, each with it's own special sauce or way of cooking the pig just right. Another reason I like pork is that many cuts are great in the slow cooker. They can cook for long periods at a low & slow heat and turn out great. It's perfect for someone like me as a commuter who works 40 hours a week.

However, this month's product is pork tenderloin. A lean and very tender cut that you probably don't want to put in the slow cooker. As tenderloin cooks fairly quickly and you really don't want to overcook it. It will dry out very fast. Tenderloin is also great marinated and has a very mild flavor.

I will be highlighting one pork product per month and creating a gluten-free recipe to go along with it. The recipe this month is for simple pan-seared pork tenderloin with homemade brown gravy... almost the way my grandmother made it! I wish I knew EXACTLY how she made it! lol But this is pretty darn close and very tasty.


Pan-Seared Pork Tenderloin with Homemade Brown Gravy
free of gluten, dairy, and soy
created by Carrie of Gingerlemongirl.com

Tenderloin Ingredients:
  • 1-2 pounds fresh pork tenderloin, sliced into 1" medallions
  • 2 tablespoons olive oil or bacon grease
  • 1/2 teaspoon freshly ground black pepper
  • 1/2 teaspoon sea salt
Gravy Ingredients:
  • 2-3 tablespoons pork tenderloin pan drippings
  • 4 tablespoons brown rice flour
  • 1/2 teaspoon freshly ground pepper
  • 1/2 teaspoon sea salt
  • 1 1/2 cups warm water
  • 1 tablespoon Worcestershire sauce or soy sauce (if you can tolerate soy)
  • OPTIONAL: 1 tablespoon butter or olive oil to finish gravy
Directions: 
  1. Heat a large cast-iron or heavy-bottomed skillet to medium high heat. Add olive oil or bacon grease and cook until sizzling. Add 4-5 pork medallions to the pan at a time. Add salt & pepper to each medallion and cook for 2-3 minutes on each side, until the pork is richly brown and caramelized and the juices in a medallion run clear. Set cooked tenderloin on an oven-safe plate in a warm oven. Repeat until all medallions are cooked. 
  2. In the same pan whisk in brown rice flour and cook for several minutes on low heat to cook out the "flour" taste. Slowly whisk in warm water and turn heat up to medium-high. Continue to whisk until gravy thickens and will coat the back of a spoon. When the gravy is thickened as much as you'd like it, stir in Worcestershire sauce and taste to see if it needs additional salt or pepper. TO finish the gravy you can also stir in 1 tablespoon of butter or additional olive oil to give the gravy a velvety consistency. 
  3. Serve pork tenderloin medallions and gravy while hot with gluten-free toast scrambled eggs, and slices of fresh tomatoes. 


GLG Disclosure: 
This post is part of a new monthly series featuring local NC pork products sponsored by the North Carolina Pork CouncilThe NC Pork Council provided me with a gift certificate to purchase pork products and create a recipe to share. The opinions and photography in this post are completely my own.


Pin It!

Tuesday, May 13, 2014

Product Review: Cook Simple's Cowboy Chili Meal (Gluten-Free, Dairy-Free, Non-GMO)


I feel like I can hear the sound of the dinner bell at the chuckwagon ringing away with this review! I was first introduced to Cook Simple's Cowboy Chili last year when I received a box in a Taste Guru monthly box. I tried it and really enjoyed it. It was a simple healthy chili that could be made in about 20 minutes for a quick, healthy, and easily gluten-free dinner!

I've bought this boxed meal several times since, and I'm always amazed at the quality of the meal and how healthy it is for a boxed mix. The box comes with directions on the pack and a packaged mix of dried beans, spices, and vegetables. You add a can of diced tomatoes, 1 pound browned ground beef, and 2 1/2 cups of water and voila... dinner 20-30 minutes later! You could easily make it vegetarian by using another can of beans or garbanzos in place of the ground beef (I actually added some leftover garbanzo beans I had in the fridge last night!), and it's already dairy-free... which is rare option for packaged gluten-free foods.

And because I'm sensitive to a lot of tomatoes (I can handle small amounts) I actually use canned pumpkin puree or sweet potato puree instead of the tomatoes... you can't tell the difference! (And bonus fiber! woohoo!) As you will see below, for such a great tasting dish the ingredient list is very small and mainly consists of dried vegetables and beans!

Nutritional Info: 
  • Calories: 140 per serving (as packaged, with 1/4 pound 85% lean ground beef = 384 cals total)
  • Total Fat: 0 grams (as packaged, with additional 1/4 pound 85% lean ground beef = 17 grams total)
  • Cholesterol: 0 milligrams (as packaged, with additional 1/4 pound 85% lean ground beef = 77 milligrams total)
  • Sodium: 85 milligrams (as packaged, with additional 1/4 pound 85% lean ground beef = 160 milligrams total)
  • Total Carbohydrates: 20 grams
  • Dietary Fiber: 1 gram
  • Sugars: 11 grams
  • Protein: 1 gram (as packaged, with additional 1/4 pound 85% lean ground beef = 22 grams total)

Ingredients:  

Red Beans*, Quinoa, Black Beans*, Tomato*, Onion*, Peppers*, Zucchini*, Chili Powder (chili peppers*, salt, spices, garlic*), Sea Salt, Spices, Spinach* 

* = Dried  (from Cooksimple.com)


Pin It!

Wednesday, March 20, 2013

2 Hour Gluten-Free Slow Cooker Meals: Jambalaya


One thing I learned when I wrote my slow cooker cookbook was that people have very strong opinions about their slow cookers. They can love them or they can hate them. There aren't many 'tweeners.

Well one thing I love about them (especially newer "Crock Pot" slow cooker models) is that they actually cook pretty fast, especially on high heat. And yes, I know that's a contradiction. Why in the WORLD would you want a "slow cooker" to cook FAST?

Because I'm never home. That's why!  I'm out of the house over 10 hours a day during the work week, which unfortunately is not conducive to MOST slow cooker recipes (unless you like really burned, or really over cooked food!). So some evenings when I get home... I throw something in the slow cooker as SOON as I get in the house. Toss it in... I can do a ton of other things (like write other cookbooks) while that's cooking and by the time Michael gets home a few hours later... dinner is done. And it took me all of five minutes to throw together.


And that was tonight's dinner. Zatarain's Jambalaya with gluten-free sausages cooked in the slow cooker. We served it with leftover broccoli from the night before and some canned green beans. We're super gourmet like that.

I don't make boxed mixes every week... but it's so cool you can make them like this in your slow cooker. Nothing burns, it's not overcooked (it actually cooked the rice through in about an hour and forty minutes), and there's very little to clean up. And since there's only two of us... this mix (and we added extra brown rice and water, so it wouldn't be as spicy) will make at least 3 meals for us.


Thanks Zatarain's! I love seeing those two happy words on your box! Now if only you could make it with less sodium and fewer preservatives you'd make a lot of other people happy too! :-)

So try it out! A slow cooker meal in two hours. And there's quite a few recipes you could use in one of my favorite cookbooks!
Pin It!

Thursday, January 24, 2013

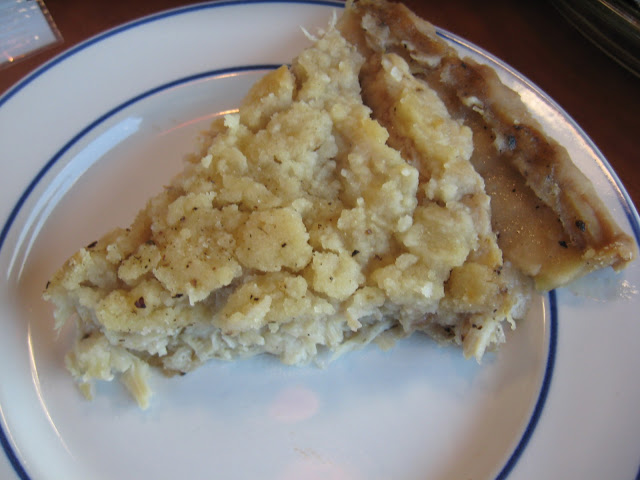
Gluten Free Moravian Chicken Pie Recipe


(This was a post I found in the archives that I meant to share months ago and it somehow was never published... I think it's perfect for January and for those who love serious comfort foods! Enjoy! -- Carrie) 

Before I went gluten-free one of my favorite places to eat lunch was this little place called "The Sugar Plum Shop." Actually you never ate there, you just picked up your food and went on your merry way.

At Sugar Plum you had the choice of three items: a pimiento cheese sandwich, a chicken salad sandwich, or a slice of Moravian Chicken Pie. More often than not, I had the pie.

The pie was basically cooked chicken in a thick sauce poured into a pie crust and topped with with an additional crust or a savory crumble topping. It sounds kinda boring, but it was and still is serious comfort food. No veggies (of course you could add them if you want), just sauce and tons of meaty chicken and flaky crust.

While we were recently traveling I bought some gluten-free frozen pie crusts at Earthfare and the first thing that popped into my mind was Moravian pie. I hadn't had any in years, I think since I had been gluten-free... and I thought... these crusts are MEANT for a savory chicken pie.


I don't know actual background of the pie. We have a history of the Moravian community in the Piedmont area of North Carolina and I think the idea of this pie may have originated there. It's also similar to some pie recipes I've seen in Amish cookbooks. It is simple, comfort-food cooking at it's very best.  Go ahead add veggies if you want.. but really, just give me the plain 'ol chicken pie!

Here's how I make it: 

Gluten-Free Moravian Chicken Pie
free of gluten/dairy/soy
adapted by carrie of gingerlemongirl.com

Crust:
1 - 8" or 9" prepared gluten-free, dairy-free pie crust, unbaked (store-bought or homemade -- scroll to the bottom of the page for the pie crust recipe)

Filling: 
2 1/2 cups cooked chicken (or the cooked meat from a small roasting chicken)
2 tablespoons butter or coconut oil
3 tablespoons brown rice flour
1/2 teaspoon sea salt
1 teaspoon ground pepper
1- 1 1/2 cups gluten-free chicken broth (or use the broth from cooking the chicken)

Crumble Topping: 
1/4 cup brown rice flour
3 tablespoons butter or coconut oil
pinch salt

Directions: 
Preheat oven to 350 degrees. In a medium sauce pan melt 2 tablespoons of butter over medium heat. Add 3 tablespoons of brown rice flour, sea salt, and ground pepper. Whisk to cook flour in the butter for 2-3 minutes. Slowly pour in the gluten-free chicken broth. Start with 1 cup and if you want a more "saucy" pie add the additional 1/2 cup of broth. Whisk over medium heat for 3-5 minutes until sauce has thickened. Add cooked chicken to the sauce. Cook for an additional 3-4 minutes to heat chicken through. Pour chicken and sauce into the prepared gluten-free pie crust. In a small bowl mix together the topping ingredients: 1/4 cup brown rice flour, 3 tablespoons of butter, and a pinch of salt. Sprinkle the crumbly mixture evenly over the surface of the pie. Bake for 45 minutes to 1 hour until the sauce around the edges of the pie is bubbly and the top of the pie is golden brown. Allow pie to cool for about 20 minutes before serving. Serve with steamed veggies on the side or a fresh green salad. This pie is delicious hot or cold! 


Pin It!

Friday, December 14, 2012

Ground Beef, Kale, and Caramelized Onions with Victoria Gourmet Seasoning


Several months ago I was complaining on facebook that I can't seem to find a curry seasoning blend that I actually like. And I want to like it! I love vegetarian meals and many cookbooks recommend curries for a vegetarian main course. 

As I was complaining, a young lady named Lisa G. contacted me and said she worked for a company called "Victoria Gourmet" and she'd love to send me some seasoning blends to try to see if I liked them. She really hoped their personal curry blend would knock my socks off. 

A week later a GINORMOUS box arrived on my doorstep and while I was trying to figure out what in the world I purchased that was so huge.. the scent of spices greeted me as I opened the box. Oh my.  The aroma was heavenly and so fresh! Unfortunately we were traveling a lot during that time and I didn't really have much time to play around with cooking and using the spices. 

We kept the spices in their cute tin boxes in the guest room until I could figure out how to store them in my tiny kitchen. (Which is a fun story for another post!)  Once I had them in the kitchen within arms length, I was eager to try them! There are so many!! 


Slowly but surely over the past few weeks we've been using Victoria Gourmet spice blends. And I really am blown away. These herbs and spices are so incredibly fresh (not to mention naturally gluten-free) that the aroma (literally as soon as you open the lid) makes you smile! I've never been a huge fan of using lots of different spices, because honestly, I don't feel like I'm "food-educated" enough to truly understand how each component of different spices works best. Also, considering you generally need to use herbs & spices that complement what food you're specifically cooking (pork vs. chicken vs. beef vs. non-starchy veggies vs. root veggies, etc...)... and I'm not very good at that!

But I'm learning that these mixes from Victoria Gourmet completely take the guess work out of proper seasoning!

The one-pot meal we made a few nights ago was simple enough:
  • 1 pound of grass-fed ground beef
  • 1 pint of button mushrooms, sliced
  • 1/2 cup (already cooked) caramelized onions -- which amounts to probably 1 1/2 fresh onions?
  • 1 large bunch of kale, stems removed, leaves torn into bite size pieces, and rinsed with cold water
I basically sauteed the above and then added about 1 tbsp. of the cinnamon chile rub seasoning mix to the blend. It mentioned being good with "steak" on the label, so I hoped it would pair well with the beef & kale. It was delicious! The cinnamon chile mix gave the beef & veggies a kind of southwestern flavor. The meal had just a hint of sweetness from the "Sumatran Korintje" cinnamon and subtle heat from the blend of chiles. Considering I'm not one to use many "hot" spices in any meal, I was pleasantly surprised by this dish and how the seasoning blend worked with it. And it made me realize I could take the same basic ingredients and simply add a different spice blend next week for a completely different, but easy meal. 

We served the meal over 1/2 cup of cooked brown basmati rice and topped it with peach salsa. This meal was definitely a win! 

Over the next few weeks I'm going to share several more posts about Victoria's Gourmet seasoning blends and how I've used them. For my final review there will be a Victoria's Gourmet seasoning giveaway to one lucky winner! I'll share those details later, so stay tuned for how you can win a trio of spice/seasoning mixes from VG!

Meanwhile... what would you do with the Cinnamon Chile Rub Seasoning Mix?


GLG Disclosure: 
Victoria Gourmet provided me with free samples of all their seasoning blends, in order to do an online review if I chose to do so. This is not a sponsored post and I did not receive compensation. The opinions in this post are completely my own. 
Pin It!

Wednesday, September 12, 2012

Everything Gluten-Free Slow Cooker Cookbook -- "Tuscan Chicken and White Beans"


I've asked several readers and fans to try recipes from my upcoming gluten-free slow cooker cookbook! Throughout the next few weeks, I plan on sharing their thoughts (from emails and pictures) on the recipes they have tried in my new book!

This review comes from Suzanne and Chris N. They decided to try the Tuscan Chicken and White Beans, a recipe from the Poultry chapter. Here's how the dish turned out for them: 

Hey Carrie

You had asked Suzanne (aka. "the wife") to test a recipe. Since I do the bulk of cooking here these days, that job actually fell on me (Chris, the husband).

We picked the Tuscan Chicken because it seemed like a recipe we normally would never try. I know that seems odd, but we've been adventurous lately.

My first impressions were not optimistic. I had to go buy a bunch of cans, which is not how we normally cook. We prefer to cook with fresh ingredients, particularly this time of year when they are so plentiful, good, and inexpensive. In any case, I followed the recipe to the letter despite my temptation to substitute fresh stuff here and there.

I must say we were pleasantly surprised. It was really good. Not sure what more I can say other than I wouldn't change it a bit. The dish was seasoned perfectly and well balanced. No particular ingredient overtook the dish. Because there is just the two of us, there was plenty leftover, so we both took some for lunch the next day, and we agreed that warmed up a day later, it tasted even better. I guess that makes sense for a dish designed to stew in a slow-cooker all day.

...We served it over rice noodles.


Many, many thanks to Suzanne and Chris for trying the Tuscan Chicken and White Beans. I specifically designed a lot of the recipes in this book so they would be "pantry-friendly" -- so for those of you who don't always have fresh vegetables available, recipes such as this can be super easy and just as healthy. I'm so glad Suzanne and Chris tried this recipe and enjoyed it! 


Pin It!

Tuesday, August 14, 2012

Eastern North Carolina Chopped Turkey Barbecue Recipe


While I grew up in the foothills of southwestern Virginia, I've become an eastern North Carolina girl through and through. I realized about a year ago that I had now lived in coastal NC, longer than I had lived in Virginia growing up (how time flies).

One of the first foods I ever tried when I moved to eastern NC was chopped pork barbecue. It's one of the most popular foods at locally owned restaurants all around the North Carolina region. In eastern NC, the sauce is primarily a vinegar-based sauce, while if you head to western NC (or states west of NC) the main sauce seems to be a sweeter tomato-based sauce.

I personally prefer the savory tartness of the vinegar sauces. The vinegary sauce, combined with the slightly sweet (and very simply made) coleslaw makes for an incredible taste combination that I often crave.

The picture above is actually what you'll get if you head to Ayden, North Carolina for some barbecue at The Skylight Inn. You have 4 menu choices... chopped barbecue, cornbread, and coleslaw -OR- you can get that barbecue on a sandwich if you're not a fan of cornbread (but oh you should be!) That's it folks. It's simple straight forward food. Michael and I are huge fans of Skylight Inn and while you won't find much else in Ayden, NC...that wood-smoked barbecue is completely worth the drive. (And guess what? Their cornbread? It's gluten-free! The owner told me it was only made with cornmeal, salt, and water... I tell ya... it's good stuff!) And just a tip... BRING CASH... they don't accept debit cards!!

After our last trip there I decided I was going to try to make barbecue at home, but I wanted to try it with turkey legs. Turkey legs are a great source of cheap protein. You can get 3-4 pounds of turkey legs for about $1 a pound.  I only had to make one batch of this chopped turkey barbecue to declare it a winner. It's the most ridiculously easy recipe you'll ever make and if you're a fan of the hearty chopped pork barbecue, (while I don't know the exact numbers) I'm pretty sure this version is a bit healthier and definitely just as delicious!

Eastern North Carolina Chopped Turkey Barbecue
Free of gluten, soy, dairy/casein
Created by Carrie of Gingerlemongirl.com
Makes: a whole lot!
Printer-friendly recipe.

Turkey:
3-5 pounds of turkey legs (about 3-4 large turkey legs)

Eastern NC BBQ Sauce: 
1 cup white vinegar
1 cup apple cider vinegar
3 tablespoons brown sugar
1 tablespoon cayenne pepper
1 tablespoon hot pepper sauce (like Tobasco)
1 teaspoon salt
1 teaspoon ground black pepper
1 tablespoon red pepper flakes

Cook & Prepare the Turkey Barbecue: 
Place turkey legs in a 4-6 quart slow cooker. Cook on low for 8-10 hours until meat is "falling off the bone" tender. Carefully remove turkey legs from the slow cooker and place on a large platter. Remove fat surrounding turkey meat. Remove bones & tendons from the turkey meat (this can be a bit tedious depending on the turkey leg). Chop meat as fine as you prefer. In eastern NC, the meat is often chopped quite fine. Place in a large bowl for storage.

**Carrie's Notes: Make sure to strain and save all the broth leftover in the slow cooker from the turkey! That's instant bone broth you can use in recipes through the rest of your week!

Make the Eastern NC BBQ Sauce: 
To make the sauce, simply place all sauce ingredients into a large mason jar. Place the lid on the jar and shake vigorously to combine. Pour desired amount of sauce over the prepared turkey barbecue and stir to combine. Use as little or as much as you desire... we LOVE a lotta sauce!! Store any remaining sauce in an airtight jar or container in the refrigerator for up to two weeks.

Serve the barbecue with homemade coleslaw and cornbread or use as a sandwich filling!


Pin It!

Wednesday, May 30, 2012

Rosemary Garlic Pan Steak with Wilted Spinach Recipe


We eat a lot of meals that look kind of like the above photo here. Lean, healthy proteins served over lightly sauteed spinach. Spinach is the new pasta. Did you know? It's so easy to cook, and you don't even have to cook it if you don't want too. I will serve just about anything over spinach. Except cupcakes. Cupcakes don't really jive with spinach. 

This was a meal from Monday night. It took about 25 minutes to make from start to finish, complete with the caramelized onion & mushroom sauce. I will say, if my kitchen is clean (as it was on Monday night -- and as it's continued to be this week -- last week was a whole 'nother ball game) I'm much more inclined to cook. If it's a mess... I'll find excuses not too. 


This meal is made in two steps (well three if you count the minute it takes to saute the spinach). You first caramelize the onions and cook the mushrooms to create the sauce to serve over the spinach and steak. The majority of the cooking time is spent caramelizing the onions, that will take about 15 minutes. Once you've finished the sauce, you set it aside and keep it warm in a small bowl, and then make the steak in the same pan. 

I served this steak with homemade applesauce on the side. Not really a popular side dish for steak... but we liked it! Again it was a really quick side dish to make. Have you ever made homemade apple sauce? You simply cook (peeled & seeded) apples for about 10 minutes with a little water. That's it. You can add cinnamon, maybe a little sugar if your apples are tart... but that's all you have to do. 


Rosemary Garlic Pan Steak with Wilted Spinach and Caramelized Onions
naturally gluten free, dairy free, paleo friendly, and soy free
created by Carrie Forbes, of Gingerlemongirl.com

For the caramelized onions & mushrooms:
2 tbsp. olive oil
1 medium sweet onion, diced
1 small (6 oz. - 8 oz.) package button mushrooms, cleaned & sliced
1/2 cup gluten free beef broth

For the rosemary garlic steaks:
2 (4 oz. - 8 oz.) ribeye steaks
1/2 teaspoon dried, crushed rosemary
1/2 teaspoon garlic powder, or 2 cloves minced garlic
salt & pepper, to taste
3 tbsp. butter or olive oil

For bed of spinach:
1 (9 oz.) bag of fresh baby spinach

Directions:

  1. Heat a large, heavy-duty skillet (cast iron is my favorite.) Add olive oil. When oil is hot, add onions and cook over medium-low heat, slowly for about 8-10 minutes until onions are starting to become very soft and browned (caramelized.) Add mushrooms and beef broth. Continue to cook over medium heat for an additional 8-10 minutes until broth has reduced and mushrooms are softened and cooked through. Transfer onions, mushrooms, and sauce to a small bowl and cover with aluminum foil to keep warm. 
  2. Place skillet back on stove. Place on medium-high heat and add 1 tbsp. butter to pan. When butter is hot & sizzling add steaks. Add half of rosemary, garlic, salt & pepper to each side of the steaks. Cook steaks for 3-5 minutes on each side, until done to your preferences. Finish steaks by placing 1 tbsp. butter on each and allow to melt. Remove steaks from pan and place on a serving plate. 
  3. Add bag of fresh baby spinach to the skillet and cook for 1-3 minutes until spinach is wilted to your preference. Add half of spinach to each plate. 
  4. Slice steaks into small strips and place 3-4 ounces of steak (or whole steak depending on how hungry you are!) onto each serving of spinach. Add about 1/3 cup of onions & mushrooms with sauce over the steak and serve immediately. 
  5. For our family -- the steaks & caramelized onion sauce makes 4 servings, so we have half a steak each for dinner and save the rest for lunch the next day. TO make 4 servings of spinach, I would wilt 2 bags instead of 1. The spinach is best, when just cooked though, which is why I prefer to only cook as much as needed initially. 


Pin It!

Tuesday, May 29, 2012

Make it Gluten-Free Tuesdays: Barbecued Spareribs

Photo from North Carolina Miscellany

Since we just celebrated Memorial Day, I thought it would be appropriate to share this recipe for Barbecued Spareribs from the 1964 Hyde County (NC) Cookbook.

This recipe isn't one from my great-grandmother's collection (as most will be in this series.) After thumbing through her recipe box and cookbooks, I couldn't find a grilling/barbecue recipe! I happened to find this pork barbecue on North Carolina Miscellany just in time for grilling season! North Carolina Miscellany is a really cool blog created & written by the NC history collection of UNC libraries. I'm rather addicted to all-things-north-carolina-history, so this one of my favorite blogs to visit.


This cookbook was originally published in 1964 by the Hyde County Home Demonstration Club. A home demonstration club was generally a women's group, formed primarily of farm wives or those who lived in a rural setting. It was a way to share education in the art of homemaking such as cooking, gardening practices, raising chickens, canning, food preservation methods, etc... These groups often shared and collected recipes and sometimes the resulting collections ended up a collaborative cookbook like this one.

This particular cookbook was so well received in the Coastal region of NC, that 3 more editions were printed in 1968, 1970, and 1973.

A great thing about this vintage recipe is that it is almost completely gluten-free, as is! You only have to change one ingredient to make this a safe option! The tomato soup. As you know, nearly all store-bought canned tomato soups are thickened with wheat flour.


For this recipe:  in place of the can of tomato soup (and we're assuming this is a small (10 3/4 oz.) can since the recipe serves around 4) you can use 1 cup + 2 tablespoons gluten-free ketchup or quite simply 1 cup plain, canned tomato sauce + 2 additional tablespoons brown sugar. Also if you wanted the vinegar & tomato sauce thickened a bit, you could add 1 tablespoon corn starch + 2 tablespoons water mixed together. Whisk together the cornstarch slurry with the tomato sauce and vinegar and cook in a small saucepan over medium heat until slightly thickened. Then pour sauce over the ribs and roast as directed.


One more tomato soup option: If you are a super motivated cook you could even simply create your own homemade gluten-free tomato soup!

In most older recipe books like this, if a recipe indicates "vinegar" it generally is referring to white, distilled vinegar which is gluten-free.


Barbecued Spareribs
Created by Mrs. Miles Finch
Published in the Hyde County Cookbook, c. 1964
Adapted to be gluten-free by Carrie Forbes
Printer-friendly recipe.

Dry Rub: 
1 tablespoon chili powder
1 tablespoon salt (I personally would only use about 1 teaspoon of salt, 1 tablespoon is a LOT of salt!)
1 tablespoons celery seed
1/4 cup brown sugar
1 teaspoon paprika

Tomato Sauce:
2 pounds pork spareribs, cut into serving pieces
1/2 cup white, distilled vinegar
1 cup + 2 tablespoons gluten-free ketchup (or tomato sauce option listed above)

Directions: 
  1. Mix together dry rub ingredients and rub over the spare ribs. 
  2. Place ribs in a large roasting pan and broil for 8 minutes on each side. 
  3. Arrange the ribs in the roasting pan to create a rack. 
  4. Mix vinegar & ketchup together and pour over ribs. 
  5. Roast at 350 degrees for 1 1/2 hours, basting with the tomato sauce every 30 minutes. Makes 4 very large servings. 
  6. Carrie's Slow Cooker Option: Make a foil rack to place in the bottom of your slow cooker by rolling up 3-4 pieces of foil and placing in a rack pattern in your slow cooker, as seen in the picture below. After initially broiling the ribs in the oven, place in a large 6-quart, greased slow cooker. Pour tomato sauce over ribs and cook on low for 6-8 hours or on high for 3-4 hours until ribs are extremely tender. If desired, baste ribs with tomato sauce mid-way through slow cooking. TO release excess moisture from the slow cooker during the cooking time, place a chop stick right under the lid to create a vent. 
Make an easy foil rack using tightly rolled foil "sticks" in a criss-cross pattern.
You can roast chickens, ribs, beef roasts, etc.. 

***********************


Now it's your turn!
Do you have a favorite family recipe that you re-created to be gluten free? It can be a new post, an old post, a post you've edited! Simply fill out the form below and a link to your recipe will be included! If you have time, please add a link back on your post to today's Make it Gluten-Free Tuesday at Gingerlemongirl.com.


Pin It!

Tuesday, December 13, 2011

Gluten Free Christmas Morning Bacon Quiche


I shared this recipe last year when I was participating in a gluten free blogging event... but it was sadly neglected and didn't get much attention.

And this quiche? It needs attention. It's a really delicious dairy-free quiche with a mouth-watering tangy sauce drizzled over the top!

So I suggest making it.. now. Before Christmas. Enjoy this and make sure you add a BIG drizzle of the wonderful not-one-bit-sinful, savory sauce!

To make a paleo version of this quiche leave off the shredded potato crust (or use shredded sweet potatoes instead). For the tangy white sauce you can use arrowroot starch or you could even try using 2-3 teaspoons of coconut flour instead of the sweet rice flour.

Christmas Morning Bacon Quiche
free of gluten, dairy/casein, and soy
created by Carrie Forbes @ Gingerlemongirl.com
printer-friendly recipe

Tangy white sauce for quiche:
1  1/2 cups hemp milk (or coconut milk or almond milk -- use what you like best! Coconut would be lovely here!)
2 tablespoons sweet rice flour
1 tablespoon olive oil
½ teaspoon salt
½ teaspoon pepper
1 teaspoon Herbs De Provence (a blend of herbs including rosemary, marjarom, thyme, and savory, often used in dishes from southern France.) 
1 tablespoon lemon juice

Quiche Ingredients:
5 eggs
1 lb. bacon, cooked and crumbled
5 green olives, finely chopped
½ cup chopped red peppers, or canned pimientos (drained)
½ cup green onions, sliced

Crust:
10 oz. frozen shredded gluten free hash browns, defrosted and drained of all water
1 egg
½ teaspoon salt
½ teaspoon pepper

Directions:
Preheat oven to 350 degrees.  In a large bowl mix together defrosted and drained shredded hash browns. Mix in egg, salt, and pepper. Press mixture into a crust in a greased 9” deep pie pan or an oven-safe casserole dish.  Place in heated oven for 10 minutes, remove and set aside.  In a small sauce pan whisk together hemp milk, sweet rice flour, olive oil, Herbs De Provence, salt, and pepper. Cook on medium heat whisking constantly until the sauce thickens. Once the sauce has thickened whisk in lemon juice and set aside to cool. Reserve ½ cup of white sauce for serving. Layer cooked crumbled bacon, chopped green olives, and red peppers  in the hashbrown crust. Beat eggs in a bowl. Slowly whisk in 1 cup of white sauce. Pour eggs/white sauce mixture over the vegetables and bacon in the hashbrown crust. Bake at 350 degrees for 1 hour or until quiche is set in the middle. A toothpick inserted in the middle should come out clean. Serve quiche in slices drizzled with warm white sauce.
Pin It!

Wednesday, July 20, 2011

A crackin' good burger - gluten free style


One of my favorite cookbooks is Jaime Oliver's "Food Revolution." His recipes are basic, healthy and are usually quite easy to make. Many of them are also naturally gluten free. A definite plus.

I have been meaning to try Jaime's recipe for 'Crackin' Good Burgers" since last summer! We finally had a chance last week. Michael mixed up the ground beef & spices and instead of using crackers as called for in the recipe, we used gluten free tortilla chips that we smashed in a bag to make crumbs. A seriously delicious decision! I used my infamous grill pan to cook the burgers on the stove. Michael added cheese to his burger along with turkey bacon and tomatoes.

These burgers were awesome! We served them on Udi's gluten free whole grain hamburger buns and it felt like a real summer cookout!

What's your favorite burger recipe?
Pin It!