Thursday, January 24, 2013

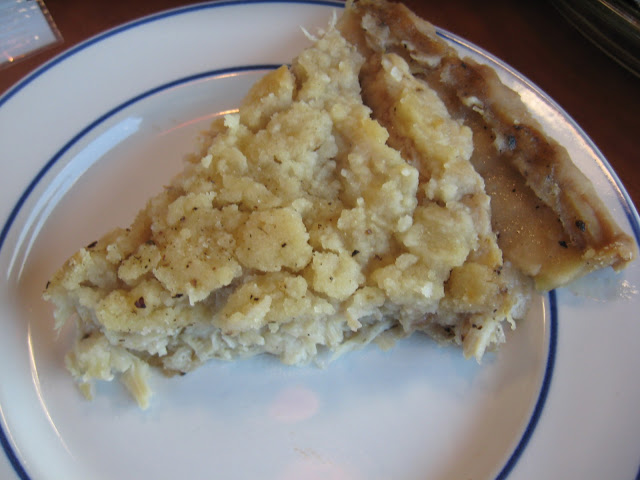
Gluten Free Moravian Chicken Pie Recipe


(This was a post I found in the archives that I meant to share months ago and it somehow was never published... I think it's perfect for January and for those who love serious comfort foods! Enjoy! -- Carrie) 

Before I went gluten-free one of my favorite places to eat lunch was this little place called "The Sugar Plum Shop." Actually you never ate there, you just picked up your food and went on your merry way.

At Sugar Plum you had the choice of three items: a pimiento cheese sandwich, a chicken salad sandwich, or a slice of Moravian Chicken Pie. More often than not, I had the pie.

The pie was basically cooked chicken in a thick sauce poured into a pie crust and topped with with an additional crust or a savory crumble topping. It sounds kinda boring, but it was and still is serious comfort food. No veggies (of course you could add them if you want), just sauce and tons of meaty chicken and flaky crust.

While we were recently traveling I bought some gluten-free frozen pie crusts at Earthfare and the first thing that popped into my mind was Moravian pie. I hadn't had any in years, I think since I had been gluten-free... and I thought... these crusts are MEANT for a savory chicken pie.


I don't know actual background of the pie. We have a history of the Moravian community in the Piedmont area of North Carolina and I think the idea of this pie may have originated there. It's also similar to some pie recipes I've seen in Amish cookbooks. It is simple, comfort-food cooking at it's very best.  Go ahead add veggies if you want.. but really, just give me the plain 'ol chicken pie!

Here's how I make it: 

Gluten-Free Moravian Chicken Pie
free of gluten/dairy/soy
adapted by carrie of gingerlemongirl.com

Crust:
1 - 8" or 9" prepared gluten-free, dairy-free pie crust, unbaked (store-bought or homemade -- scroll to the bottom of the page for the pie crust recipe)

Filling: 
2 1/2 cups cooked chicken (or the cooked meat from a small roasting chicken)
2 tablespoons butter or coconut oil
3 tablespoons brown rice flour
1/2 teaspoon sea salt
1 teaspoon ground pepper
1- 1 1/2 cups gluten-free chicken broth (or use the broth from cooking the chicken)

Crumble Topping: 
1/4 cup brown rice flour
3 tablespoons butter or coconut oil
pinch salt

Directions: 
Preheat oven to 350 degrees. In a medium sauce pan melt 2 tablespoons of butter over medium heat. Add 3 tablespoons of brown rice flour, sea salt, and ground pepper. Whisk to cook flour in the butter for 2-3 minutes. Slowly pour in the gluten-free chicken broth. Start with 1 cup and if you want a more "saucy" pie add the additional 1/2 cup of broth. Whisk over medium heat for 3-5 minutes until sauce has thickened. Add cooked chicken to the sauce. Cook for an additional 3-4 minutes to heat chicken through. Pour chicken and sauce into the prepared gluten-free pie crust. In a small bowl mix together the topping ingredients: 1/4 cup brown rice flour, 3 tablespoons of butter, and a pinch of salt. Sprinkle the crumbly mixture evenly over the surface of the pie. Bake for 45 minutes to 1 hour until the sauce around the edges of the pie is bubbly and the top of the pie is golden brown. Allow pie to cool for about 20 minutes before serving. Serve with steamed veggies on the side or a fresh green salad. This pie is delicious hot or cold! 


Pin It!

Monday, January 21, 2013

Carrot Apple Curry Soup Recipe


For the past few weeks I've had this soup swirling through my thoughts. I've been trying to eat a lot more vegetable based meals lately. My tummy hasn't been super happy with meat proteins the past few weeks, I'm not sure why (no, no kids on the way, you don't have to ask!) I just have times when my body craves more vegetables and other times I crave more protein. Right now though, veggies are the bee's knees.

I am a comfort food junkie. I love mashed potatoes... mac and cheese... baked beans... anything creamy and warm, and I love pureed soups. Michael isn't such a huge fan of them, he thinks they resemble an adult version of baby food. And maybe he's right, who knows... but what can I say I love them.

This soup is so incredibly simple and consists of only a handful of ingredients you probably already have in your pantry. It cooks in about 25 minutes and it makes enough for several meals. I kind of see this as an "orange" version of my favorite green soup.  Ha! Did you notice when I posted that soup? Last January! Apparently my body craves veggies in January! 


I added a very tiny amount of curry seasoning to this soup. I haven't always been a fan of Indian curries and I only like it in very small amounts... but in this creamy soup it really works.

Simple Carrot Apple Curry Soup
free of gluten/dairy/soy/grains/eggs/sugar
created by carrie of gingerlemongirl.com
printer-friendly version

1 medium sweet onion, diced
2 tablespoons olive oil
2 medium apples, peeled, cored, and diced
1 teaspoon curry seasoning (I used Victoria's Gourmet)
5 medium carrots, peeled and diced
5-6 cups filtered water
salt and pepper, to taste

Directions: 
In a large dutch oven heat olive oil over medium heat until sizzling. Add diced onions, apples, and curry seasoning and cook on medium heat for 5-8 minutes, stirring constantly until onions are translucent and have softened. Add carrots and continue to cook for another 5-6 minutes until carrots begin to soften. Add 5-6 cups of water, depending on how thin or thick you prefer the soup. Cover and cook over medium low heat for about 20 additional minutes, until carrots and apples are fully cooked through and soft. Add salt and pepper to taste. Allow soup to cool for several minutes and then puree in small batches in a high-powered blender or use an immersion blender. Serve soup with a swirl of coconut milk and a dash of cinnamon over each bowl.


Iris of The Daily Dietribe has started a Monday blogging event called "Five Ingredients" -- which this recipe 7 ingredients, I think it still fits the bill as quick and easy and really delicious and healthy! Go check out all the other amazing recipes in Iris' roundup today! 
Pin It!

Thursday, January 17, 2013

Gluten-Free, Vegan, Cane Sugar-Free, Chocolate Chunk Cookies -- Adapted from Real Sustenance


YUM, right?! They really are. I rarely get so excited about making SOMEONE ELSE'S recipe... but this time I genuinely am. And well, like with nearly all recipes, I have to tweak them and change them along the way. I'm not really sure why... I think it might have something to do with having a rebellious personality... my grandmother always called me defiant... so maybe these are defiant chocolate chunk cookies.. who knows!

At any rate, Brittany Angell... the amazing author of the blog "Real Sustenance" and books: "The Essential Gluten-Free Baking Guides" (Part 1 and Part 2) shared these cookies on her blog a few days ago. They reminded me of cookies I had seen on Elana's Pantry several years ago, sort of combined with chocolate chunk cookies from Lauren of Healthy Indulgences, also quite a few years back. I've made both of those cookies as well and hubs (the cookie monster at our house) thought both versions were pretty good (not as good as THESE chocolate chip cookies) but ate them all regardless. He's really not that picky when it comes to cookies.

So I played. I loved that Brittany made them vegan and offered a cane sugar-free and an agave-free version... But I remembered when I tried Lauren's version I threw in a hefty few tablespoons of ground flax seeds, because I love them. Love all that extra fiber, omega-3-fatty-acid-goodness, and the tiny bit of nutty flavor they add. So I added them. And because I went a little wild and crazy with the flavor extracts (ADD the almond extract -- TRUST ME -- it doesn't make them taste like cherries, it makes them AWESOME), I had a really wet dough and decided to throw in some arrowroot starch to thicken it up.

For the chocolate, I had 70% dark chocolate (3.5 oz) Lindt bars which I chopped into chunks.(These Lindt bars do not contain gluten ingredients, and the company uses stringent manufacturing practices to avoid cross-contamination, but it is a possibility and they are honest about it -- so use the chocolate you like best, if you're not a fan of Lindt.) One bar provided about 1 cup's worth of  "chocolate chunks" so it worked perfectly for this recipe!

I've made these cookies 4 times now... and they ARE really, really, REALLY awesome. I can't believe how delicious they turn out with no eggs, no gums, and no cane sugar. Right out of the oven they have an incredible crunch on the outside and a perfect chewiness inside. I can totally see why Brittany named them "Worlds Best Chocolate Chunk Cookies" --  cuz' they TOTALLY live up to the name, especially if you are limiting sugars and trying more lower glycemic, lower carb recipes! Try Brittany's awesome recipe, try my version... either way... MAKE THEM!


Gluten-Free, Vegan, (Almost) Grain-Free Chocolate Chunk Cookies
Adapted from Brittany Angell's recipe
free of gluten, dairy/casein, eggs, soy, and options for grain-free
printer-friendly recipe

Dry Ingredients: 
2 cups packed, blanched almond flour
1/2 cup coconut palm sugar
3 tablespoons arrowroot starch
1 teaspoon baking powder (this brand is corn-free or make your own -- it works SO much better than storebought!)
2 heaping tablespoons ground flax seeds
1/4 teaspoon salt

Wet Ingredients: 
3 tablespoons Spectrum Palm Shortening (or butter, if you can tolerate dairy)
1 tablespoon pure vanilla extract
2 teaspoons pure almond extract
3-4 tablespoons almond milk (start with 3, then add 1 more if you need additional moisture)

Add In's:
1 cup gluten-free, vegan chocolate chunks or chips (I used a 3.5 oz, 70% dark chocolate bar, chopped up)
1/2 cup chopped walnuts or pecans (optional)

Directions: 
Preheat oven to 350 degrees. Line a large cookie sheet with parchment paper or a silpat mat. In a large bowl whisk together all dry ingredients. Cut in Spectrum Palm Shortening or butter into the dry ingredients with a pastry blender or a knife and fork until the shortening resembles very small peas evenly throughout the dry ingredients. Make a well in the center of the dry ingredients and add the vanilla extract, almond extract, and 3 tablespoons of almond milk. Using a little elbow grease, stir the wet ingredients into the dry ingredients until you have a very thick, batter (it might be a bit crumbly). This may take several minutes to be incorporated well. If necessary, use an additional tablespoon of almond milk. The batter WILL be VERY thick though, DO NOT add tons of extra milk, or the cookies will not turn out right. Scoop the dough into golf-ball sized mounds and place on cookie sheet about 2" apart. Flatten lightly and shape with your hands into round cookies. Bake for 12-15 minutes depending on how crispy you want your cookies. The edges should be golden brown when done. Makes 12-15 cookies depending on how large you make them. I'd tell you to store leftovers in an airtight container on the counter or the fridge for 2-3 days and then freeze them for up to 1 month.. but seriously, there won't BE any leftovers!

Carrie's Notes: 

  • Almond pulp, leftover from making almond milk will NOT work in this recipe. I tried! It's just too moist and it makes a pile of mush for a cookie. You may be able to make it work with a dehydrator, but in the oven, it just didn't work. 
  • You can probably use another nut flour/meal to make the cookies, but I haven't tried it, so I don't know how it works. If you don't want to use a nut flour see the note below: 
  • If you are allergic to nuts, just make my regular ol' gluten-free chocolate chip cookies, they are awesome too!
  • Use your favorite non-dairy milk in the recipe if you don't like almond milk -- it will work. 
  • If you don't have coconut palm sugar: use regular sugar or even brown sugar. I don't know how it would work with liquid sugar substitutes, if you have agave nectar, try Elana's cookies


Pin It!

Monday, January 14, 2013

Giveaway & Cool Stuff: How to store Victoria's Gourmet Seasonings


A few months ago when I received sample seasoning blends from Victoria's Gourmet, I was overwhelmed! There were so many of them! The seasoning blends came in super cute little tins, but I couldn't figure out where in the world I was going to store them. 

I have a TINY kitchen and my spice/seasoning shelf space is minimal and completely full at the moment! I also knew if I didn't keep the spices in sight, I probably wouldn't use them. So where in the world to put them... 


And then it dawned on me... I remembered seeing stores sell little tins with a magnet on the back of them for spices that could be stored on the fridge. Despite being cramped already, I could certainly put these little tins on the fridge... 

Now let me tell you something... I'm NOT a crafter... Pinterest usually bores me... and any hobby that needs more "stuff" than I already have just isn't my cup of tea... so just the thought of doing a "craft" was amusing... BUT... 

I soldiered on and bought some some small round magnets and some super bonder glue stuff that supposedly sticks anything to anything. One evening after work I took all the little tins and glued the magnets to the back of them. These were smaller magnets and if I did this project again, I would have found ones that were a little stronger and maybe a little larger... but regardless... the end result was pretty cute: 


These small magnets weren't strong enough to hold the tins up without support on the fridge alone, but when the tins were stacked up against each other they had support and didn't move! Voila... magnetized storage!

My favorite part? I LOVED the colors! It really added some pop to my kitchen and I now I actually use these spices all the time because I can see them. The cool thing about having them in this arrangement is that if you pull out a spice somewhere in the "magnetized seasoning tower" they just scoot down as if you were playing spices "Tetris!" My husband thinks it awesome and he was so surprised by my creativity!

**************

Please see my previous two posts reviewing Victoria's Gourmet Seasonings: 


The Giveaway is now over! 
Congrats to PJ! 
I hope you enjoy your new set of Victoria Gourmet Seasonings! 

The Giveaway:

  • I am giving away a Tin Trio of Victoria's Gourmet gourmet seasonings (3 seasoning blends) and a brand new Victoria's Gourmet Cookbook. 
  • This giveaway is limited to residents of the 48 contiguous United States aged 18 and older.
  • One entry per person.
  • Enter by leaving a comment below on this post AND please include a way for me to contact you -- your email address preferably.
  • The giveaway begins January 14, 2013 and ends on January 18, 2013  at 11:00 pm eastern time.
  • No purchase is necessary.  Odds of winning are based on the number of entries.  
  • The winners will be randomly chosen and will be contacted by email.  The winners will have 24 hours to respond.  If the winner does not respond, a new winner will be randomly chosen.


************

GLG Disclosure: 
Victoria's Gourmet Seasonings provided me with free samples of their seasoning blends and their cookbook for the purpose of sharing an online review, if I chose to do so -- ALONG with 1 brand new copy to giveaway. This is not a sponsored post and I did not receive compensation. The opinions in this post are completely my own.


Pin It!

Tuesday, January 8, 2013

Book Review & Giveaway: Cybele Pascal's Allergy-Free and Easy Cooking


Several months ago I received a brand-new beautiful  review copy of Cybele Pascal's latest cookbook, "Allergy-Free and Easy Cooking." And my friends... if you deal with multiple food sensitivities or allergies, this book is DEFINITELY for you. Cybele made EVERY recipe in this book free of: gluten, wheat, dairy, eggs, soy, peanuts, tree nuts, fish, shellfish, and sesame.

The book contains 75 recipes for quick and easy 30 minute meals at home. TO be honest, I receive so many cookbooks, I wasn't really sure what to expect with this book. But as soon as I started thumbing through it, I immediately smiled. These are easy, everyday, "down home" comfort foods... and that is the kind of cooking I like to do.

I'm about as far from a gourmet as you can get (although I do prefer freshly grated pepper and nutmeg, smoked paprika, and grass-fed beef... I mean you have to have some priorities right? :-) Cybele does an amazing thing here... as a sophisticated wife, mom, entrepreneur, chef, and home cook she takes the gluten-filled foods you loved and remember and turns them into allergen-free masterpieces with basic, healthy ingredients you probably have in your pantry right now.

There are a few specialty ingredients you will need for some dishes (such as Daiya dairy-free, soy-free "cheese" -- which I LOVE) but most of these items can easily be found online, if not at your local higher-end grocery store like Whole Foods.

Here are a handful of recipes that particularly caught my eye:
  • Tomato Soup with Grilled Cheese Squares
  • Creamy Mac & Cheese
  • Shepard's Pie
  • Chicken and Sausage Paella
  • Chicken a' la King
  • Salisbury Steaks with Mashed Potatoes
I had every intention of trying the Salisbury steak tonight because I have to admit, on the occasional time we had frozen dinners growing up, I LOVED Salisbury Steak... and I was SO excited when I saw Cybele's rendition of this classic ground beef steak and gravy. 

Unfortunately work has been a little crazy and we ended up having gluten-free sandwiches because this chica was too tired to chop an onion (although Cybele shares her onion-chopping secret throughout the book and I have to say, I may just have to invest in it! It sounds like it would make weeknight veggie chopping a BREEZE!) 

However I have a very special treat for you my dear readers... Yep! You now have a chance to win a copy of this wonderful book. Many cookbooks will come and go, but I truly think Cybele's "Allergy-Free and Easy Cooking" will be on your kitchen shelf for years to come! 


THIS GIVEAWAY IS NOW OVER!! 
Congrats to comment #17 Lisa D! 
I hope you really enjoy the book!
The Giveaway:
  • I am giving away one brand new copy of Allergy-Free and Easy Cooking by Cybele Pascal.
  • This giveaway is limited to residents of the 48 contiguous United States aged 18 and older.
  • One entry per person.
  • Enter by leaving a comment below on this post AND please include a way for me to contact you -- your email address preferably.
  • The giveaway begins January 8, 2013 and ends on January 15, 2013  at 11:00 pm eastern time.
  • No purchase is necessary.  Odds of winning are based on the number of entries.  
  • The winners will be randomly chosen and will be contacted by email.  The winners will have 24 hours to respond.  If the winner does not respond, a new winner will be randomly chosen.


GLG Disclosure: 
Ten Speed Press provided me with a free copy of "Allergy-Free and Easy Cooking" for the purpose of sharing an online review, if I chose to do so -- ALONG with 1 brand new copy to giveaway. This is not a sponsored post and I did not receive compensation. The opinions in this post are completely my own. 


Pin It!

Thursday, January 3, 2013

DIY - Instant Quinoa Meal Mixes with Victoria's Gourmet Seasonings


When I first started using the different spice mixes of Victoria's Gourmet I truly had no idea how versatile they could be.

When my Dad was sick a few months ago, we had many meals with my step-mom Betty and one night she made an "instant" quinoa mix. I had no idea they made instant quinoa meals... and what a great idea! It's such a healthy "carb" with tons of protein and fiber and it cooks so quickly, it's perfect for weeknight meals. I looked for some of the instant meals when I got back home and couldn't find any at our local grocery store.

Then it dawned on me last night... I could make my own! With all of the different seasoning mixes that Victoria's Gourmet offers, it would be super easy to make my own quinoa mixes. Quinoa cooks in about 15 minutes, so all I would have to do is mix up 1 cup of dry (pre-rinsed variety) quinoa with 1-2 tablespoons of my favorite Victoria's Gourmet seasonings. Add quinoa and seasoning to a baggie or glass jar, seal and voila... an instant side dish or starter for a meal! How cute would that be as a Christmas gift? And so darn easy!


Here are just a few of the seasoning mixes from Victoria's Gourmet that I think would make a really delicious instant quinoa meal mix.

  • Want a French inspired meal? Use 1-2 tablespoons of Herbs de Provence with a unique blend of 7 different herbs including lemon, lavender, and rosemary. 
  • Use 1-2 tablespoons of the Holiday seasoning mix if you want a traditional "stuffing" flavor! 
  • For a quick kid-friendly side dish try adding 1 tablespoons Pizza seasoning blend + 2-3 tablespoons parmesan cheese.  
  • For a quick instant breakfast use 1 tablespoon of Pie Spices seasoning blend along with 1-2 tablespoons of brown sugar per 1 cup of quinoa! 
  • Enjoy middle eastern dishes? Try 1-2 tablespoons of the Moroccan seasoning blend with 1 cup of quinoa. 
  • For an Asian flair try the Ginger Citrus seasoning blend. Still need more ideas? Check out all 22 seasoning blend varieties from Victoria's Gourmet. 


Last night I served a deli roast chicken with a side dish of green beans with almonds, baked sweet potatoes, and this instant quinoa with 1 tablespoon of Victoria's Gourmet Tuscan seasoning blend. It was delicious. Not overly powerful with just a hint of Italian flavors.

How to cook quinoa (pronounced keen-wah)
Shared by Carrie of Gingerlemongirl.com
(This is the brand of quinoa I have been using, I love how easy it is to use since it is already pre-rinsed.) 
  1. Add 1 tablespoon of the seasoning mix of choice + 1 cup of dry pre-rinsed quinoa to a medium-sized pot. If desired, add 1 tablespoon of butter or olive oil. 
  2. Add 2 cups of water to the quinoa & seasoning. Mix thoroughly and bring to a boil for 5 minutes. Turn down to medium heat and simmer, covered for 15-18 minutes until the small spirals of the grain separate from the germ (little squiggles) and the grain is fluffy and light. 
  3. Allow to cool for several minutes and serve. 
  4. (You could also totally (yep... totally! lol) MAKE quinoa in a rice cooker! Easy Peasy! Just follow the instructions for rice!) 
**************

Please see my first review of Victoria's Gourmet seasoning sharing how I often make quick & easy weeknight meals using different VG seasoning blends! For my final review next week there will be a Victoria's Gourmet seasoning giveaway to one lucky winner! I'll share those details later, so stay tuned for how you can win a trio of spice/seasoning mixes from VG!

GLG Disclosure: 
Victoria Gourmet provided me with free samples of all their seasoning blends, in order to do an online review if I chose to do so. This is not a sponsored post and I did not receive compensation. The opinions in this post are completely my own. 
Pin It!

Wednesday, January 2, 2013

new year, new you, canned beef stew...


Because today started out with a migraine... day two (no headache remedy tips necessary, trust me, I've tried them all).

Because it wasn't gluten. Really, it wasn't. It was just a migraine.

Means I didn't pack lunch for my first day back at work. But I had these little Hormel Beef Stew containers in my desk drawer at lunch.

And they are gluten-free. Yes. They really are. I called the company. Ignore the sodium content, you don't want to know.


You're Welcome Tip: Make sure to heat the stew up in A LARGER container in the microwave, like my favorite multi-use pottery bowl/mug and cover with a paper towel.

Otherwise the small container will explode (my guess as to why they sold it at the dollar store) and you'll have to clean that up. At work. And it WILL smell up your office ALL day long.

But really, it's a pretty decent lunch for 150 gluten-free calories.

Thanks Dinty Moore beef stew (in a different container)... I don't get it either... just go with it.

I KNOW... I'll have a green smoothie when I get home to make up for it... but really gluten-free convenience, especially when you have a migraine is pretty awesome stuff.


Pin It!